A BCI-6 cartridge opened up

paulcroft

Fan of Printing
Joined
Jan 11, 2010
Messages
74
Reaction score
39
Points
58
Printer Model
Canon Pro-100
I had some time on hand today so I cut the side out of a spare BCI-6 cartridge to see how it's made. These
cartridges cost a lot to buy new so I thought it would be interesting to see what goes into them and whether
it was possible to ponder on how much R & D went into their design. And to wonder whether cheaper copies
are as well made. Then I thought I'd photograph it and label what I found interesting:

5099_start.jpg


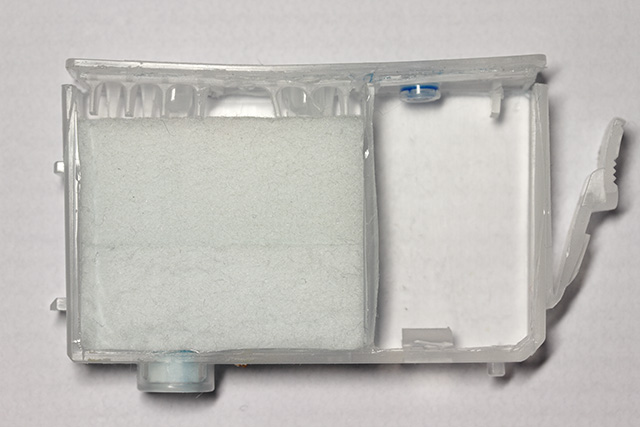
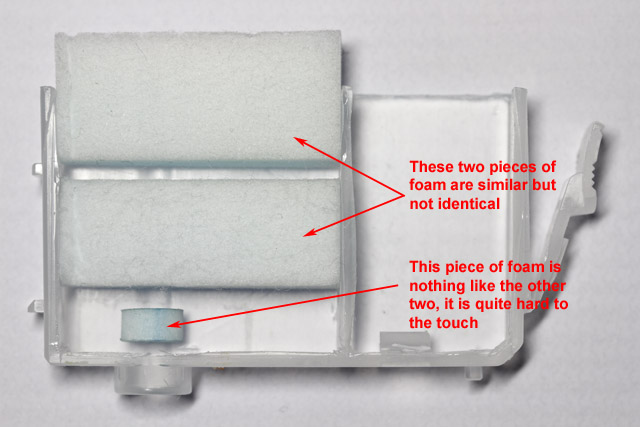
There are three pieces of foam, not two. The small, oval shaped plug through which the ink is fed to the nozzles
is surprisingly rigid and not like the other two pieces at all:

5099_3_foams.jpg


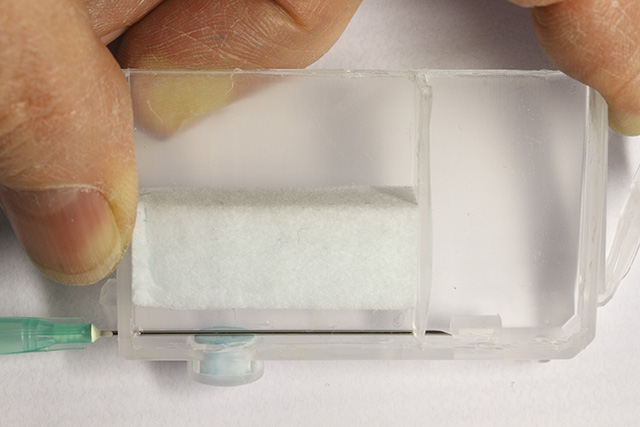
The separator between the ink chamber and the foam chamber has a rectangular hole in the bottom to allow the
ink to feed through. This is where the needle goes when refilling with the 'German' method. Does anybody not
use this method nowadays?

5099_needle_path.jpg


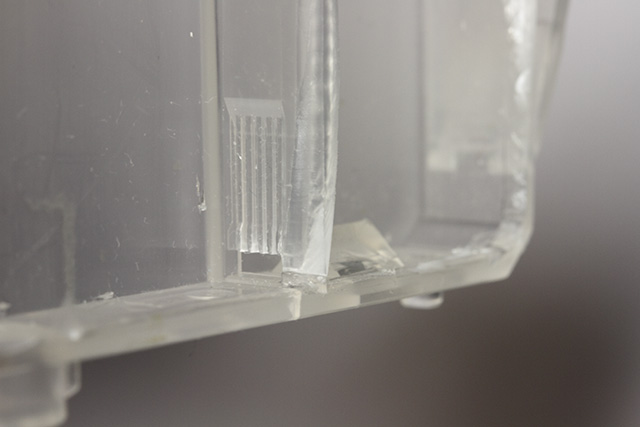
Immediately above this hole, and on the side of the separator facing the foam chamber, are a number of grooves
which are recessed into the plate:

5099_the_grooves.jpg


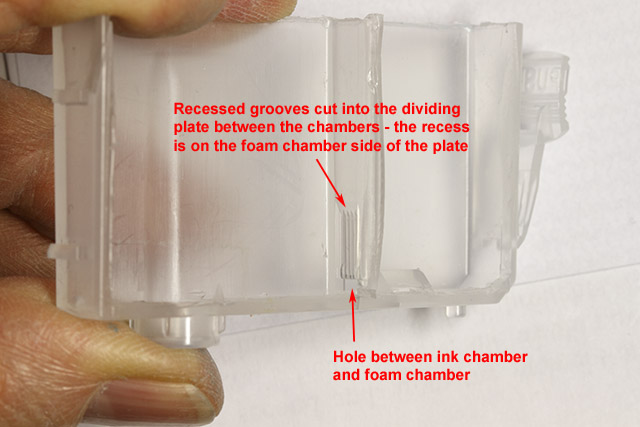
Here is a close up of the grooves:

5099_close_up_of_grooves.jpg


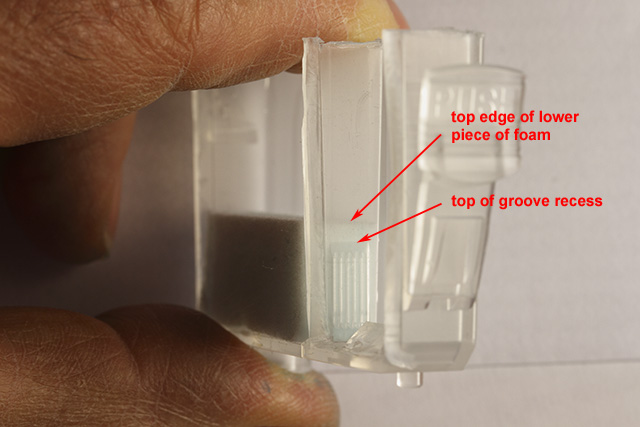
And this is what they look like from the other side. Note that the recess stops below the top edge of the lower foam:

5099_grooves_from_ink_side.jpg


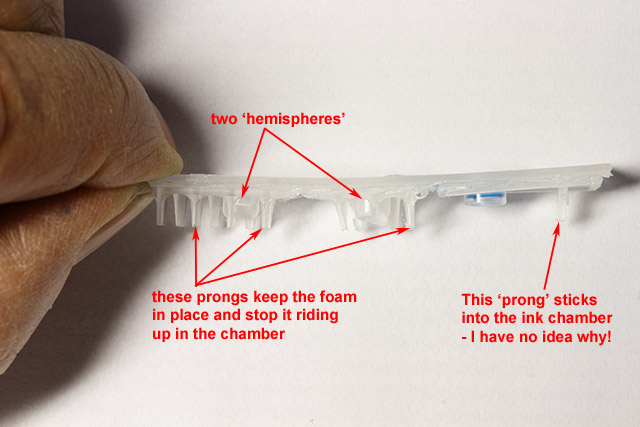
Now here's what, for me, is the really interesting part - the top plate. There are a number of 'prongs' which keep
the foam in place. There's a similar shaped 'prong' in the ink chamber side too which appears to serve no purpose
whatsoever. But do you see those two bulges which resemble hemispheres? They've not come out too clearly in
this photo (they are clearer in my first photo) but they are hollow, i.e. they're recessed from above but there's no
hole in them. It's like they are expansion chambers of some kind. I wonder what purpose they serve?

5099_top_plate_side_on.jpg


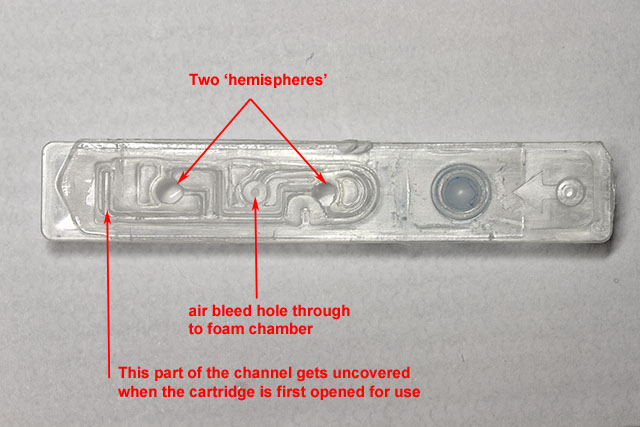
Now look at the top plate from above, with the label peeled off. Follow the path of the air channel groove from its
vent to atmosphere through to the bleed hole into the foam chamber. See how, before getting there, it goes from
the vent to atmosphere first through the left-hand hemispherical chamber, then out again, then through the
right-hand hemishperical chamber and out again before finally reaching the air bleed into the foam chamber.
And the path it follows is not the most obvious one. I'd love to know the science behind this and how it came to be
designed this way.

5099_top_channel.jpg


Anyway, I hope you found this as interesting as I did. I'm now using a Canon Pro9000 II which uses CLI-8 cartridges
but the design appears to be virtually identical, apart from the chip. To my mind it goes some way to explaining that
there's a lot more to an ink cartridge than one might, at first glance, think.

Paul

Edit: In the original post I inadvertently called this a CLI-6 cartridge. It is, in fact, a BCI-6, as immediately spotted by
the eagle eyed contributors, so the name in the title and text has been changed accordingly.
 

Nifty

Printer VIP
Administrator
Joined
Nov 3, 2004
Messages
3,046
Reaction score
1,405
Points
337
Location
Bay Area CA
Printer Model
CR-10, i560 ,MFC-7440N
Fantastic post and AMAZING pictures!!! The last pic clearly shows why we often refer to it as the "air maze".

I too would be extremely interested in learning more about the reasons behind such a complex air system and wonder to what extend the off brand cartridges try to duplicate this... and if they even understand what the chambers do.
 

stratman

Printer VIP
Platinum Printer Member
Joined
Apr 19, 2007
Messages
8,712
Reaction score
7,172
Points
393
Location
USA
Printer Model
Canon MB5120, Pencil
Had to look up CLI-6 as I've not used a printer that required them. Sure looks a lot like a CLI-8. If you hadn't told us I wouldn't have noticed!
 

mikling

Printer VIP
Platinum Printer Member
Joined
Jul 2, 2006
Messages
3,239
Reaction score
1,471
Points
313
Location
Toronto, Canada
Now you do realize that if you do not reseal the hole with the German method all this air maze is short-circuited by the hole made by the German method and this neutralizes or negates the effort made by Canon with the intricate air maze? Take note. The German method is not perfect but it is highly convenient and can provide a simple refill. That is one reason why Trigger has stated once that he refuses to discuss the merits of the German method. While I might not be in total agreement with him, I can sometimes justify its use, if done properly.

The hemispheres are volume dampers so that when the air volume within the cartridges expands and contracts due to pressure caused by the atmosphere, temperature changes in the equipment/room and pressure fluctuations caused by the cleaning cycle/priming pump, minimal humidity variances occur within the cartridge. So in essence these chambers increase the volume of the trapped air within the maze system thereby minimizing 100% air exchanges without increasing the length excessively causing too great a restriction. Having two in series has a much greater effect than if one larger one was used. You can model this as having two dampers or shocks in series. ... for those with a technical background with some calculus training. The analog is not perfect but the concept is valid.

What you might not have noticed during your dissection of the cartridge is that the top label seal is actually the real final seal for the reservoir. After having removed the balls on hundreds of cartridges, I can tell you that many have ink past the balls and it is the label that provides the positive no leak seal.
 

irvweiner

Fan of Printing
Joined
Apr 5, 2010
Messages
150
Reaction score
2
Points
59
Location
USA Massachusetts
I believe the hemispheres serve as a hydraulic 'shock absorber' for the air flow. We see similar air filled containers connected to piping carrying fluids--they are used to absorb the shock of 'water hammering' when flow is disturbed in the piping.
In addition, this structural tube maze and the spheres form a low pass filter acting on the transient fluid dynamics--it is the equivalent of an R-C LP filter for removing noise and establishing the response time for transients. A swift fluid transient is slowed down minimizing its effect on the system.
Ignoring the spheres, the fine maze length (and its diameter)in the cartridge determines the resistance of the air vent path--if this resistance is too low, the cart will leak, just as if you removed the filling plug while printer port cap was off. Too high a resistance and the cart can become air starved when laying down lots of ink--like in the middle of a print--even though printing started off AOK. This explains why a good nozzle check doesn't guarantee a good print-especially when several minutes later a subsequent nozzle check is OK. The cart has recovered from its temporary overload leaving us frustrated.

Well, that's my take! irv weiner
 

mikling

Printer VIP
Platinum Printer Member
Joined
Jul 2, 2006
Messages
3,239
Reaction score
1,471
Points
313
Location
Toronto, Canada
Now some readers will think that they've shortcircuited this maze and everything works fine. Indeed it will. Here is what needs to be further considered. Canon recommends usage of the cartridge for a one time use within six months. This means that the cartridges should be fully functional towards the end of six momths. Given a scenario where the printer is seldom used and placed in various environments, the cartridge needs to be preserved without being sealed. This maze system provides this.

I can hardly see a case where someone who is refilling would not consume a cartridge worth of ink within six months or even two for that matter. Thus we seldom see situations where the German method with a non sealed hole would expose its weakness.... its ability to preserve a cartridge over an extended time.
Now do remember that Canon's six months recommendation is stated with a safety factor. So it would not surprise me that a year later the cartridge might still be good. I would be doubtful that a refilled cartridge using the German method without a resealed hole would make it that long without the ink within the sponge changing its physical properties. For heavy users, where the ink is consumed within weeks or week, this time issue is moot.

Thus, for very light users, they might be better served with the traditional method where it is available or ensuring that the hole made by the German method is properly resealed.

This time dependent analysis also applies to the aspects of whether purging is required or not. Just stating the number of uses or refills without the consideration of time between refills and how quickly the ink is consumed ignores one critical parameter... time that will cause the ink to lose humidity eventually.
 

ghwellsjr

Printer Master
Platinum Printer Member
Joined
Jun 16, 2006
Messages
3,645
Reaction score
85
Points
233
Location
La Verne, California
Printer Model
Epson WP-4530
Your pictures are of a BCI-6 cartridge, not a CLI-6 cartridge, correct?

On the subject of the serpentine path and the wells on the top of the cartridge, see this thread.

And here is my second post on this forum years ago. It provides a lot of information on the workings of a Canon cartridge and there are a number of links on the next post by Grandad35 with even more information.
 

PeterBJ

Printer VIP
Platinum Printer Member
Joined
Nov 27, 2010
Messages
5,061
Reaction score
4,908
Points
373
Location
Copenhagen Denmark
Printer Model
Canon MP990
Hi paulcroft

Thank you very much for your most excellent photo series, from one of those trying to figure out what is really going on inside a canon cartridge. Your pictures provide a wealth of information.

Peter.
 

paulcroft

Fan of Printing
Joined
Jan 11, 2010
Messages
74
Reaction score
39
Points
58
Printer Model
Canon Pro-100
@ stratman and gwellsjnr

Yes, my mistake, it was very late when I was writing this up. It's a BCI-6, not a CLI-6. I've edited my original post and the thread title to reflect this.

Following some of the links here has allowed me to find, at my own pace, that I've been re-inventing the wheel, but it has also provided me the opportunity to find/revisit some of the vast body of knowledge contained in this forum.

Many thanks for all your contributions, both here and (sometimes much) earlier. This is what inspires relative newcomers like me. Refilling is a surprisingly absorbing subject.

Paul
 

martin0reg

Printer Master
Joined
May 9, 2010
Messages
1,058
Reaction score
746
Points
273
Location
Germany Ruhrgebiet
Thank you for the photos paul and all experts for explaining or trying to understand.

There seem to be much engineering in a simple cartridge, but I am wondering if a more simple third party cart is really worse, especially for refilling.
- There are these mazy air pipes and as mikling said, it might be a safety factor to preserve the sponge chamber from too much air exchange.
- And there is the "two-floor" sponge with the grooves going shortly underneath the second floor. Probably to regulate the amount of air exchange and negative pressure in the ink chamber.

A simple one-piece sponge might serve its purpose as well, I don't know

edit: see ghwells link, he points out the pro's of OEM two-floor design:
http://www.nifty-stuff.com/forum/viewtopic.php?pid=6935#p6935

To me the most frequent problem of refilling OEMs (german) is bad saturation of the lower sponge and/or bad ink flow to the outlet. I want to try top fill with OEM and german durchstich with good third party carts and see how it works.
 
Top