Robert the Bruce
Getting Fingers Dirty
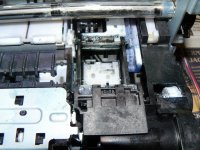
Sorry to hi-jack this thread, but I'm currently cleaning out an old Canon MP500 which I think uses the same print/machine unit (with waste ink system).
I've just signed up here after reading some interesting discussions about cleaning print heads and purge units.
I had a problem printing black (pigment) ink after replacing the print head (the old one wasn't printing colour) Following an exhaustive Internet search, I did all the cleaning recommended (here and elsewhere) including the absorbent pads, and the tubes to the purge unit.
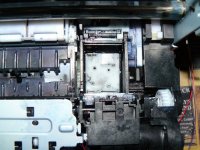
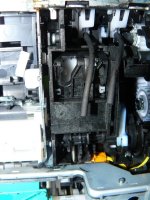
However, I noticed four tubes coming from the ceramic block on the capping station. I have flushed out the two which connect to the purge system, but the other two seem to resist injection, and I can't even see where they go inside! They appear to attach to two sprung arms, but more than that I can't see.
A poster asked this question on a thread over three years ago here:
http://www.printerknowledge.com/thr...ci-3-black-not-printing-in-pixma-ip3000.1143/
but never received an answer.
Does anyone know what those other two tubes are for? I want to make sure I've cleaned everything before putting the printer back together.
I will start another thread if you think it's more appropriate....
I've just signed up here after reading some interesting discussions about cleaning print heads and purge units.
I had a problem printing black (pigment) ink after replacing the print head (the old one wasn't printing colour) Following an exhaustive Internet search, I did all the cleaning recommended (here and elsewhere) including the absorbent pads, and the tubes to the purge unit.
However, I noticed four tubes coming from the ceramic block on the capping station. I have flushed out the two which connect to the purge system, but the other two seem to resist injection, and I can't even see where they go inside! They appear to attach to two sprung arms, but more than that I can't see.
A poster asked this question on a thread over three years ago here:
http://www.printerknowledge.com/thr...ci-3-black-not-printing-in-pixma-ip3000.1143/
but never received an answer.
Does anyone know what those other two tubes are for? I want to make sure I've cleaned everything before putting the printer back together.
I will start another thread if you think it's more appropriate....
")
