Blacks shifting to greenish under daylight?

MichaelKnight

Getting Fingers Dirty
Joined
Feb 5, 2018
Messages
47
Reaction score
13
Points
46
Printer Model
Epson L3060
Thanks for your answer.

you purchased picture 1 , as a copy, on paper 4x6" whatever by a party photographer
and did you get the image file, the .jpg file as well with this deal ?
And you printed that .jpeg file yourself which got that bad as you show above.
Or did you scan that 1st image to duplicate by printing it another time ?
And then scanning this print again to show how bad it looks ?
I'm jsut trying to understand how many copy/print/scan activities that image went through ending up like this.

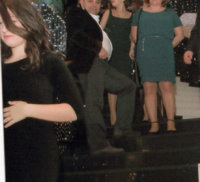
We purchased that photo(together with some other photos) as jpeg files in a cd.So the first image is the original jpeg file, but I used some cropping and sizing.

I printed the second photo from the unmodified original jpeg file(without cropping,sizing etc.)
Then I scanned the photo from photo paper.Then I did some cropping and sizing on the file.

Based on my observation, the second photo I showed has more problems than the printed photo on the paper has in reality.White balance(if I understand it right) of the photo on the photo paper(Epson Premium Glossy) , is better than it seems in the second photo I sent.So it didn't scan very good with the settings I used.

But blacks are really not blacks like you said, and it is actually what I see when I looked at the photo on the photo paper under daylight.I feel like blakcs are greenish, sometimes I doubt but sometimes it looks so obvious.


Are you printing private images regularly ? And how do they get ? Which inks are you using - those which camewith the printer ? Are you using any photo editor to do something with your images - cropping, sizing, levelling the
horizon, changing colors or any other fancy stuff ?
I think we need to identify and separate possible causes - an issue with printer/driver/color settings or with the
scanner - white balance , color adjustments and black level during or after scanning.

I do some cropping and sizing, I don't change colors or other things, but I believe printer may be doing some corrections automatically(color correction is set on "auto" under printer settings)
I don't print images regularly but after I bought this printer a few weeks ago, I printed many photos(but only a few family photos, others are generally photos I found on internet, to test the printer).I noticed the problem of blacks in some other photos, for example in one photo there was a black mask(with some shine) on a woman and when I look at that photo especially under daylight,I see gray and greenish tones more than black.On another photo, a man's jacket looks greenish although it shouldn't be,it should have black and some gray tones.In another photo, again I saw problem with another man's jacket, again greenish although it should be black and should have a little whiteness.In another photo I saw some blue-ishness in the background although it should be yellow.In another photo, a man's black jacket was looking like very dark blue but not black.

I am planning to print the picture you suggested, in a few minutes.
 
Last edited:

MichaelKnight

Getting Fingers Dirty
Joined
Feb 5, 2018
Messages
47
Reaction score
13
Points
46
Printer Model
Epson L3060
Here it is:
img20180212_22481466.png


Which scanner setting should I choose?I choose either 200 or 400 dpi.
 

Ink stained Fingers

Printer VIP
Platinum Printer Member
Joined
Dec 27, 2014
Messages
5,861
Reaction score
6,985
Points
363
Location
Germany
Printer Model
L805, WF2010, ET8550
I think there are 2 effects we should discuss - to get a good black level - and to get good scans.
I have attached a zip-file with 2 test images - one dark and the other the inverse in light - BW-zip -
one has a black background - RGB=0 with numbers with slightly lighter gray tones - 1 means a gray of RGB=1 and 24 is RGB=24, you just print this, without settings to enhance/improve images - just with color corrections in neutral position and the print will tell you which gray levels start to become visible and how the surrounding black looks and whether this black shows a tint under lamp light or sun light or not. This black is a kind of reference what your printer can do, and you can compare this printout to other printouts.

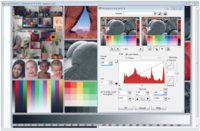
Your scan of the test image shows 2 effects - a slight color cast - less red , more blue, not much but visible, and it shows that you don't get good blacks at all. I have attached your image with an histogram , the distribution of the lightness levels, and the histogram shows a gap on the left side of about 25 (in the range of 255) , blacks are not scanned as blacks but as dark grays, and that's what you get in your problem image 2 - no real blacks. That's a matter of the scanner settings in the software - it typically has a simple mode - just scan - and an extended mode which allows your to make some adjustments - a pre-scan , a histogram and some more. And here you should be able to adjust the black level of the scan output.
Test-Image.JPG
Programs offer you automatic enhencement modes - e.g.e the printer driver but you don't really know what it is doing to your image so do some tests e.g. with this test image or your own images with and w/o that option turned on to see the difference. Be aware that such software may react differently on other images - e.g. only changing the contrast when needed or removing the reds from a sunset motive....
And scanner software can come with similar options - color enhancements - removal of a color cast - de-moire and more, again test those if they do something good to your images or not.

And I have taken your problem2 image and adjusted it with 2 clicks in an editor - closing the gap to the blackpoint in the histogram and changing the color balance, taking away the blueish color cast. It could get even better spending a few more seconds on the adjustments.
o-problem2-adj.jpg
 

Attachments

  • BW.zip
    20.1 KB · Views: 503
Last edited:

MichaelKnight

Getting Fingers Dirty
Joined
Feb 5, 2018
Messages
47
Reaction score
13
Points
46
Printer Model
Epson L3060
Thanks for your answer.

I printed the first photo in the zip file(black and gray tones,BW10.bmp).I notice the same greenish color tint I notice with the photos, on most of the colors/tones in that picture(BW10.bmp).
 

Ink stained Fingers

Printer VIP
Platinum Printer Member
Joined
Dec 27, 2014
Messages
5,861
Reaction score
6,985
Points
363
Location
Germany
Printer Model
L805, WF2010, ET8550
o.k., please do a print for comparison with matte paper setting, but onto the same glossy paper , but watch for the black ink , it is sensitive to the touch of your finger, and it won' look glossy. It is a test for comparison in this case. And please report the number of the first patch which can be distinguished from the surrounding 'black' on both prints.
 

MichaelKnight

Getting Fingers Dirty
Joined
Feb 5, 2018
Messages
47
Reaction score
13
Points
46
Printer Model
Epson L3060
Thanks for your answer.

I didn't want to use another photo paper and ink, cause I have already used too much to test the printer(more than 30 photo papers).Also I was a bit afraid that the inks' levels may get too low before we take the printer to the technical service.

Regarding my problem,although I cleaned the printerhead and also did ink cleaning using Windows, nothing changed.The technical support recommended me to take the printer to a technical service point.

My father took it to the technical service point a few days ago and yesterday they said on the phone that they see no problem inside the printer and that this model is not a good model for photo-printing cause it uses 4 inks instead of 6 inks...

I sent this result to the technical support on Epson website and waiting for a reply from them.

I think Ink stained Fingers was right in his first reply in this thread.
 
Last edited:

MichaelKnight

Getting Fingers Dirty
Joined
Feb 5, 2018
Messages
47
Reaction score
13
Points
46
Printer Model
Epson L3060
I actually want to try what you said lastly Ink stained Fingers, but I wonder if it will be the last test or not because I have just a few glossy photo papers left and I don't want to use more than 1 paper( we have some financial problems currently so buying new glossy photo papers and/or inks is a bit difficult for now).

I wonder if I do the the last test you suggested, will/may it reveal the cause of the problem?
 

Ink stained Fingers

Printer VIP
Platinum Printer Member
Joined
Dec 27, 2014
Messages
5,861
Reaction score
6,985
Points
363
Location
Germany
Printer Model
L805, WF2010, ET8550
you can print on a rather small format - e.g. cutting A4 sheets down to 10x14,7cm, the test should show whether you can get a good black with the matte paper setting. And if so , you either may use dye inks for refill or pigment inks with a photo black, and not a matte black ink.
 

MichaelKnight

Getting Fingers Dirty
Joined
Feb 5, 2018
Messages
47
Reaction score
13
Points
46
Printer Model
Epson L3060
Thanks for your answer.

I printed the images.

Ink stained Fingers wrote:
And please report the number of the first patch which can be distinguished from the surrounding 'black' on both prints.

Inside the glossy print, it is number 3 from the first row.Inside the matte print, I am not sure exactly but I think it is number 8 from the second row.

Using "matte" setting definitely prints better though it loses some fine details, I mean subtle shades of gray.On a photo of Brad Pitt, his black/very dark gray jacket looks greenish when I use the glossy setting(and that's why it looks bad) and when I use the matte setting his jacket on the printed photo looks totaly black, darker than I see on the monitor and unfortunately it lost subtle shades of gray.

I am not sure if I told it before but when I use the glossy setting gray tones look greenish too,not only black.(I am not sure but maybe gray tones look greenish actually more than color black, still blacks are not really black).Also, even using "matte" setting, I see/feel slight greenish tone on grays on the jacket on the photo(of Brad Pitt) though when I compare it with the photo which I printed using "glossy" setting, the matte one looks gray.
 
Last edited:

Ink stained Fingers

Printer VIP
Platinum Printer Member
Joined
Dec 27, 2014
Messages
5,861
Reaction score
6,985
Points
363
Location
Germany
Printer Model
L805, WF2010, ET8550
the test sheet setup is quite simple - grays range from black to white - this is defined in the RBG range from R=G=B = 0 for black to RGB=255 for white in a 8 bit binary number range (from 0 to 255). The background is simply black - the numbers as grey with their resp. value - RGB = 3 or 8 or whatever you can see on the print. Please let us not compare the contrast range of a print and a monitor - a reasonably good monitor can do much better than any print in the darker range, that's what you see, and you recognize as well that there is a visible difference between the different driver settings taking paper characteristics into account. You state that you get very good darker and neutral blacks than with the glossy setting, that's good to start with.
The next step could be to look to the images you want to print - to look specifically to the range in the shadows , to lift those
shadows just above the level they otherwise would drain in the black. This is something you do with a photo editor, the histogram function or the program (module) you are using to print - some allow to raise the black level of an image at this point. Editors offer various functions - e.g. raising the contrast in the shadow range only, or you have a function called local contrast enhancement, you can via the histogram function raise the black point of an image slightly - just by the value of 8 you found out with the test print. Which program are you using for photo editing ?
There is one other piece of software you can use for such adjustment - the driver itself in the color adjustment mode, don't touch the colors but raise the brightness somewhat and reprint the number test sheet and check whether you can see a lower number now - with the same matte paper setting, so you can get to the 'best' setting with just a few iterations. You just use this driver setting for regular prints on the same paper you used for the test and wouldn't need to do anything in the editor. You may use the contrast slider alternatively - test its effect- I have seen that some drivers use brightness and contrast differently I'm used from editors. Anyway - you should get a more detailed printout of darks with a few tests, and not loosing the black point for the darkest areas.
 
Top