[Tool] ChromIQ – a macOS and Windows GUI for ArgyllCMS printer profiling (v4.3.0)

Ok, thanks everybody, I think I get what it is all about.
For me and my ET-18100 + Epson ink + Epson Matte paper heavyweight the situation is this: I only get the deepest possible black with relative colorimetric and BPC off. No perceptual or whatever else gives me a black that deep. It's not a big difference, but it's a game changer for me - so far I thought my printer/paper combination wasn't able to do blacks that deep.
And maybe that deepest black is not neutral, but I can't see a color shift in that black! (And I'm very sensitive to color shifts! That's the reason why I avoid perceptive intent!)
Well, sigh, I wish I had known this earlier. And I wish I had ditched CCStudio earlier, because those profiles always gave me color casts, and I always thought "ok, that's how it is with printers and profiles"...
But as they say, better late than never.
Now I'll do some more profiles for other papers and I hope I won't fall into another trap again... In the end I'm just a dumb user who wants great prints ;-)
One more question regarding the charts: If I use the guided mode in ChromIQ, how many patches are good enough? Now I did around 400 for a first run and refined the profile with around 500 more. And the resulting profile was way better than the ones from CCStudio. Will I see an improvement with say 700 + 700 for refinement? What numer of patches or what procedure would you suggest from your expirience? You have a lot more expirience with ChromIQ/Argyll than I do.
Thanks a lot!
P.S. Please give me advice for regular sized patches, not for those presets with tiny patches that require fiddling around with rulers. Maybe the 1160 patches with extended grays, but with bigger patches? Can you provide something like that? Or how can I build a test chart like this myself? Thank you so much!
 
Last edited:
I guess Nelson can give the best advice here as he has much more experience with the whole process in Argyll. Especially if you want to do the 2-pass process with the refinement. I assume that the first pass then needs less patches then the second one that gives the final profile. But again Nelson is the person to ask.

How many sheets of paper are you comfortable using for profiling? It would be possible to create and share presets for the handheld mode with more sampling points around the grey axis as well. Then you wouldn’t need to do the refinement process and probably have similar results.

You could also load the preset the you like and then change the setting for the instrument. Set it to Clormunki and handheld mode and generate again. It should give you the same patches with another layout for your device.
 
Last edited:
Ok, thanks everybody, I think I get what it is all about.
For me and my ET-18100 + Epson ink + Epson Matte paper heavyweight the situation is this: I only get the deepest possible black with relative colorimetric and BPC off. No perceptual or whatever else gives me a black that deep. It's not a big difference, but it's a game changer for me - so far I thought my printer/paper combination wasn't able to do blacks that deep.
And maybe that deepest black is not neutral, but I can't see a color shift in that black! (And I'm very sensitive to color shifts! That's the reason why I avoid perceptive intent!)
Well, sigh, I wish I had known this earlier. And I wish I had ditched CCStudio earlier, because those profiles always gave me color casts, and I always thought "ok, that's how it is with printers and profiles"...
But as they say, better late than never.
Now I'll do some more profiles for other papers and I hope I won't fall into another trap again... In the end I'm just a dumb user who wants great prints ;-)
One more question regarding the charts: If I use the guided mode in ChromIQ, how many patches are good enough? Now I did around 400 for a first run and refined the profile with around 500 more. And the resulting profile was way better than the ones from CCStudio. Will I see an improvement with say 700 + 700 for refinement? What numer of patches or what procedure would you suggest from your expirience? You have a lot more expirience with ChromIQ/Argyll than I do.
Thanks a lot!
P.S. Please give me advice for regular sized patches, not for those presets with tiny patches that require fiddling around with rulers. Maybe the 1160 patches with extended grays, but with bigger patches? Can you provide something like that? Or how can I build a test chart like this myself? Thank you so much!

There are I believe preset targets with a 13 mm width target size allowing you to scan with a standard ruler:

1794067191629.png


you just scan with the outer edge of the adjacent row as the boundary of your ruler, making it much easier to get about 325 patches on a single sheet of A4.
 
The regular patches seem to be around 26mm wide. Maybe I can do around 13mm wide with a standard ruler I have.
So how many patches should I do? And how many patches in the refinement? And can I do extended greys myself in ChromIQ? Or do I need a custom made test chart for that?
Thanks!
 
I try to make a video later to show you. But I personally don’t have recommendations on the best numbers

Edit:

Hope this helps:
 
Last edited:
@MeandmyET18100 :

Here is a printscreen with my 14 mm wide patch target for the Colormunki/i1Studio for ChromIQ:

1794080458163.png


It has 312 patches per A4 page and can be easily scanned with the Colormunki/i1Studio by aligning the left side of your Colormunki on the left border of the row left from the active row that is to be scanned (see previous post). Just use normal ruler.
 
@itsab1989 Thank you so much for the video! This really helps.
@pharmacist Thanks for the help with the patch size! I think I can manage to read them like that.
Question for everybody: What kind of chart do you use? How many patches? Refinement run or not? What would you suggest? I think you all have a solution that works for you, and I'd like to hear about it. I don't want to start with a patch number that's too low to get a good profile and I also don't want to have too many patches only to find out later that it wasn't worth the effort.
Thanks again!
 
@MeandmyET18100: the most difficult area for a printer to grab the right colours are on the area around the near neutrals and greys (to have good neutral greys without colour cast and have good details in the shadows and highlights) and the outer boundaries of the RGB cube (to prevent clipping in the saturated and bright colours). The intermediate colours are quite linear in behaviour for most printers. Taking this physical aspect into account you want to emphasize these two aspects in choosing the sampling points of the RGB colour space having a limited patch count.

This means: don't use a rigid and evenly RGB space when having a limited patch count, but emphasize the outer boundaries and the innner neutral axis and let ChromIQ distribute the rest of the remaining patches evenly in the RGB colour space. The even i1Profiler grid is not very effective if your patch count is limited (it is ok with patch sizes above 1500-2000 patches, which uses a lot of paper, so you want to be smart with your limited patch count and sample only the area's that are the most important).

Here is a sample you can do, so you do not need a refinement step (in most cases) and only uses 2 sheets of A4:

1794122626747.png


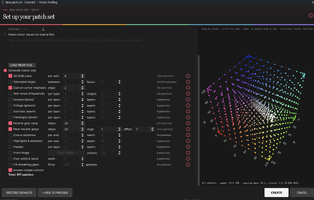
You can see: I have unchecked the 3D RGB cube (even distribution) and checked "fill remaining gaps"fill to : 624 patches (combined with the ensure unique colours, so the paches will avoid each other maximally inside the RGB cube). Using 2 or more black and white points will also increase the robustness of a profile (cfr. ArgyllCMS).

624 patches gives 2x312 patches on 2 A4 pages and 312 patches can be divided in 13 rows per page with 24 patches row (need slow scanning with the Colormunki/i1Studio).

Now have a look at the patch distribution of the famous TC9.18 target where you can clearly see the emphasis around the neutral axis and the outer boundaries (the area around 8 corners of the RGB cube): this is the secret of a good target, albeit it uses a rigid and even RGB cube (since it is has 918 patches it can safely use a RGB grid of 9x9x9).

1794123732267.png


Anyhow I can simulate the above TC9.18 layout almost perfectly with the ChromIQ patch generator (only the area around the corners lacks some sample points):

1794126962741.png


Eventually you can do a 3 page target (3x312 patches) with your Colormunki/i1Studio using something like this:

1794124258436.png


This distribution maximizes sampling around the neutral and near neutral axis (double ring with a off-set of 4 of each ring, giving superior near neutral sampling and thus good neutral black and white prints) and good colour sampling even in the outer boundaries of the RGB-cube. The TC9.18 only has 1 ring around the neutral axis.
 

Attachments

  • 1794126823282.png
    1794126823282.png
    426.4 KB · Views: 14
Last edited:
The latest version 4.3.28 is removed by Windows antivirus and is regarded as a serious threat.....
 
Back
Top