How to remove PRO-1 printhead ?

Moixixon

Printing Apprentice
Joined
Feb 8, 2022
Messages
9
Reaction score
6
Points
10
Printer Model
Canon PIXMA pro 1
Hello, I'm new in printing at home and I've been reading a lot here to make it easy, but it time to my first question.
I've got two Canon PIXMA pro 1 with two different problems:

Printer #1. Does normal nozzles chek but its problem is when I print a photo in A4 canon photo paper. It always appear the same lines near the end of the sheet, always in the same place, at one inch of the end.
What is the problem with it? Ive done cleanings and alignement with no sucess.
IMG_20220208_094217.jpg
IMG_20220208_094255.jpg


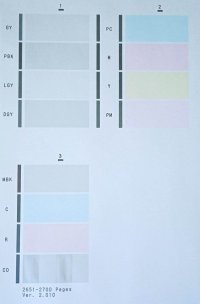
Printer #2 . Its nozzle check print looks like this:

IMG_20220208_093024.jpg


And when I print a photo in A4 canon paper, a black ink stain appears near the end of the sheet.

IMG_20220208_095341.jpg


Is there anything I can do?
Is it possible to repair one of them?

Thank you so much
 

The Hat

Printer VIP
Platinum Printer Member
Joined
Jan 18, 2010
Messages
15,617
Reaction score
8,691
Points
453
Location
Residing in Wicklow Ireland
Printer Model
Canon/3D, CR-10, CR-10S, KP-3
Is there anything I can do?
Is it possible to repair one of them?
Hi and welcome, Firstly, Printer 1#. I reckon the cause of your issue maybe be related to printing borderless and this can be cured by printing on oversized paper and trimming afterwards, if borderless is essential to you. Otherwise don’t use it..

Issue with Machine 2#

The nozzle check is showing a severe problem on the Matte Black in block 3 and also the Cyan has less of an issue but it still is not showing a complete and proper block either..

The only way to correct this problem is to purchase a new print head and not to continue to use this printer until you can get a new one, otherwise it may lock you out with a B200 error..

The other related issue with smears on the photo maybe caused by a curl or a bow in the end of the paper, you may also try increasing the platen gap using the Prevent paper Abrasion in (Custom Setting)..
Try and store all your photo paper flat..
 

Moixixon

Printing Apprentice
Joined
Feb 8, 2022
Messages
9
Reaction score
6
Points
10
Printer Model
Canon PIXMA pro 1
Hi and welcome, Firstly, Printer 1#. I reckon the cause of your issue maybe be related to printing borderless and this can be cured by printing on oversized paper and trimming afterwards, if borderless is essential to you. Otherwise don’t use it..

Issue with Machine 2#

The nozzle check is showing a severe problem on the Matte Black in block 3 and also the Cyan has less of an issue but it still is not showing a complete and proper block either..

The only way to correct this problem is to purchase a new print head and not to continue to use this printer until you can get a new one, otherwise it may lock you out with a B200 error..

The other related issue with smears on the photo maybe caused by a curl or a bow in the end of the paper, you may also try increasing the platen gap using the Prevent paper Abrasion in (Custom Setting)..
Try and store all your photo paper flat..
Thank you so much. Is it possible trying to replace the broken print head with the one working in the other printer? How can I replace it?
 

The Hat

Printer VIP
Platinum Printer Member
Joined
Jan 18, 2010
Messages
15,617
Reaction score
8,691
Points
453
Location
Residing in Wicklow Ireland
Printer Model
Canon/3D, CR-10, CR-10S, KP-3
Is it possible trying to replace the broken print head with the one working in the other printer?
To start with.. Why would you want to swap the two print heads around, how does that help. The Pro 1 is not your average Canon printer, you can’t just go fiddling around inside her without suffering some sort of consequences, If it ain’t broke then don’t break it..

There are certain steps that have to be taken to install a new print head in this machine, and while swapping them around sounds like a good idea, that may not work to your advantage.

Because the printer may not see the replacement head as a good working head and refuse to recognised it, or worse lock the printer to stop you using it, besides when you remove the print head then it uses up 35% approx. of all inks to replenish the ink that is lost during the installation.

Is Printer 1# not working properly.. ?

P.S. This printer can bite when you interfere with its normal day to day running..
 

Moixixon

Printing Apprentice
Joined
Feb 8, 2022
Messages
9
Reaction score
6
Points
10
Printer Model
Canon PIXMA pro 1
To start with.. Why would you want to swap the two print heads around, how does that help. The Pro 1 is not your average Canon printer, you can’t just go fiddling around inside her without suffering some sort of consequences, If it ain’t broke then don’t break it..

There are certain steps that have to be taken to install a new print head in this machine, and while swapping them around sounds like a good idea, that may not work to your advantage.

Because the printer may not see the replacement head as a good working head and refuse to recognised it, or worse lock the printer to stop you using it, besides when you remove the print head then it uses up 35% approx. of all inks to replenish the ink that is lost during the installation.

Is Printer 1# not working properly.. ?

P.S. This printer can bite when you interfere with its normal day to day running..
Printer #1 prints the same way in A4 photo paper, either bortherless or not. When using normal A4 plain paper or 4x6 photo these white lines don't appear. It's firmware isn't update and I'm unable to do it. Nozzle check are normal, but A4 photo prints always show this:
IMG_20220208_094217.jpg


Printer#2 firmware is updated, but it's the one with an electric problem in it's printhead. When I print an A4 photo, ot looks normal.
That's why I thought it could be better to replace this printhead with the one working in printer #1.
Do you it it could be better trying to solve the problem with the white lines in printer #1?
I've tried printing with or without borders, showing the same problem. Then normal A4 plain paper don't do this...
I would like to solve this, because Ive invested a lot in ink for this printer.
Thank you so much, I really appreciate your help.
 

The Hat

Printer VIP
Platinum Printer Member
Joined
Jan 18, 2010
Messages
15,617
Reaction score
8,691
Points
453
Location
Residing in Wicklow Ireland
Printer Model
Canon/3D, CR-10, CR-10S, KP-3
I would like to solve this, because Ive invested a lot in ink for this printer.
Are these lines appearing on the long side portrait or on the cross horizontal side, and are they appearing in the same position even if you rotate the image 180, there’s obviously an issue there somewhere but it’s not firmware related.

Does it appearing in both quality settings in standard and high quality, and can you post a nozzle print on printer #1 please..

P.S. Upgrading the firmware on the Pro 1 is a huge no, no.. That only limits your options..
 

Moixixon

Printing Apprentice
Joined
Feb 8, 2022
Messages
9
Reaction score
6
Points
10
Printer Model
Canon PIXMA pro 1
Are these lines appearing on the long side portrait or on the cross horizontal side, and are they appearing in the same position even if you rotate the image 180, there’s obviously an issue there somewhere but it’s not firmware related.

Does it appearing in both quality settings in standard and high quality, and can you post a nozzle print on printer #1 please..

P.S. Upgrading the firmware on the Pro 1 is a huge no, no.. That only limits your options..
These lines appear on the cross horizontal side, one inch to the end of the print using photo paper. When I print an image in a normal sheet of paper, they don't appear.
I'm out now, tomorrow morning I'll try your proposal... Image rotation, standard quality and attach here both with a nozzle print.
Thank you!
 

Moixixon

Printing Apprentice
Joined
Feb 8, 2022
Messages
9
Reaction score
6
Points
10
Printer Model
Canon PIXMA pro 1
Are these lines appearing on the long side portrait or on the cross horizontal side, and are they appearing in the same position even if you rotate the image 180, there’s obviously an issue there somewhere but it’s not firmware related.

Does it appearing in both quality settings in standard and high quality, and can you post a nozzle print on printer #1 please..

P.S. Upgrading the firmware on the Pro 1 is a huge no, no.. That only limits your options..
Good morning
Here is the nozzle print:

IMG_20220209_093935.jpg


I've tried rotating image, lowering quality, avoid paper abrasion option enabled... and it's always the same result, these lines always in the same position:
IMG_20220209_094731.jpg


If I reduce the image and print it with a white 3,5 cm border, they don't appear:
IMG_20220209_101406.jpg

And when printing on a normal A4 paper, it looks fine:

IMG_20220209_101626.jpg

I'm using Photoshop, with provided ICC profiles.
I don't have A3 paper, but I tried to print an A4 paper putting it horizontally in the printer, and the result was this:
IMG_20220209_102852.jpg


And finally, resizing the document on Photoshop, double the width to convert it in an A3 size photo and setting the paper option to A3 with the white portion down, I insert the A4 paper sideways as if it was an A3, it looks great!
IMG_20220209_104625.jpg


So, I think there is not a physical problem with the printer, but some software issue... but, how can I solve it? Is resizing documents my solution?
Thanks
 

Attachments

  • IMG_20220209_093935.jpg
    IMG_20220209_093935.jpg
    51.8 KB · Views: 128

The Hat

Printer VIP
Platinum Printer Member
Joined
Jan 18, 2010
Messages
15,617
Reaction score
8,691
Points
453
Location
Residing in Wicklow Ireland
Printer Model
Canon/3D, CR-10, CR-10S, KP-3
So, I think there is not a physical problem with the printer
Let’s deal with your nozzle print first, the printout is as perfect as printouts go, but I’m not too happy with the two cyan colours, because the PC cyan is darker than the Cyan blue, but this can’t happen if your using all OEM carts and inks, still I taught I mention it.

Moving on to your first Pic of in the Arch, I can see the same lightless near the top of the Pic, I assume you printed this on glossy paper, borderless and on high quality ?, to me that might suggest your having an issue with your photo black ink, but as in other photos it also happened with the Cyan ink too, so that can’t be an ink issue.

Maybe the answer lies in the next four Pics which were printed using margins and they don’t have these lines in them, and you’re A3 trick doesn’t have it either, I suggest you try running the Bottom Plate Cleaning to stop the smudges.. (Maintenance)

Now I’m wondering if you using Wi-Fi to print with or a USB cable, because that’s about the only other thing that I can think of that could be causing these lines to appear 27cm down the page , that's if you're not printing borderless.

A head alignment won’t cure the problem either because this is only happening on certain paper types, and maybe one of our many resident photo experts might have a suggestion or answer to your problem, chirp in and have a go, because I’m all out of ideas for now..:hu
 

Artur5

Printer Master
Joined
Jan 24, 2011
Messages
1,294
Reaction score
1,618
Points
278
Location
Kmt. 0.
Printer Model
MB5150,Pro10s,i3Mk3s+,Voron2.4
I wonder if enabling 'avoid paper abrassion' in the custom settings of the driver could make a difference. I do that when I print with photo paper cut from a roll, as it's never perfectly flat.
 
Last edited:
Top