Here's some shots of so called Homebrew DIY KISS CISS Systems.
If you don't already know these systems are by far the most reliable especially for pigment ink based Epson printers. They simply outperform the commercial offerings because they are highly functional, extremely serviceable, and the quality of the product is as high as you want to put into it.
KISS because they are that simple with no marketing excrement.
Refillers are by nature DIY kind of persons who are extremely resourceful.
On with the show over the next few days.
Well you need some tuuuuubing:

Then some MAGIC Caps with at least two holes: one for the tubes and one to let air in.

Then you start putting one end of the tubes with fittings into the refillable cartridges:

Arrange the tubes neatly

Then you prepare the other ends to go into the magic caps

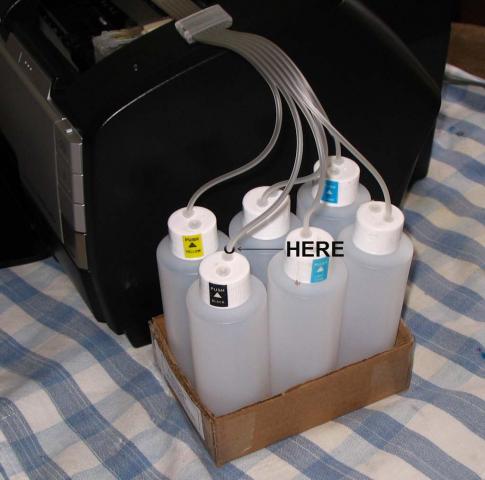
Here's how the Tanks will look like with the caps, Just drop the tubes in to the bottom:

Here's how the caps fit into the bottles:

Here's an R200 completed


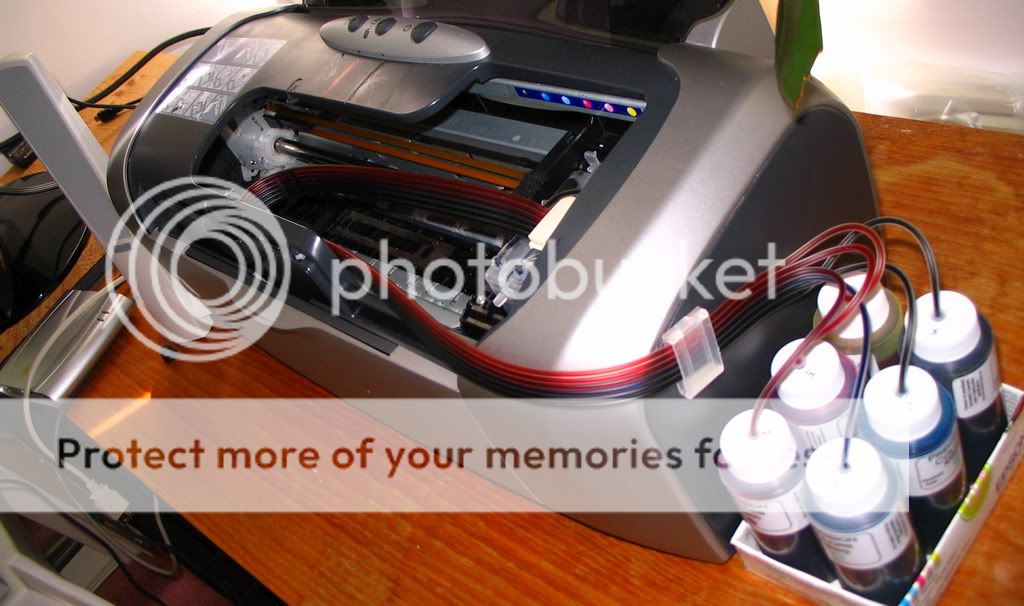

That's pretty much all there is to a CISS system. If the cartridges are full no priming is really necessary, as the ink is used the ink will move into the cartridges.
For those thinking about tanks tied together, when you need to clean the tanks. let's see how you get that done. With simple bottles you simply remove and rinse. Easy enough? Did I say you eliminate the risk of leaks?????
In the next few days I will show some pics of High Performance homebrew systems for SP14000, R1800 and Artisan 710s.
A little vid clip
http://rapidshare.com/files/382808436/MVI_0507.AVI
Enjoy!
I'll let those who own an R200 in on a little secret of sorts. If you want high performance printing from an R200 and its siblings you MUST use PhotoRPM in the advanced tab. With this and a custom profile this old and abused and discarded printer can print right up there with the newest printers. The only issue is that in this mode they are slow slow slow. If speed is not an issue, these printers go for less than peanuts ( Have you priced peanuts these days?).
If you don't already know these systems are by far the most reliable especially for pigment ink based Epson printers. They simply outperform the commercial offerings because they are highly functional, extremely serviceable, and the quality of the product is as high as you want to put into it.
KISS because they are that simple with no marketing excrement.
Refillers are by nature DIY kind of persons who are extremely resourceful.
On with the show over the next few days.
Well you need some tuuuuubing:
Then some MAGIC Caps with at least two holes: one for the tubes and one to let air in.
Then you start putting one end of the tubes with fittings into the refillable cartridges:
Arrange the tubes neatly
Then you prepare the other ends to go into the magic caps
Here's how the Tanks will look like with the caps, Just drop the tubes in to the bottom:
Here's how the caps fit into the bottles:
Here's an R200 completed
That's pretty much all there is to a CISS system. If the cartridges are full no priming is really necessary, as the ink is used the ink will move into the cartridges.
For those thinking about tanks tied together, when you need to clean the tanks. let's see how you get that done. With simple bottles you simply remove and rinse. Easy enough? Did I say you eliminate the risk of leaks?????
In the next few days I will show some pics of High Performance homebrew systems for SP14000, R1800 and Artisan 710s.
A little vid clip
http://rapidshare.com/files/382808436/MVI_0507.AVI
Enjoy!
I'll let those who own an R200 in on a little secret of sorts. If you want high performance printing from an R200 and its siblings you MUST use PhotoRPM in the advanced tab. With this and a custom profile this old and abused and discarded printer can print right up there with the newest printers. The only issue is that in this mode they are slow slow slow. If speed is not an issue, these printers go for less than peanuts ( Have you priced peanuts these days?).
")