drc023
Printer Guru
- Joined
- May 1, 2005
- Messages
- 183
- Reaction score
- 9
- Points
- 138
- Location
- Arkansas
- Printer Model
- Canon Pro-100, iP8720, MG6220
This is a refill base and setup I made for BCI-3/6 tanks. Its an alternative to some of the conventional methods and does have a few advantages. Its cheap to build, easy to use, makes refilling virtually mess free and holds refilled cartridges for later use. Obviously there is room for improvement and modifications. I hope that other users will provide suggestions and comments and also share with the rest of us any photos and write-ups you may have on any unique refilling techniques and contraptions.
Ron
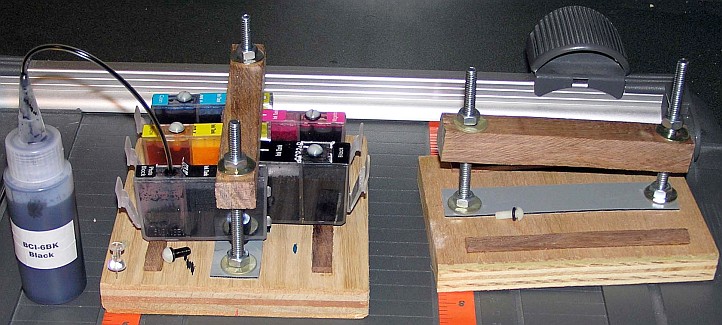
Refill Base - Scrap plywood, 4 stove bolt w/nuts and washers, 3/4 sq. wooden bar, 3/16 wood strips, rubber mat. The rubber mat is cut from a piece of offset printing press blanket. Other materials such as very wide rubber bands, old inner tube, etc.. would also work. The wood strips are only for help in balancing the tanks before they are clamped down. They arent really necessary. One of the advantages to this base is that it can be used to store the ready to use refills.
The refill bottle is a standard 2 ounce bottle with a yorker cap. Very small diameter vinyl tubing extends to the bottom of the bottle so that when the bottle is squeezed, ink is pushed through the tubing. A 4 or 8 ounce bottle would be just as good. Less pressure is needed on the larger bottles to push ink through the tubing. The push pin stuck in the refill base is used to cap off the ink tubing. For those living in areas where obtaining syringes is difficult or illegal, using the refill bottle is a viable alternative. it is also somewhat neater as the bottle doesnt have to be opened and if the bottle is tipped over, spillage is not a problem.
The ink cartridges have been modified for refilling. The top label was cut back to reveal the ink fill opening. This one had a vinyl plug covered with plastic tape. Both were removed. The fill hole was enlarged by drilling a 5/32 hole and a 10-32 tap was used to cut the threads for a 10-32 nylon screw and o-ring. Normally the o-ring isnt necessary as a sufficient seal is made by the threads. Its just extra insurance to insure a 100% seal is made. The blackened screw on the refill base is from the black tank being filled. The white one on the empty base is an unused one. Instead of going to the trouble of converting the cartridges as I did, it would be much easier to simply order a refill kit from www.hobbicolors.com. They also have an eBay store under the name kbay2002. Empty cartridges are part of the refill kit. The bulk ink in the bottles is Sensient-Formulabs from www.alotofthings.com. They also can supply empty cartridges.
All of the above components are independent of each other. Instead of the refill base, you may prefer to stay with the original caps and rubber bands. The refill bottles and vinyl tubing can just as well be replaced by a syringe. Unless you have ink cartridges with very good plugs, they are the one item that I wouldnt change. Ive used several different methods of sealing cartridges and this is the best Ive found. Note that the original opening extends further into the tank so that the original plugs dont fall in. This also results in more surface area for the threads.
By using the above components I can refill an entire set of cartridges in very little time and with virtually no mess at all to clean up.
Ron
Refill Base - Scrap plywood, 4 stove bolt w/nuts and washers, 3/4 sq. wooden bar, 3/16 wood strips, rubber mat. The rubber mat is cut from a piece of offset printing press blanket. Other materials such as very wide rubber bands, old inner tube, etc.. would also work. The wood strips are only for help in balancing the tanks before they are clamped down. They arent really necessary. One of the advantages to this base is that it can be used to store the ready to use refills.
The refill bottle is a standard 2 ounce bottle with a yorker cap. Very small diameter vinyl tubing extends to the bottom of the bottle so that when the bottle is squeezed, ink is pushed through the tubing. A 4 or 8 ounce bottle would be just as good. Less pressure is needed on the larger bottles to push ink through the tubing. The push pin stuck in the refill base is used to cap off the ink tubing. For those living in areas where obtaining syringes is difficult or illegal, using the refill bottle is a viable alternative. it is also somewhat neater as the bottle doesnt have to be opened and if the bottle is tipped over, spillage is not a problem.
The ink cartridges have been modified for refilling. The top label was cut back to reveal the ink fill opening. This one had a vinyl plug covered with plastic tape. Both were removed. The fill hole was enlarged by drilling a 5/32 hole and a 10-32 tap was used to cut the threads for a 10-32 nylon screw and o-ring. Normally the o-ring isnt necessary as a sufficient seal is made by the threads. Its just extra insurance to insure a 100% seal is made. The blackened screw on the refill base is from the black tank being filled. The white one on the empty base is an unused one. Instead of going to the trouble of converting the cartridges as I did, it would be much easier to simply order a refill kit from www.hobbicolors.com. They also have an eBay store under the name kbay2002. Empty cartridges are part of the refill kit. The bulk ink in the bottles is Sensient-Formulabs from www.alotofthings.com. They also can supply empty cartridges.
All of the above components are independent of each other. Instead of the refill base, you may prefer to stay with the original caps and rubber bands. The refill bottles and vinyl tubing can just as well be replaced by a syringe. Unless you have ink cartridges with very good plugs, they are the one item that I wouldnt change. Ive used several different methods of sealing cartridges and this is the best Ive found. Note that the original opening extends further into the tank so that the original plugs dont fall in. This also results in more surface area for the threads.
By using the above components I can refill an entire set of cartridges in very little time and with virtually no mess at all to clean up.
