i9900/pro9000 print head mysterious clogging

262144

Getting Fingers Dirty
Joined
Mar 20, 2009
Messages
14
Reaction score
0
Points
22
Location
MD, USA
Hi, at this moment I'm just short of microwaving my printers.

I rescued a i9900 about 2 months ago and till now it's still having trouble with print heads, all 4 of them.

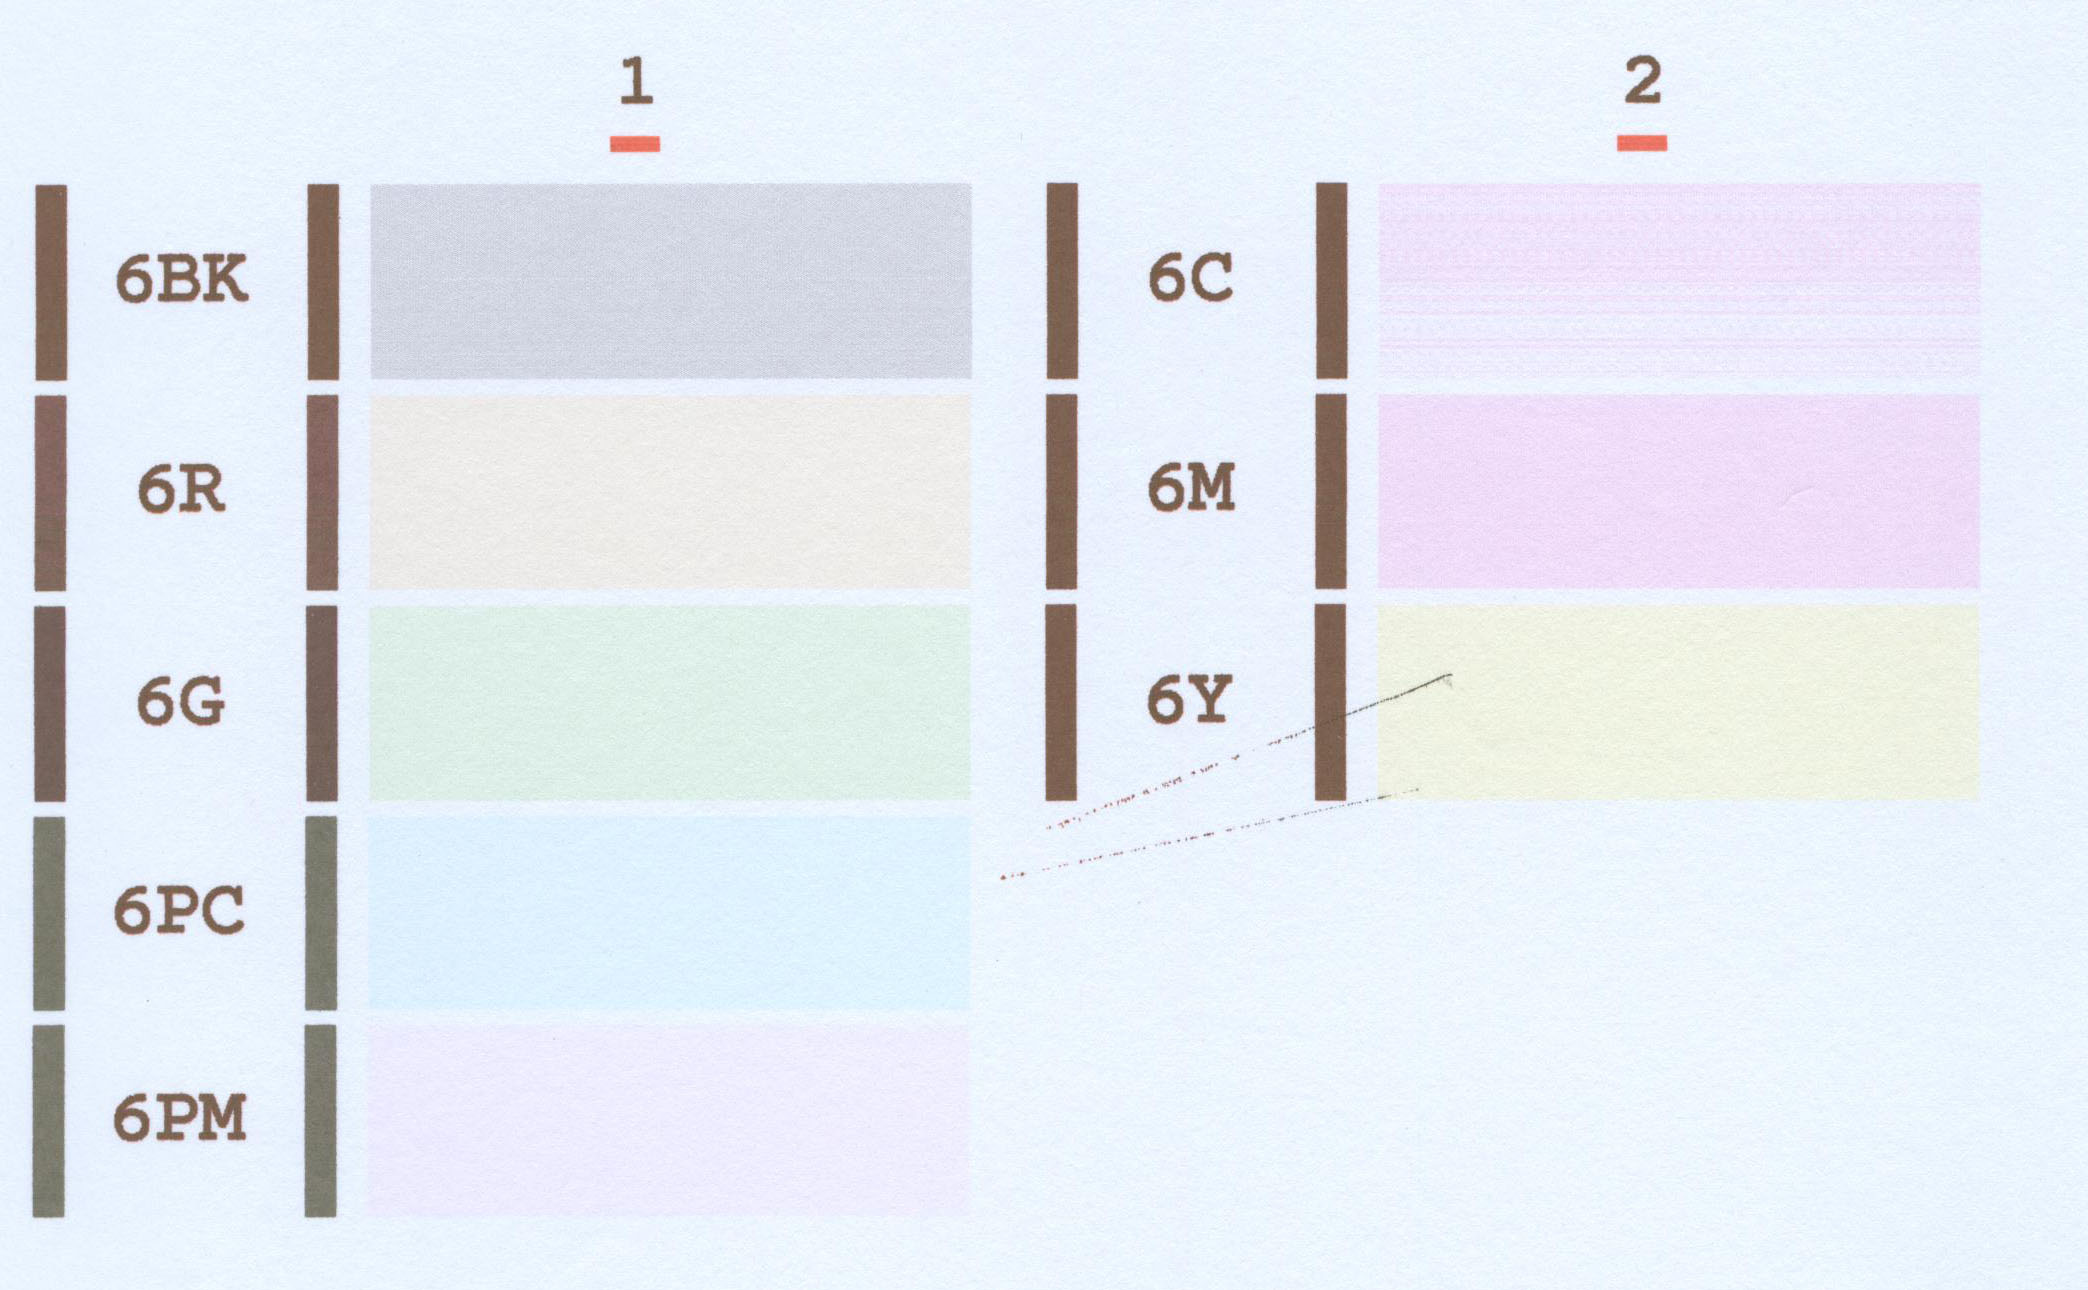
From the person getting rid of it, he said his ink was no good and killed the print head, so I dismembered the print head very caution, cleaned it inside out, and put it back together. Then, it started to give me something looks like tire marks.

So, I bought a ip8500 from a friend, trying to salvage the printhead from that printer. Treated with windex for unclogging, didn't work, took apart, cleaned, and then it gave me tire mark again.

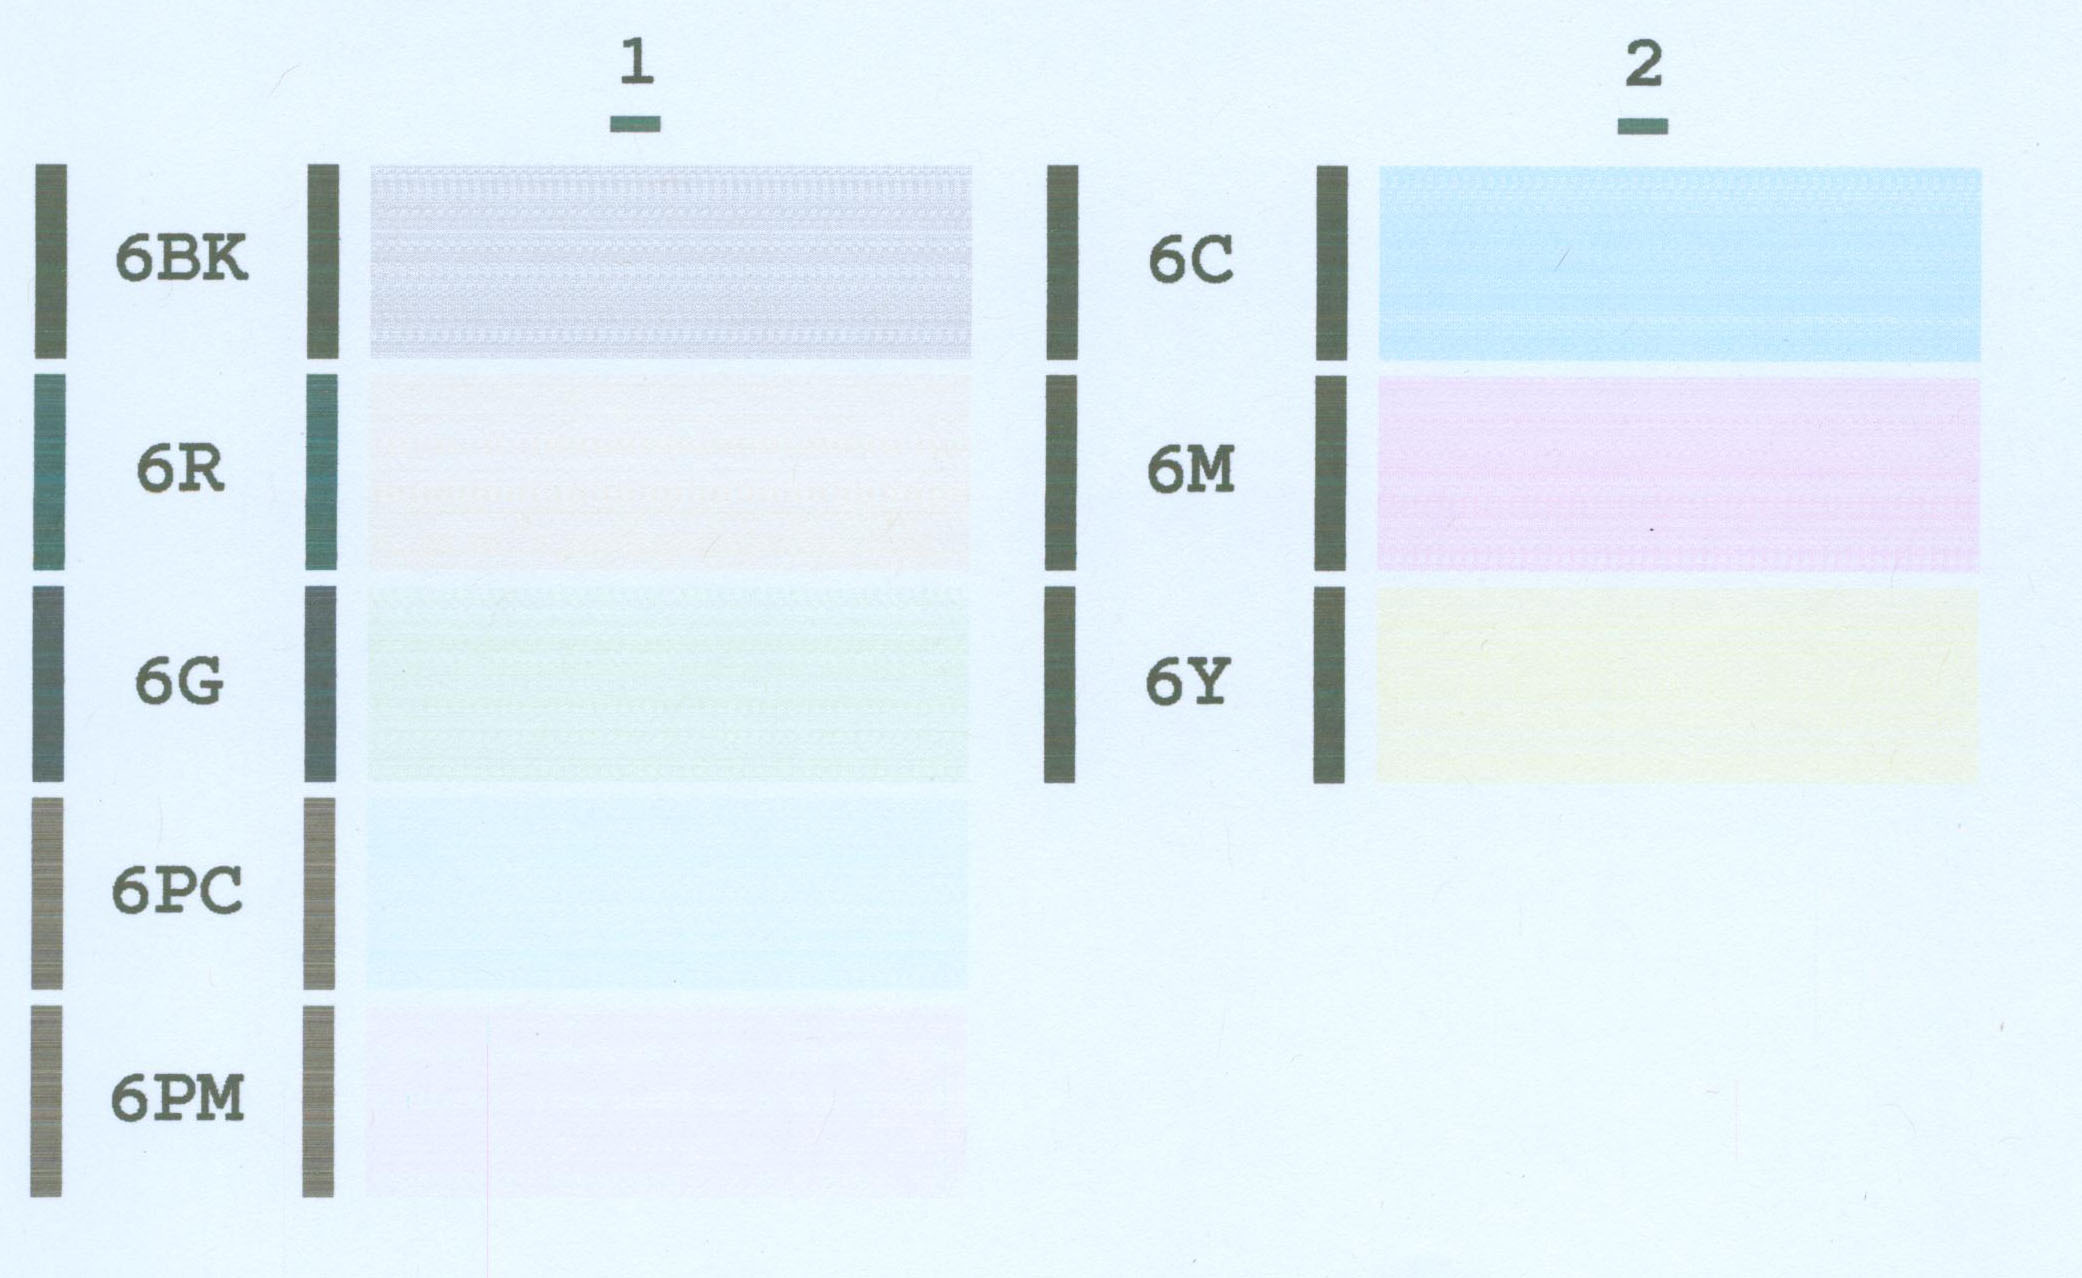
Today, I got 2 print heads off eBay (used), along with another i9900 that is still in my car. One of the print head was left in the printer without carts for over a year, and apparently clogged very badly and is still under water, but I did run nozzle test and it didn't show tire marks. The other head was missing Cyan, so I tried to unclog it, but as soon as I put in some windex through the ink feeding hole (with the metal film), it clogged completely. I tried ALL method and nothing works, so I took the nozzle along with the circuit off, cleaned it, and put it back onto another plastic chassis, and the weird tire mark looking nozzle pattern showed up again!

All of these are checked with my Pro9000, which has a working head that I don't dare to mess with. I just take out the good head and swap in the testing heads. Tire marks again.

Now I'm suspecting something about taking apart the print head caused the tire mark to show up. Does anyone in here experienced the same trouble?

At this moment I've already spent over $300 on this damn printer, with tons of ink and parts, and an extra i9900 I don't even want. Planning on putting some of these under microscope some time soon but that probably wouldn't help too much. I called Canon and they said they sell print heads at about $90 and there's no warranty/return on the print heads. Not sure if I want to risk that although I know the problem is in the head.

Any extra info/comments, or some methods I should try? I have already tried to pressurize water going through the head with positive and negative pressure, windex, water (boiling, hot, warm, cool, cold), put into freezer (I was thinking when the ink froze it would expand and thus move around, when thaw it should come out wasily--didn't work).

Please let me know before I throw a nuke on this damn printer. Thank you! Oh yes I have read every single one of the post here up to 17th of July, 2009, and most of the posts after that day till now.
 

mikling

Printer VIP
Platinum Printer Member
Joined
Jul 2, 2006
Messages
3,239
Reaction score
1,471
Points
313
Location
Toronto, Canada
Were you disassembling the heads?????

If you were, then brave man you are. One common element is that you are acquiring heads which all had a history of potential problems.

The first episode of the person that had "clogging" ink was the first bad sign. Whenever the Canon or thermal heads for that matter, exhibit printing with quality issues, then it is being damaged. If you are fortunate enough to catch it soon, rectify the problem then you can restore the print quality. If you don't catch it soon enough, then enough damage may have taken place that no amount of unclogging procedures will restore the printhead. ( Actually the restoration process of cleaning is not really unclogging as much as dissolving baked on ink coating the heater elements. The fact that the heaters do not heat up enough to boil and eject the ink creates a missing bubble and the thought that a "clog" has happened. If the printer had been sitting idle and the ink dried up within the nozzle would make for a clog ...with no serious damage. If it was not sitting idle and started to miss during printing, then this is a danger sign and not really a clog. ) Thus the head that was reported to be missing due to poor ink might already have been in a terminal state anyways.
BTW, you will not be able to see the coated heaters on the nozzles without a serious microscope so it is unlikely that disassembly to clean the channels would truly declog a printhead damaged by poor ink or ink feed.

The second source of suspect heads are ones that have come off Canon printers that had been using a CISS. If the feed conditions are just outside the range tolerated by the printhead, you will begin a slow process of cooking the heaters until the buildup becomes too large and irreparable. The first signs are weak or seemingly lazy nozzles that seem to work when it feels like or are very intolerant of slightly off spec ink feed conditions.

It is my experience with the i9900 and heads that have zillions of nozzles in a long line, that you need to be a little patient to rehydrate all the nozzles. When the head is taken apart and cleaned it is possible to have tiny air pockets trapped inside the nozzle. Just let the head sit there for a few hours, and do another head clean and try again.

It looks like you might have gotten some subpar heads but also don't continue the procedure of opening up heads. The heads as they get old become more fragile and temperamental.

If soaking and or cleaning cartridges with ammonia based window cleaner doesn't fix it then I usually relegate it to terminal and ready for disposal.
 

embguy

Printer Guru
Joined
Mar 9, 2009
Messages
331
Reaction score
3
Points
141
Please upload a picture of the tire-mark nozzle check.

There are two type of clogs in inkjet printer:
1. Actual ink in the nozzle prevent ink from going through.
2. The purges system is clogged at the exit tubing.

If the purge system is working properly, doing head cleaning will unclog the printhead. This is the easiest clog to clear because the purge system is working.

The purge system is used to sucking ink from the ink cartridge through the printhead nozzles. If the purge system is not working, no amount of head cleaning will clear the clog. We need to fix the purge system first.

The purges system works like a water pump. Water pump need to be primed i.e. the pump inlet needed to be filled with liquid before the pump can pump the liquid through. The purge system consists of the purge pads where the printhead parks. One or more tubing are connected under the pads. When the pads are dry, we need to put some ink or Windex on the pads to prime it. The purge system problem is usually at the tubing. Sometime, the clog is so back the back pressure cause the tubing to come off the pad. If this happens, you need to take the printer cover off in order to re-connect the tubing. Epson printer is common with the tubing popping off the pad. But Canon is not that bad - just clog in the tubing.

To unclog the purge system:
1. Flood the purge pads with Windex. Close the cover and let the printhead parks over the pads.
2. Wait a few minutes to let the Windex to dissolve the ink clog.
3. Do a head cleaning and print a noozle check.
4. If the clog persists, repeat steps 1 - 3.
5. After performing step 1 - 3 ten times, if the problem persists, flood the purge pads again, close the cover and let it sit overnight.
6. Next day, do a head cleaning and print a noozle check. If the clog persists, repeat steps 1 - 5.
7. Have faith and do it until it works.

I wasted at least four ink cartridges of inks trying to unclog my MP830 photo black. ghwellsjr suggested this procedure for me to try. I know it is discouraging after repeating these steps day after day without any result. But this works.
 

262144

Getting Fingers Dirty
Joined
Mar 20, 2009
Messages
14
Reaction score
0
Points
22
Location
MD, USA
Thanks mikling for the info and such a quick response! I've been taking things apart for long time now. I took apart my Nikon D80 the 2nd day I got it, and it's still working today. All my canon printers are being taken apart and put back together, without instructions (MP830 was a bit tough), and 2nd month when I had my car I took that apart as well, although not all the way but the engine, transmission, and most of the electric system were out. Good thing my cat doesn't have screws on her... :)

For this summer I took apart at least 20 print heads now. I have to say although I absolute hated Epson printers for stupid cartridges, their print heads are like tanks! Simple and robust. And for some reason they have much less (but larger) nozzles. At the moment I still have a head from CX6400 (?). Brother's head is very weird, and their nozzles are huge! Kind of make me wonder how these large nozzles managed to spray out the small ink droplets. If someone can tell me how to upload images I can send a a bunch of photos of these print heads.

As far as the ink goes, I'm not too concerned. I used canon's genuine carts, flushed them really well, then dried for 2 weeks, and now refilled with Hobbicolors ink I bought probably a little over 2 month ago. The other ink I got from the person are in storage with cross bones stickers on them. I will give those ink to my other "friends" who like to refill drink things. :) (Just kidding!)

So far the 4 dead heads are having the following condition:

The one came with the i9900 was actually a fairly new head, the person baked a head, put in this head and still got clogs so he thought it's a bad printer. I took it and put in my Pro9000 head and got it work flawlessly (i9900 use different cart sequence, though). I didn't even bother to do the nozzle check as there are dried up ink on the nozzle. Took it apart, cleaned thoroughly but it gave me a weird tire mark-like pattern during nozzle check. Took it apart, soaked the ceramic part in windex for 9 days, took it out, symptom got worse. At the moment it's still like that.

From iP8500: total print count of the printer is only 342pages, which fits to my friend's description of "only used one set of ink." However, he used this printer to print term papers, and the printer was on and off for over 3 years. The head looks like new, though. I did exactly the same thing as the original i9900 head, got exactly the same symptom, only a lot worse. Tried to dampen it and let the head went sub-zero over night, didn't do anything. Then from a Chinese site they suggested that you can force water through the ceramic part to form a mist-like spray, so I did that, didn't help. Then I used a hand held air pump to suck water in from the nozzle, water got in but tire marks still. Put the ceramic part in boiling water for 30 minutes and put back together, nothing happened. I got upset and microwaved it, and the thing melted... :)

Third head and forth head got here today.

Third head has been dried for over a year, and there are hardened ink on the output side of the head, and at the moment it's submerged in windex, and is already apart.

The forth head was working fine except the Cyan, which was banding in the middle part, I tried to pressurize windex from ink inlet hole in, and first it was flowing then stuck, disassembled, and found the clog was in the plastic chassis, switched the chassis, dried and put back to the printer, tire marks again.

Now, what puzzles me the most is the fact that for the forth head I didn't do anything to the other 7 nozzles (9 if you count the disabled ones), only rinsed them with purified water when dissembled, and now PC, PM, C, M, G, and BK are all tire marks, especially the black, I saw them working flawlessly hours ago. Then I took the head for another dive, with negative pressure from the ink inlet, they all flowed backwards fine, and sucked quite a bit of water through the whole system, but tire mark still shows.

I work in a Science Center, so I have access to a bunch of microscopes, hopefully I can find a powerful enough lens. But guess that wouldn't really do anything. I just really hope someone had ran into this situation before, or can point out what I'm doing wrong, or maybe some other ideas that I can try on these genie pig heads. Thank you!
 

262144

Getting Fingers Dirty
Joined
Mar 20, 2009
Messages
14
Reaction score
0
Points
22
Location
MD, USA
mebguy, thanks for the input, but I'm sure the purge system works fine.

When I first got this printer I took the whole printer apart, flushed the pads in the bottom, dissembled and washed the purge system (man I like dye based ink, they came off very easily), and put back together and tested working. The printer was almost like new when I finished cleaning, the purge pads were all pure white.

Did same thing with my iP4200, iP4300, 2 MP830s (Pigment ink permanently colored the bottom pad and the purging pad), and Pro9000, they are all working now so I don't think the purge unit is malfunctioning. Besides, I put them in my working Pro9000 and they were still having same symptoms.

I'd love to upload some photos of my print heads along with the nozzle check pattern, but I don't know how :(. I remember saw it somewhere but couldn't find it now.
 

embguy

Printer Guru
Joined
Mar 9, 2009
Messages
331
Reaction score
3
Points
141
Use the upload link from the top menu to upload file. After upload, it gives you a link to your file. Copy the link and paste it on the compose message box. Highlight the link and click on the Img button.
 

262144

Getting Fingers Dirty
Joined
Mar 20, 2009
Messages
14
Reaction score
0
Points
22
Location
MD, USA
My damn scanner won't pick up the light colors, will try again tomorrow at work.

Also, I'm trying to get some more i9900 print heads off eBay for testing. I probably will end up getting one from Canon, but I'd rather try all other options before that.
 

262144

Getting Fingers Dirty
Joined
Mar 20, 2009
Messages
14
Reaction score
0
Points
22
Location
MD, USA
Alright, let me try this again.

The original nozzle check:
001-1.jpg


Nozzle check after disassemble and reassemble:
002-1.jpg
 

262144

Getting Fingers Dirty
Joined
Mar 20, 2009
Messages
14
Reaction score
0
Points
22
Location
MD, USA
The two black lines on the original nozzle check are my fault, I put the print head on that sheet at some point.
 

mikling

Printer VIP
Platinum Printer Member
Joined
Jul 2, 2006
Messages
3,239
Reaction score
1,471
Points
313
Location
Toronto, Canada
Let the cartridges sit there and then perform another nozzle check. Keep the prior nozzle checks and label them in sequence. Eventually the missing lines will improve slowly in sequence. Tiny bubbles are in some nozzles. Give it time.
 
Top