Extreme Ozone Fade Test Results for a few original and compatible inks

fadeaway

Getting Fingers Dirty
Joined
Oct 27, 2005
Messages
24
Reaction score
0
Points
22
I thought I would share my extreme ozone fade test results. They are only for comparative testing and give no absolute estimate of the life of prints. It was a quick and dirty experiment so keep that in mind and don't take the results too seriously.

fadetest.jpg


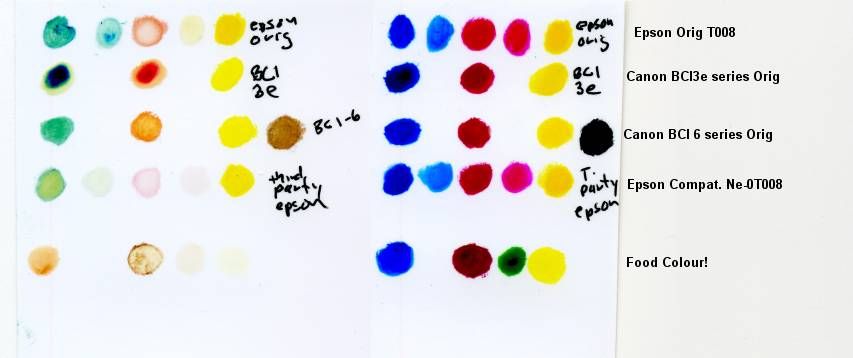
Left Ozone Exposed 30 min Right Room Air Exposed 24 hrs

Notes:

Conditions:
Exposure: 30 minutes extreme Ozone level Exposure
Environment: Small Closed Glass Jar with small ED Ozone generator producing a very high concentration, Room Temperature
Paper Epson Premium Glossy Photo Paper (microporous ceramic coating)
Ink dried for 24 hrs

-I had no T007 Black ink on hand to test

-The inks were not printed on but dabbed on with a cotton swab since several of the inks tested were from old machines that I no longer have a printer for.

Results:

The ozone level was very high but I do not know the actual level. It is the relative fading that is important.

The left half was placed in the ozone, and the right half placed in a room with no sunlight exposure.

The BCI3e cyan and magenta went on too thick so only look at the edge of those to rate the fading

The Epson Compatible came in a small green box. Manufacturer unknown but the code name is there on the photo legend.

Fade Level Best to Worst:

1-epson orig T008
2-Canon BCI -6
3 Canon BCI 3e and epson compatible T008 are at a tie in that the canon was better on magenta but the epson compatible was better on the cyan
4 -Food colour -added just for fun!

I also placed a Fuji crystal archive glossy print , and a magazine glossy photo in the jar -there was no visible fading of either of these.

Caveats: Ink density was hard to make consistent

This test was just to compare dyes with extreme ozone exposure and does not convey any UV susceptibility.

The Fuji crystal archive likely has a sealer coating as it does not feel like typical gelatin coatings when touched with a wet finger- not sticky. The magazine print I do not know much about but it is glossy and may have used pigments but I am not sure.

Many modern ink-jet papers use a microporous surface coating. These are often a nano particle coating such as Alumina. If you are not sure, take a small piece and burn it -a white or glossy brittle layer will remain because this ceramic doesn't decompose from heat. Problem with these is they let gases into the pores and these gases such as ozone, NOx, and SOx will oxidize and therefore fade most dyes. That is waht you are looking at in the test.

What about sprays to seal the pores?

What a difficult question. In theory they should help, but there can be problems with yellowing, interaction with dyes, and in the case of microporous ceraamics, the solvents can cause weakening of the binder that is used to bond the ceramic to the substrate which could eventually lead to cracking and peeling of this microporous layer.

Overall I am not a fan of microporous paper. Eventually I will try one of the swellable polymer types and see if it fairs better. Kodak seems to claim one of their's has a longer life but I do not believe 100 years. Ill try that one next .

Email me if you want me to run a test for you but I would need the test prints mailed.
 

Grandad35

Printer Master
Platinum Printer Member
Joined
Feb 24, 2005
Messages
1,669
Reaction score
182
Points
223
Location
North of Boston, USA
Printer Model
Canon i9900 (plus 5 spares)
Fadeaway,

This sounds like a very interesting test. Some questions:
1. How large is your test jar?
2. What is the biggest paper size that you can accomodate.
3. How many samples of that size can be tested in a single test?
4. Do you have a scanner that could be used to measure the color of each sample both before and after a test? This would eliminate sample-to-sample variability, and allow a good measurement of Ozone fading.
5. Have you tested the same ink/paper combination multiple times to get an idea the test's repeatablility?

I have a number of dye based inks and various types of papers and coatings that would give us some interesting ozone fading data if they all receive the same exposure to the ozone.
 

fadeaway

Getting Fingers Dirty
Joined
Oct 27, 2005
Messages
24
Reaction score
0
Points
22
Grandad35,

The jar is small, about 1 liter but there would be no problem with using a larger container, it would just take a little longer to ramp up to the same ozone level. I could probably accomodate a 12" x 12" sheet. Strips from other sheets could be pasted onto one for relative comparisons. One 12 x 12 sheet would have to be done at a time. If any of those sheets are other than microporous types it would be better to run the whole test for at least a 1/2 hour. This would allow time for the ozone to permeate down to the ink level.

I do have a scanner and I can set it for manual exposure and turn off color correction. This offers repeatability for test to test scans. As a matter of fact, I just finished scans of a paper test of Epson Premium glossy photo versus Kodak Ultima using Canon BCI-06 ink with up to 90 min Ozone exposure. The difference is shocking! I am going to post these tomorrow, or Monday. I think they will be informative.

I did a number of tests using the same paper and ink, and same test image. Repeatability looks to be very good once the container size is set. The ozone generator efficiency may be affected by relative humidity but my basement is always around 48 -54%. All other variables are for the most part fixed.

If you are able to make a test sheet and equivelant control sheet you could send them to me and I will do the test, scan them and post the results.
 

Nifty

Printer VIP
Administrator
Joined
Nov 3, 2004
Messages
3,049
Reaction score
1,410
Points
337
Location
Bay Area CA
Printer Model
CR-10, i560 ,MFC-7440N
fadeaway, just wanted to say hello and welcome to the forum. We all appreciate your offer and your experimenting for the good of the group. Grandad set a great standard for this as you can inevitably see in all his posts.

For the forum members who are not well educated on the effects of ozone (including me) could someone stick a little blurb on here about ozone and how it relates to inkjet prints? What may also be helpful is how ozone relates to / interacts with the effects of UV light.
 

fadeaway

Getting Fingers Dirty
Joined
Oct 27, 2005
Messages
24
Reaction score
0
Points
22
nifty-stuff.com et al,

Thanks for the welcome message and what an excellent question that is. I am not an expert in archival science but I will try to convey what this means for those who want to learn. Here is my stab at it:

Sources:

Ozone (O3), a molecular form of regular Oxygen (O2) is in the air all around us. It is created when UV rays from the sun strike regular O2 molecules. It has a pungent smell when concentrated and you can smell it on clothes that have been sun-dried. It is also formed in Thunderstorms (familiar smell of air after a Thunderstorm). Third, some industries emit it as a pollutant. In urban areas where there are many automobile or industry, there is more of it since the pollutants act as a catalyst with the Sun's UV rays. Summer is much worse because of poor airflow and more UV.

Oxidation -the cause of fading

Ozone is very reactive much more so than the oxygen we breathe. That is it easily gives up its oxygen to materials that always want to be oxidized. Most organic compounds crave oxygen such as Wine, Foods, and dyes, which are all organic. This is why they say you should eat lots of foods with natural dyes such as beets, blueberries, and cranberries... these natural dyes crave oxygen and they scavange reactive oxygen from your body (hence the term antioxidant). In exchange for the oxygen they scavenge, they give up their colour as they are transformed to a new compound. Now they can no longer absorb any more oxygen. It is this process that causes inkjet photos to fade. Other pollutants also accelerate oxidation in these dyes, but Ozone is the worst for our concern.


Outdoor/Vs Indoor

Outdoors, the level is almost always higher unless you have appliances that use a high voltage such as electrostatic air cleaners, or motors that generate small sparks. Typically maybe 1/3 to 1/5 as much indoors versus outdoors. A window fan blowing air in from outside will certainly push the level higher on a summer day. The difference in level is due to ozone's unstable nature. It returns to Oxygen in a relatively short amount of time (hours) and in a typical dwelling, the air exchange between outdoors and indoors is limited. If your prints are mounted in a box, the Ozone can seep in through porous material but by the time it gets inside some of it will have reverted back to oxygen so the amount inside will be even less than in your dwelling.

Ozone UV Light Interaction

UV Light is responsible for most ozone but as far as the two interacting on your print, I do not know. Based on tests I have read, it appears that the two act cumulatively although its possible that one could act as a catalyst to accelerate the effect of the other. Good question!

About my Uploaded tests:

The Ozone exposure images I have posted are from a very high level of ozone. If I were to go out on a limb, I would guess that 15 minutes at those exposure levels could equate to anywhere from 5 to 15 years of a fully air exposed print indoors. I base this on what I have seen my own unprotected inkjet prints do indoors...away from sunlight and fluorescent lights. Why so high a level for tests? Well, you can see from my "paper" test that in order to affect some very resistant papers, a very high level is needed unless one wants to spend days testing.

I hope this helps.
 

Grandad35

Printer Master
Platinum Printer Member
Joined
Feb 24, 2005
Messages
1,669
Reaction score
182
Points
223
Location
North of Boston, USA
Printer Model
Canon i9900 (plus 5 spares)
This post is meant to compliment Fadeaway's post on gas fading by giving references for UV fading. As such, it has a "FNO" warning.

This link is a good reference for various aspects of light and lighting (http://www.thekrib.com/Lights/faq.html).

This link says that UV fading damage gets progressively worse as the wavelengths get shorter and that wavelengths above about 600 nm (red, orange, yellow and green) cause little fading damage. (http://www.alpeninc.com/features/uv/). This explains why valuable paintings, etc. are usually displayed with warm (toward the red) lighting. It also says that the best lighting to accelerate fading would be rich in the shorter wavelengths. Another reference on this subject is (http://www.loc.gov/rr/scitech/mysteries/colors.html).

Sunlight contains a wide range of wavelengths (including UV) and will fade most colors, given enough time. Fortunately, a lot of the sun's radiation doesn't make it to the earth's surface, as shown in (http://en.wikipedia.org/wiki/Image:Atmospheric_absorption.png), with almost everything shorter than 250 nm being absorbed by the atmosphere. A second factor is that the sun's radiated energy starts to drop off below 470 nm, so the net result is that very little energy below 300 nm is received at the earth's surface (http://en.wikipedia.org/wiki/Image:MODIS_ATM_solar_irradiance.jpg). Combining the information given so far indicates that fading due to sunlight is mainly caused by radiation in the 300-450 nm range (UV and violet).

The following is a study done in India that measured the incidence of UV as a function of the time of day and season. Given that India is about 20 degrees closer to the equator than the US, I would expect to see a larger difference between the summer/winter results than they measured (http://www.ijdvl.com/article.asp?is...e=4;spage=198;epage=201;aulast=Balasaraswathy). This links directly to the chart that is of interest (http://www.ijdvl.com/viewimage.asp?img=ijdvl_2002_68_4_198_12512_5.jpg). Clearly, sunlight can be (and is) used as a source of energy for fading tests. This is fine if all of the samples are tested at the same time and in the same location. However, sunlight is so variable that it will be difficult to compare samples tested at different times or locations. For this reason, it would be preferable to use a fixed, predictable source of fading energy.

This link (http://wolfstone.halloweenhost.com/TechBase/blttip_BlackLightTips.html) defines the wavelengths that are emitted by two special fluorescent bulbs (as well as a lot of good background information on UV):
Black Light 345-400 nm
Sun Tanning 315-345

An interesting point is that fluorescent bulbs all generate UV inside the tube, and that the coatings on the inside of the tubes "fluoresce" when they are hit with the UV, converting it into visible light. This is what happens with a "Black Light" - the wavelength of the black light is shorter than we can see, but it is converted to visible light when it falls on certain materials and fluoresces. In any case, it is possible to use many types of coatings on these bulbs to create many types of light.

I bought a small "Black light" (18" long tube) and measured the light spectrum shown on the left in the image below. The chart on the right shows a conventional fluorescent light and a spiral fluorescent light that replaces a conventional tungsten light for reference.
FluorescentLighting.jpg


There are a number of similar charts for other types of lighting given in (http://www.nifty-stuff.com/forum/viewtopic.php?id=455&p=2)

These charts show the wavelengths where the energy is concentrated, but they do not tell us anything about the height of the energy peaks. To fill in this gap in our information, the following chart gives the relative energy at 420, 400 and 380 nm (the shortest wavelength reported by my spectro).. These numbers give an idea of the magnitude of each type of radiation as well as an indication of whether it is getting stronger or weaker as the wavelength gets shorter (further into the UV spectrum).
60 49 24 Direct morning sunlight through a window
0.14 0.08 0.06 Morning sunlight reflected off wall
0.22 0.14 0.08 Morning sunlight reflected off white ceiling
1.1 7.9 0.5 6" away from spiral fluorescent bulb
4.7 6.0 0.8 6" away from 18" long fluorescent bulb
1.3 0.7 0.3 6" away from tungsten bulb
3.6 2.3 0.9 12" away from 300 watt halogen light
9.5 7.7 3.2 Afternoon light through window in the shade
2.7 2.1 0.8 Afternoon light through window under overcast sky
0.8 5.4 25.8 12" away from black light
1.2 10.7 51.2 6" away from black light

This information is far from the definitive definition on this subject, but it shows (along with the charts given on the previous post listed above):
1. Sunlight has far more energy at the shorter wavelengths than fluorescent or tungsten lights.
2. Different types of fluorescent lights emit energy at different wavelengths, so the type of bulb must be specified when defining a test protocol.
3. Sunlight that is reflected from a wall or ceiling has far less UV than sunlight.
4. Sunlight has about 100 times as much UV as artificial lighting.
5. A window in the shade receives far less UV than direct sunlight, but far more than artificial lighting.
6. A "Black Light" emits about as much UV as sunlight at 380 nm, and the trend is that it will emits far more at shorter wavelengths.
7. The distance from a black light bulb has a direct relationship to the energy level that was measured. Wrapping the photo directly around the light bulb should increase the energy level by at least an additional factor of five over the 6" results.

In summary:
1. Most fading damage is caused by the shorter wavelengths, especially UV.
2. It appears that the wavelengths in sunlight responsible for fading are mainly in the 300-450 nm range.
3. The strength of UV in sunlight varies widely with the time of day, season of the year and latitude.
4. A Black Light or "Sun Tanning bulb" should provide a controlled radiation source that contains more "fade-ability" than even direct sunlight, and will provide it reliably for 24 hours/day. This should allow the tests to be further accelerated over sunlight tests while maintaining reproducible test conditions.
 

Nifty

Printer VIP
Administrator
Joined
Nov 3, 2004
Messages
3,049
Reaction score
1,410
Points
337
Location
Bay Area CA
Printer Model
CR-10, i560 ,MFC-7440N
Wow, great information guys! Thanks so much!

fadeaway, I especially liked your comments regarding "Oxidation -the cause of fading". I've never read anything about this before, but know that my wife has been getting into the whole "antioxidant" craze. Now a lot of this makes sense. This morning when I went to the fridge to get a drink I saw some Welches Concord Grape Juice. I remembered all of the commercials for this stuff and that it is full of antioxidants. Now I see the correlation with this dark and very staining juice and the whole antioxidant thing.

Thanks guys for your posts!
 

JV

Getting Fingers Dirty
Joined
Apr 23, 2005
Messages
91
Reaction score
0
Points
29
It would be desirable to develop a standard fading test setup using the black fluorescent lights presented by Grandad in Post #6. I will look at existing fading test setups and report back.

JV
 

fadeaway

Getting Fingers Dirty
Joined
Oct 27, 2005
Messages
24
Reaction score
0
Points
22
JV,

I own a compact fluorescent 13 watt Black Light Noma Brand. It emits plenty of UVA and will make many organic materials and all materials treated with whiteners fluoresce even from some distance. It does not only have a violet filter (glass is violet coloured) but also a phosphor that emits in the UVA region. A couple of weeks ago I performed a fade test with BCI 6 inks and microporous paper by wrapping the print around the circumference. I left this for 12 hours burning. After the test I could not discern visually, any degree of fading between the masked and unmasked regions.

I ran a similar test with a Philips Marathon CFL of the same size, form and wattage. This is a white light emitter rated 900 lumens and a 2700K colour temperature. The difference is that I ran this test for 66 hrs. The result was a visually obvious fading. Oddly enough the elastic that I used to hold the print had broken and had many cracks in it -a sign of UV damage. The fading did not occur in a masked area. BTW the CFL white emitter at the position of the print was producing a light output greater than noon day sun confirmed by my light meter.

Now the difference in duration is unfair but since the UV lamp should be emitting somewhere in the order of atleast 20x and maybe as much as 50x the UV, UV fading should have been apparent after 3.5 hrs of exposure. This reason is a complete mystery to me. If you have a CFL black light or other, give it a try. I would like to see some confirmation. Is there sometihng else going on? Are other spectrums of light needed as well?
 
Top