Epson Workforce 610 From Bad to Worse

LOTL

Getting Fingers Dirty
Joined
Nov 9, 2009
Messages
15
Reaction score
0
Points
22
Hi All,
I have been using refillable cartridges and ink from Precision colors for my Epson Workforce 610 printer for about 2 years.
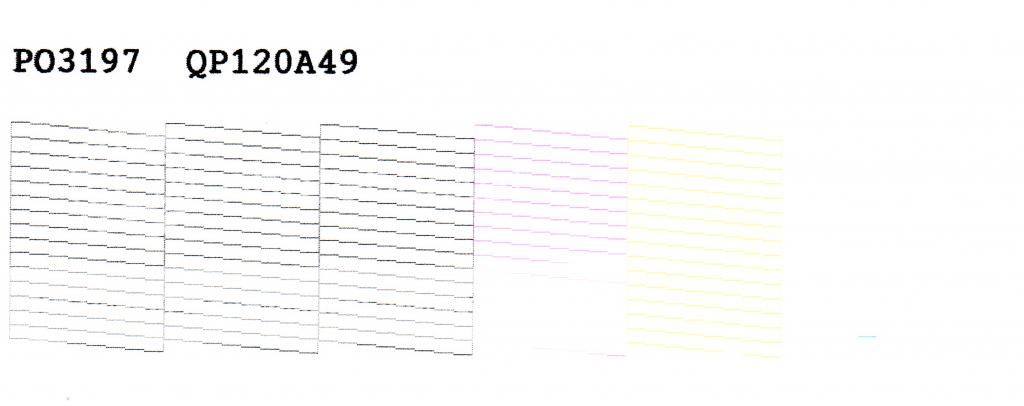
Recently my black cartridge ran out completely and the Magenta ran low but not out.

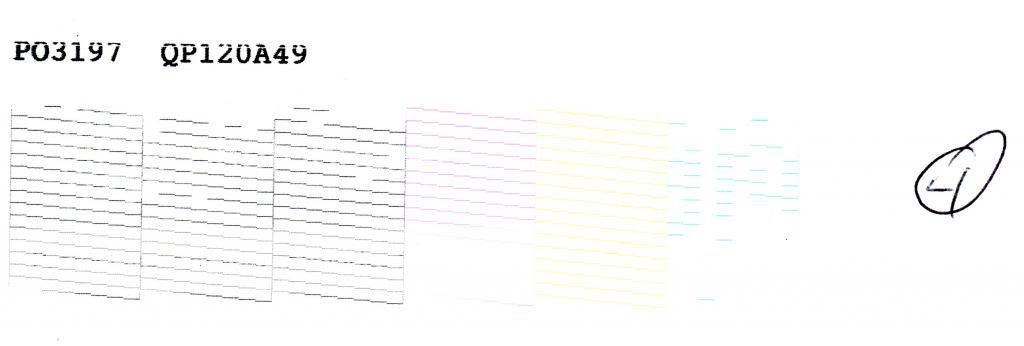
The black patterns on the nozzle check were not complete and the Magenta was missing the bottom 1/2. The other 2 colors looked good.
I ran 4 head cleanings back to back with nozzle checks between each one. The Black and Magenta never improved.
I waited 12 hours and repeated this process, still with no improvement.

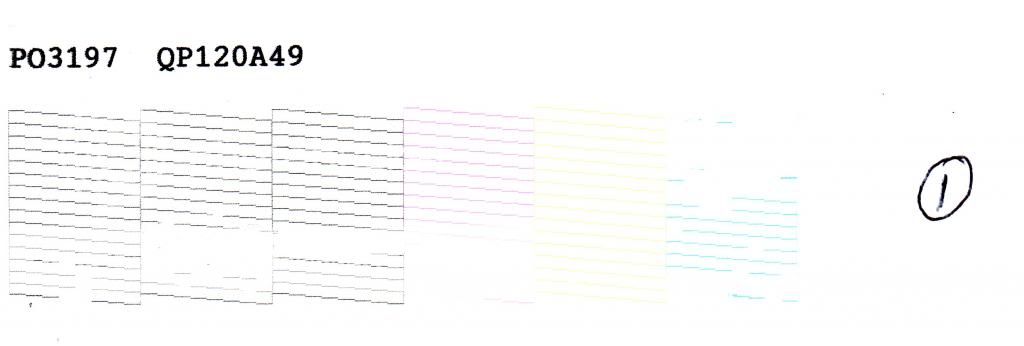
It was then suggested to me by Precision Colors to saturate the pads with Windex and let sit overnight. The next morning i ran a nozzle check and the black patterns looked great, but 1/2 the magenta was still missing.

It was also suggested to me to inject ink into the cartridges if any of them had run dry and the round reservoir was empty. It was recommended to do this with the cartridges empty. I had just refilled them all and the round reservoirs all had some ink in them, so i skipped that step.

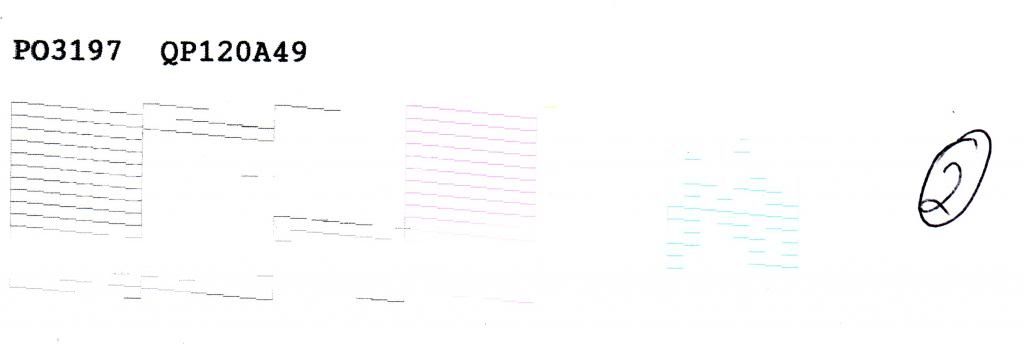
I ran another 4 head cleanings and the Magenta started to show some very slight improvement. I decided to repeat the Windex treatment and let it sit overnight again. The next morning when i ran a nozzle check, the Magenta was the same, the Cyan was completely missing and the yellow was just barely showing. Ran a couple of Head cleanings with no improvement.

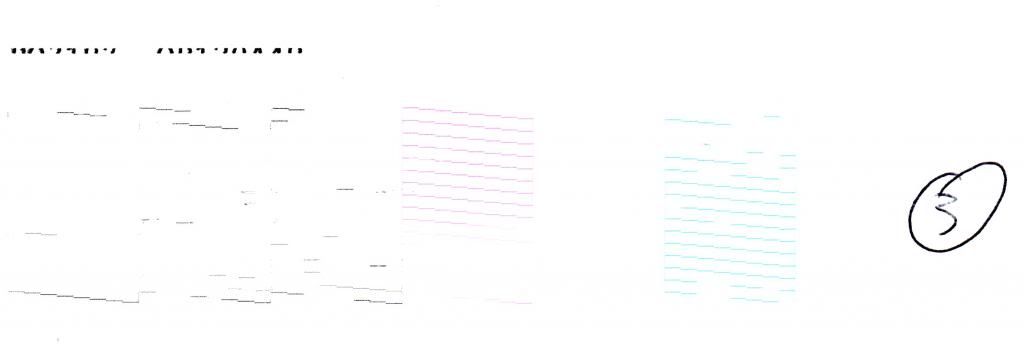
So unfortunately it seems i have made matters much worse. The black patterns still look good, but the colors are a mess.
Any suggestions on a next step? Is there a way to remove the print heads and do a more thorough cleaning?
 

mikling

Printer VIP
Platinum Printer Member
Joined
Jul 2, 2006
Messages
3,239
Reaction score
1,471
Points
313
Location
Toronto, Canada
Start from square one again. Make sure that all the cartridges are properly primed and refilled. The put them in and perform a head clean to bring the ink into the printheads. Since you had the colors coming out, nothing with what you did in restoring the black would have caused the colors to go off, unless the color cartridges themselves were in need of ink. So take a deep breath, go slowly, do them all over again and you should be good. The procedure for the black would be identical to all the other channels.
 

LOTL

Getting Fingers Dirty
Joined
Nov 9, 2009
Messages
15
Reaction score
0
Points
22
mikling,
Are you suggesting i empty the color cartridges and prime them per your instructions. Just for the record, what restored the black pattern was the use of the windex. I also saturated the color pad to try and restore the Magenta whos pattern was 1/2 missing. It was after the 2nd time that i did this with the windex on the color pad, that i lost the other 2 colors.

Im willing to do whatever it takes at this point, but just want to make sure i understand the procedures you are suggesting it take.

Is it most likely air in the cartridge or print heads that is causing the issue now?

Thanks
 

mikling

Printer VIP
Platinum Printer Member
Joined
Jul 2, 2006
Messages
3,239
Reaction score
1,471
Points
313
Location
Toronto, Canada
Do note that for stubborn clogs, repetition and patience is critical in success. It took me about 10 consecutive days to clear an Artisan 835. With about 1-2 attempts per day. If the nozzles were not clogged initially, nothing that was done would cause them to clog. So by priming each one properly, you eliminate the possibility of air and then work on dissolving the clog using patience and your prior method. Now if the soak does not reach the head, you will need to build up a soak pad arrangement. Seeing it reached the black that might not be necessary. Persistence and patience now. I would defer from pressure on the printhead for newer Epson printheads. They simply are not as overbuilt as they were years ago...you only go there as the last resort now.
 

LOTL

Getting Fingers Dirty
Joined
Nov 9, 2009
Messages
15
Reaction score
0
Points
22
mikling said:
So by priming each one properly, you eliminate the possibility of air and then work on dissolving the clog using patience and your prior method.
Would you let me know if my previous question is the way to proceed. It sounds like you want me to prime the 3 color cartridges to eliminate air being an issue.

Should i drain all 3 color cartridges of ink and then fill per your instructions?

Thanks
 

mikling

Printer VIP
Platinum Printer Member
Joined
Jul 2, 2006
Messages
3,239
Reaction score
1,471
Points
313
Location
Toronto, Canada
Yes, make sure the cartridges are in good shape to remove any possibilities as to the problem being there. That is always the way to diagnose and resolve problems. Always eliminate possibilities and work from there.

When repriming you need to remove as much ink as you will be putting in during the prime or else you will face an overflow when you put in the new ink. Safest is to remove till the cart is near empty.
 

LOTL

Getting Fingers Dirty
Joined
Nov 9, 2009
Messages
15
Reaction score
0
Points
22
Ok sucked all the ink out of the color cartridges. I then drew up 4 ml of ink into the syringe. With both plugs removed from the top of the cartridge and the needle removed from the syringe i filled the cartridge from the bottom port.
I could still see some air bubbles inside the cartridge after doing this.

I put all 3 color cartridges back in, ran 2 head cleanings back to back and still no improvement. Magenta is still 1/2 missing, yellow is faint but almost full and the Cyan is missing completely with the exception of a very small line.
See nozzle check image below. It seems to me that the using the Windex on the color pad is what caused this issue in the first place. Hard to believe that the black patterns were all missing segments and the Windex trick brought them back, but at the same time all 3 colors got messed up.

The reservoirs that the colored plugs go into when removing and installing the cartridges are all empty. I cant remember if they have always been that way or not. Im ready to try what ever step i should take next. I inserted the original factory cartridges and ran a nozzle check with them. The nozzle check looked the same. So it seems the issue to me is with the heads and not the cartridges?

NozzleCheck1_zpsc3940287.jpg
 

mikling

Printer VIP
Platinum Printer Member
Joined
Jul 2, 2006
Messages
3,239
Reaction score
1,471
Points
313
Location
Toronto, Canada
Put two plugs on all the cartridges except the cyan and magenta and then do a head clean and a nozzle check about three times and see if there is any progress. For the Cyan, remove both plugs. When you completely seal the cartridges with two plugs the head cleaning is then concentrated on the cartridges with the ability to allow air in. So you get stronger forces onto the cyan and magenta. It is important to keep a numbered record of the nozzle checks to inspect carefully what progress is being made. After the tests, put the normal amt of plugs back on the cartridges.

I can tell by what I see on the magenta, you have dried clogs on the nozzles.
 

LOTL

Getting Fingers Dirty
Joined
Nov 9, 2009
Messages
15
Reaction score
0
Points
22
mikling,
How many head cleans can you do in one day? Manual says 4. What happens if you exceed this or do a ton of head cleanings like i have done in the past week? Will i need to clean or replace the waste ink pad. I can try this tonight, but im wondering if you would recommend waiting till tomorrow.

Thanks
 

LOTL

Getting Fingers Dirty
Joined
Nov 9, 2009
Messages
15
Reaction score
0
Points
22
Ok so here are 4 scans of the nozzle checks. 1 through 3 were taken back to back after doing the nozzle cleanings as you suggested. I did not change any of the plugs when doing the nozzle checks.
Seeing as how the black got bad again, i pulled all of the plugs except the ones that are there during normal operation and ran a 4th head cleaning and another nozzle check.
Let me know if you think i should repeat this procedure tomorrow or try something else.

Thanks

NozzleCheck2_zps48093d34.jpg


NozzleCheck1_zpsc10e9544.jpg


NozzleCheck3_zps6efdd1b7.jpg


NozzleCheck4_zps6036051e.jpg
 
Top