Dual two color embed into an embossed / embedded text in a 3D Print?

Nifty

Printer VIP
Administrator
Joined
Nov 3, 2004
Messages
3,046
Reaction score
1,405
Points
337
Location
Bay Area CA
Printer Model
CR-10, i560 ,MFC-7440N
I've been enjoying customizing prints in Tinkercad by adding some text as a "hole". I'd really like it to stand out more... maybe inserting color into the lowered / embossed text.

For example, this print below: I'd like to make the text stand out by putting some ink or coloring into the recessed holes. What's the easiest & fastest way to do this?

I'm trying to minimize effort. If it was wood or metal, I could just paint the whole thing and then sand or wipe off the excess... but that's not really an option here, right?

Oh, I just had an idea! What if I paused the print, used a big permanent marker (or similar) and marked the area, then restarted the print?

Any other ideas on how to add some contrast to the inset lettering?

upload_2018-4-10_14-34-27.png
 

Nifty

Printer VIP
Administrator
Joined
Nov 3, 2004
Messages
3,046
Reaction score
1,405
Points
337
Location
Bay Area CA
Printer Model
CR-10, i560 ,MFC-7440N
Wow, interesting idea at the 3 minute mark! Use a syringe (which I have from my inkjet stuff) and inject paint into the recesses!


Nifty

Printer VIP
Administrator
Joined
Nov 3, 2004
Messages
3,046
Reaction score
1,405
Points
337
Location
Bay Area CA
Printer Model
CR-10, i560 ,MFC-7440N
BTW, I know that I can also do raised lettering, pause the print at the top of the lettering, and print another color... but that's even more effort than I want to put into this.

Another option would be something like the video below. The problem is that I'd have no idea at which point I should start / stop coloring the filament... and this is even more tricky when the extruder is so far from the printhead & nozzle.


PeterBJ

Printer VIP
Platinum Printer Member
Joined
Nov 27, 2010
Messages
5,055
Reaction score
4,896
Points
373
Location
Copenhagen Denmark
Printer Model
Canon MP990
The ink in a CD marker sticks to many kinds of plastic. You could try colouring the lettering with a such marker pen.

Depending on the plastic used a solvent based paint might stick well to the plastic.

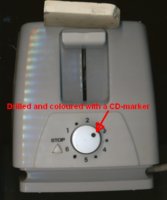
I have a toaster that had no clear marking on the timer knob. I made an indentation using a drill and coloured it using a CD marker.

Here is the toaster, click to enlarge:

Toaster.jpg
 

The Hat

Printer VIP
Platinum Printer Member
Joined
Jan 18, 2010
Messages
15,618
Reaction score
8,691
Points
453
Location
Residing in Wicklow Ireland
Printer Model
Canon/3D, CR-10, CR-10S, KP-3
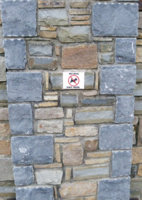
I prefer to use raised lettering to get the best effects, plus it make a better statement...
Dogs.jpg click to enlarge..
 

Redbrickman

Printer Master
Joined
Dec 27, 2010
Messages
1,102
Reaction score
1,184
Points
293
Location
UK
Printer Model
MB5150
That syringe technique is brilliant! In my younger days I did some emgraving on metal and filled the lettering with special coloured waxes that you melted into the letters then buffed off the excess.

This article explains how it can be used and you can get coloured sticks now that work without melting

https://markforged.com/blog/engraver-filler-labeling/
 

PeterBJ

Printer VIP
Platinum Printer Member
Joined
Nov 27, 2010
Messages
5,055
Reaction score
4,896
Points
373
Location
Copenhagen Denmark
Printer Model
Canon MP990
By coincidence I have also used a "Markal B Paintstick" to fill engravings. The marking stick is intended for marking onto all kind of surfaces in the industry. This morning after having scanned one toaster for my first post in this thread I took a look at my other toaster that had lost the timing marks which were silk screened onto the timing knob skirt. Using a Dremel and the tool at the left I made some new marks and filled them with the paint stick and wiped off excess paint just as shown in the video. As I repaired the marking of the timing knob this morning I cannot tell how durable the paint will be.

Here is a scan, to scan a flatbed toaster you of course need a flatbed scanner ;)

Toaster2.jpg
 

Nifty

Printer VIP
Administrator
Joined
Nov 3, 2004
Messages
3,046
Reaction score
1,405
Points
337
Location
Bay Area CA
Printer Model
CR-10, i560 ,MFC-7440N
By coincidence I have also used a "Markal B Paintstick" to fill engravings

Interesting! I've heard of similar with people melting crayons into recessed / engravings!

My only issue is that the print needs to be SUPER smooth for this to work in a way that wax doesn't get into the other print lines.
 

The Hat

Printer VIP
Platinum Printer Member
Joined
Jan 18, 2010
Messages
15,618
Reaction score
8,691
Points
453
Location
Residing in Wicklow Ireland
Printer Model
Canon/3D, CR-10, CR-10S, KP-3
Top