Canon Pro-10S, Cyan is printing in my Chroma Optimizer (CO) on the nozzle check test pattern. Can someone explain what the problem is?

Dighini

Printing Apprentice
Joined
May 2, 2022
Messages
7
Reaction score
1
Points
13
Printer Model
Canon Pixma Pro 10S
Print Pattern.jpg
 

Dighini

Printing Apprentice
Joined
May 2, 2022
Messages
7
Reaction score
1
Points
13
Printer Model
Canon Pixma Pro 10S
A bit of background. I am refilling my canon original ink cartridges with non-canon ink. My ink bottles have been standing for a couple of years. Could the pigments be flocculating and blocking the print nozzle or does the problem lie somewhere else?

I am an industrial paint inspector but I am not very knowledgeable about dyes and printing.

Best regards
Derek
 

The Hat

Printer VIP
Platinum Printer Member
Joined
Jan 18, 2010
Messages
15,618
Reaction score
8,691
Points
453
Location
Residing in Wicklow Ireland
Printer Model
Canon/3D, CR-10, CR-10S, KP-3
I am an industrial paint inspector but I am not very knowledgeable about dyes and printing.
I have no idea as of yet, but your answer above might be the issue, are you using dye or pigment inks in your cartridges.. ? ?
 

palombian

Printer Master
Joined
Feb 4, 2014
Messages
1,869
Reaction score
2,244
Points
297
Location
Belgium
Printer Model
PRO10,PRO9500II,MB5150,MG8250
Never seen that.
Seems Cyan ink contaminates the CO channel. It looks like partly clogged too.
How does the outlet maze of the CO cart looks like ?
If not blank replace.
What kind of CO do you use (most 3th party are rather poor IMO), maybe you should try an OEM one.

I would start by rinsing the parking pads (the rubber cups at the right where the printhead rests).
You don't need to disassemble the printer, just position the printhead in the middle as for changing ink, and spray some deminarized water (a used for ironing) with a syringe on the pads (they are of ceramic material).
Close the lid and wait until the whirring stops, shut down and restart the printer and verify if all the water has disappeared.
Repeat a few times, you should see the pads becoming white.

PS: check all your carts, in particular the cyan, for leaks, and clean the printhead around the ink inlets.
Maybe you made a mess when refilling.
Carts should be clean when reinserted.
When they leak there is air in it, this should not happen, there are posts how to solve this.
 
Last edited:

websnail

Printer VIP
Platinum Printer Member
Joined
Oct 27, 2005
Messages
3,661
Reaction score
1,345
Points
337
Location
South Yorks, UK
Printer Model
Epson, Canon, HP... A "few"
One other thing to try... Remove all cartridges and cap them. Check the outlet of the PGI-72CO cartridge for any sign of cyan (or anything other than clear fluid).

Next, remove the printhead, soak a piece of folded kitchen towel with either a cleaning solution or distilled/deionised water (definitely NOT tap water). Then gently press the printhead down into the kitchen towel such that the content of the printhead channels is forced back to the inlet mesh. Pay particular attention to the Cyan and CO channels. Is there any sign of Cyan coming through the CO channel.

Assuming there is, use a cotton-bud/Q-tip to mop up the CO channel then move the printhead to another clear (but soaked) part of the kitchen towel and repeat with the mop up operation. Repeat the move, press, soak up routine until the CO channel is completely clear.

Once you're happy that it's all clear, reinstall the printhead and the cartridges then allow the printer to do a single priming routine. Print a nozzle check and cross your fingers...

If the cross contamination is still as bad as your original photo I'd suspect there's a leak between the cyan and the CO channel internally. If it's considerably lower than previously you may want to print off a load of scrap images, particularly glossy type with CO coverage turned to full and see if the prints start to improve without and cyan tint... If they don't I'd say it's time to change the printhead...

This assumes that you haven't found that there was a leak in the cartridge bay that was allowing drops of ink to seep across to the CO bay and get soaked up into the CO cartridge.
 

Artur5

Printer Master
Joined
Jan 24, 2011
Messages
1,294
Reaction score
1,618
Points
278
Location
Kmt. 0.
Printer Model
MB5150,Pro10s,i3Mk3s+,Voron2.4
The previous printhead of my Pro-10s started to show cyan in the CO band of the nozzle checks a few months before error B200 popped in and I had to replace the printhead. It wasn't as evident as in Dighini's example but quite noticeable all the same. Usually a cleaning cycle fixed the contamination for a while and it didn't reappear unless the printer was idle for at least a week. Printing every other day seemed to keep it free from trouble.
At first I suspected the carts, but soon I discarded the idea because there wasn't any cyan color on the sponges of my two CO carts. No problem with the resting pad either, so it had to be internal leaking between the cyan and CO channels.
The new printhead has been working OK for several months (crossing fingers). That means that the Chroma optimizer carts are OK. and the problem was the old printhead. Nevertheless, the puzzling fact is that after replacing the printhead when error B200 blocked the printer, I disassembled the old printhead and found nothing wrong with the rubber gasket sealing the different ink channels. I have no idea how the cyan ink could find his way into the CO line. I have no idea either if the contamination issue was related to the fatal error B200 that appeared later.
 
Last edited:

palombian

Printer Master
Joined
Feb 4, 2014
Messages
1,869
Reaction score
2,244
Points
297
Location
Belgium
Printer Model
PRO10,PRO9500II,MB5150,MG8250
The previous printhead of my Pro-10s started to show cyan in the CO band of the nozzle checks a few months before error B200 popped in and I had to replace the printhead. It wasn't as evident as in Dighini's example but quite noticeable all the same. Usually a cleaning cycle fixed the contamination for a while and it didn't reappear unless the printer was idle for at least a week. Printing every other day seemed to keep it free from trouble.
At first I suspected the carts, but soon I discarded the idea because there wasn't any cyan color on the sponges of my two CO carts. No problem with the resting pad either, so it had to be internal leaking between the cyan and CO channels.
The new printhead has been working OK for several months (crossing fingers). That means that the Chroma optimizer carts are OK. and the problem was the old printhead. Nevertheless, the puzzling fact is that after replacing the printhead when error B200 blocked the printer, I disassembled the old printhead and found nothing wrong with the rubber gasket sealing the different ink channels. I have no idea how the cyan ink could find his way into the CO line. I have no idea either if the contamination issue was related to the fatal error B200 that appeared later.
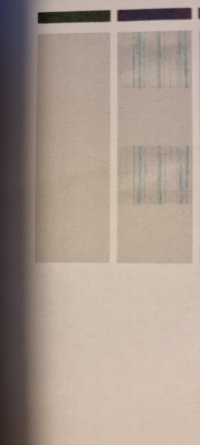
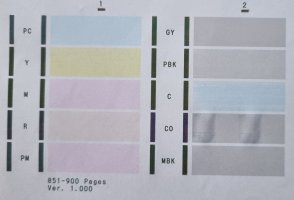
Very interesting observation, @Artur5, could be added to the PRO-10 geriatric symptoms list.

Just guessing: if it isn't an internal leak (although probably since the colours are adjacent) the only other explanation is migration via the purge pad. But in this case it would rather be a mix of colours.
I never had any evidence a pressure difference in the carts could cause contamination in PRO-10 type printers as it does in the Maxify where the most "dominant" - often the last refilled - infects all others.
But if it disappears or doesn't occur with frequent printing this could be an argument.
 
Last edited:

Dighini

Printing Apprentice
Joined
May 2, 2022
Messages
7
Reaction score
1
Points
13
Printer Model
Canon Pixma Pro 10S
Thanks, guys,

My feelings are that there may be cross-contamination between the cyan and the CO. I did a partial clean of the print head by flushing it with de-min water then fitted new C and CO cartridges. I performed a nozzle clean cycle and a test print. The results were much better (attached) but there was still cyan in the CO.

So, I protected the contacts on the tray with low tack non residue leaving masking tape then made a dam with electrical tape and filled it with the print head hospital. The cleaning solution has been slowly filtering through the print head for about 20 hours. I do not know if this will cure the problem problems but I thought it was worth a go. I did this before reading Websnail's recommendation. Apologies.

I do not think that there is back pressure in the cyan channel as the cyan on the test pattern looks to my eye as it should be.

I will let you know the results when I de-min the tray and perform another test print.

Oh, Artur thank you for your insight on having a similar problem.
 

Attachments

  • 20221218_135422.jpg
    20221218_135422.jpg
    32.5 KB · Views: 85
  • 20221218_135433.jpg
    20221218_135433.jpg
    75.9 KB · Views: 88
  • 20221218_135451.jpg
    20221218_135451.jpg
    55.3 KB · Views: 84
  • 20221218_142607.jpg
    20221218_142607.jpg
    67.2 KB · Views: 103

Dighini

Printing Apprentice
Joined
May 2, 2022
Messages
7
Reaction score
1
Points
13
Printer Model
Canon Pixma Pro 10S
I did as Websnail suggested and looked to see if there were any traces of C in the CO when dabbing the print head into a damp kitchen paper. I could not see any C in the CO. Which should mean that there is no internal leakage in the printhead.

After soaking the print head in cleaner, then printing and running a few cleaning cycles I now have only a trace of C in the CO but the C has banding.

I am going to try leaving the print head in the cleaner for another 24 hours to de-clog the C.

I have isopropyl alcohol coming today. Does anyone have a good recipe to make print head cleaner?
 

Attachments

  • 20221220_131513.jpg
    20221220_131513.jpg
    100.7 KB · Views: 169

PeterBJ

Printer VIP
Platinum Printer Member
Joined
Nov 27, 2010
Messages
5,055
Reaction score
4,896
Points
373
Location
Copenhagen Denmark
Printer Model
Canon MP990
Pharmacist's cleaning solution is a good printhead cleaner that has been used with success by more members.

A metric drop is 0.05 ml. so 20 drops equals 1 ml. Instead of counting drops you can measure the ammonia using a small syringe.

Do not exceed the 1% ammonia content in the cleaning solution. Too much ammonia makes the solution very aggressive. See this.
 

Latest posts

Top