Trigger 37
Printer Guru
- Joined
- Dec 23, 2006
- Messages
- 607
- Reaction score
- 4
- Points
- 136
I'm posting this story so that it may help others with similar problems that this person had with his printer. He is not a registered poster and initially contacted me via email address. To be accurate in this note I have used his emails where it can help explain the problem. I will also use the photos that he took and sent to me as an aid in diagnosing his problem and coming up with the solution. His name is Peter and I will use this to seperate the back and forth communications we had to get this printer fixed.
Peter---09-12-08
Hi Trigger
Let me bore you with my saga.
I have an i9950 which is the problem. (Also have a pixma i6000D).
I have been using generic inks for 18 months and the head ( for whatever reason) has blocked up. I took it apart, cleaned it but it was not completely successful. Next was a purchase of a new head from Precision Roller in the US. (I am in Australia). The new print head refused to print M, C and Y. They sent me a replacement, this had the same problem. I took the printer to a service place where they pronounced sanctimoniously that I was using non-genuine inks, so the head was not guaranteed; and by the way they wanted to change the purge unit and adjust something with the rollers - $550. I said no thanks and brought the printer home. Turned it on and got 8 consecutive amber flashes between greens. I have reset the EEPROM and the flashes have disappeared. (Since I wrote to you yesterday). I am not a forum participant, just read, so I saw your comment to the person before me and posted a message. Then I worked it out that I can email you directly.
Do you have any suggestions? A manual would be useful but more so for the i6000D.
Cheers, Peter
Trigger--09-12-08
Peter,
That is some "Saga" you had to endure. However, I think I know what went wrong to begin with. Originally the Printhead looked bad and all attempts to clean it did not work, at least the ones you knew about. Then you took the head apart hoping you could fix it, and of course it would never work again. Now you purchased a new head which was a good thing to do but you couldn't get it to work either. Even with a 2nd head. Then you got the bad news from the repair shop.
I've seen this happen in a similar way to all kinds of Canon printers. The problem is like a run away train. First a clog starts in some color because of lack of use, or the type of prints you were making didn't evenly use up the inks. So a clog begins. The clog prevents the "Purge Unit" from successfully sucking ink. These units typically have separate suction pads for colors and black. Without sufficient ink the purge unit can become clogged and then everything will stop. The Purge unit can fail in about 37 ways and this stops all suction of ink into the printhead. Without the suction, the printhead heats up what ink is left and soon it can get totally dried up and clogged. Now if you put in a brand new printhead and the purge unit is still not working, you will get exactly the same results. It is not a bad printhead, it is that you are getting the same action from the old Purge unit. I will bet you can still fix you iP9950, that is if you still have the good head.
One of the steps in my Repair Manuals is to take out the Purge unit from the printer and to clean, inspect, and repair where possible. On the ones that I have fixed, 9 out of 10 of them were simple problems and once the unit was cleaned and tested the problem was resolved. The one that was broken had to be replace, but those parts can be ordered directly from Canon Parts Department and shipped to you.
I do not have a Repair Manual for the iP9950 because I have never had one of those printers. All of my Manuals are written directly from my efforts to repair an existing unit.
As far as the iP6000D, I have not done that printer either, but I have the Service Manuals and the Parts Catalog for it plus all the other documentation. I do have the Canon iP6600D and the iP5000, & iP4200. In looking at the internal drawings and parts, the iP6000D is much closer to the iP5000 once you have the covers off and need to disassemble the rest of the printer including the Purge unit. The Service Manual and the Parts Catalog for the iP6000D show in some detail how to get the covers off and the basic concept on how to take things apart. However, there are no detailed pictures or step by step instructions and detailed digital pictures as my Repair Manuals typically have.
I will be happy to work with you and provide whatever manuals you require. I doubt if I will ever get my hands on the iP6000D as I am not buying anymore printers at this time. I already have over 50 and my wife will divorce me if I get one more printer. I believe we can put together a set of documents, instructions, and pictures that will help you do the repair you need to do, If you can't get the parts in Australia, I can order them here and ship them to you. I get all my parts directly from Canon, since this is the lowest possible price and without any overhead markup. Everything you buy on the internet has been marked up in price.
Let me know what you want to do......Trigger
Peter---09-13-08
Hi Trigger
Thanks for the reply.I still have both new print heads and the one I took apart. The latter is actually sort of working. Magenta is the only problem now. It sounds like the purge unit is a good start. Where do we go from here?
Cheers,...Peter
Trigger,--09-13-08
Peter,
The printer you need to fix the most is the i9950, which is a very expensive printer. That is why the repair shop wanted to dig into your pockets. The key to fixing this printer is 3 parts.
Part 1 is getting the covers off without breaking one of them. Part 2 is getting the main printer asm out of the base. Part 3. is getting the Purge unit out of the main printer asm and then cleaning it and testing it.
To purchase any manual from me, you need a PayPal account or you can send me a Money order or Cashiers check. Once those are verified I can send you the CD with all the information. As I indicated before, this will effectively be more than one manual on the CD just to give you sufficient information to get the job done. I am hoping that the iP9950 is not that much different from the iP9000, especially for the removal of the covers. Once the covers are off, I am confident that my standard repair manual will show you how to get the main printer asm out of the case. Once that is done we will work together on the internet to get the Purge Unit removed. Once it is removed, again my standard manual will explain how to clean and test the purge unit. Once the printer is down to this level, you will also be able to remove and clean all of the waste ink pads. The final big step will be to re-assemble just enough of the printer so we can test everything and visually see what is going on with the Purge unit cycle, the printhead, and the cleaning action. This can only be done while the entire printer is disassembled and sitting on some temporary blocks.
Trigger
Peter,...09-15-08
Hi trigger
Attached is the scan from the brand new head. The left column is perfectly uniform and is what I would expect. The second brand new head shows the same pattern. The 6C, 6M, 6Y patches are clean white paper, not a mark. When I had put the old head back, I got patchy (streaky) colours from all 8 inks. Dont have the printout anymore. I will scan some service test prints & EEPROM data to you soon. Yust paid your invoice worst possible exchange rate in months .Got U$0.80 for A$1.00. A week ago it was 0.96. Never mind, no big deal.
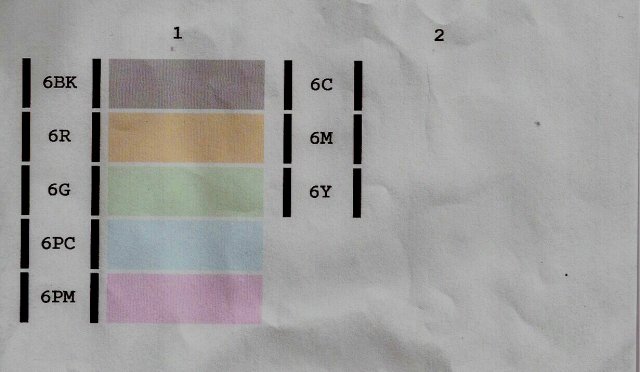
Cheers, ..Peter
Trigger,.. 09-27-08 (to make this story much shorter I have eliminate non-essential information and only added what would help)
Peter, Those are some great pictures. OK, from the information you have provided and the pictures, this printer insides looks Identical to the i960 mechanism so that is the unit I will use. Some of the screw position are different than the i960 but the pictures you sent seem to be sufficient.
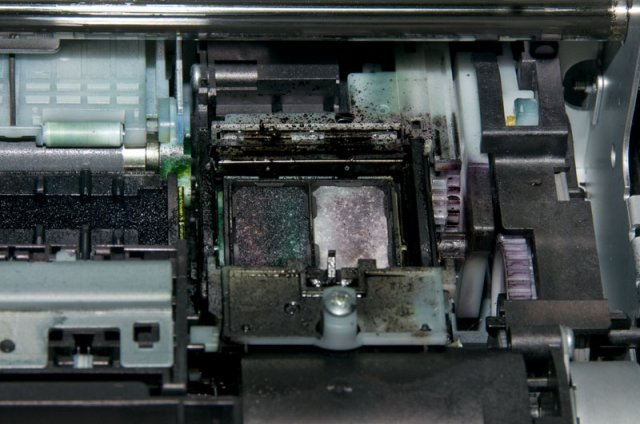
From the information you provided and the pictures, it appears that one of the suction tubes for the right side pad has come loose. The purge unit can not suck any ink out of the ink carts and down into the printhead for the C<M<Y because the tube is open or loose, or clogged. What is strange is that the right pad is clean and has not ink stains. It should be "Black" with ink. It pulls ink from the C,M,Y, and the combination of those three inks equal "BLACK". It is clearly not sucking any ink and if there is no suction the printhead can not get primed and therefore it can not print. I would not do anything else with the printer until you take it apart and take out the purge unit and check the tubes.
Rather than wait for snail mail, I sent all of the large (15MB) files directly to Peter over the Internet. Peter was able to get the printer apart and examine the insides. The picture below shows the ink pads and you can clealy see that the right side pad is still white which means no ink ever passed through it from the printhead. This had to be a Purge unit problem.
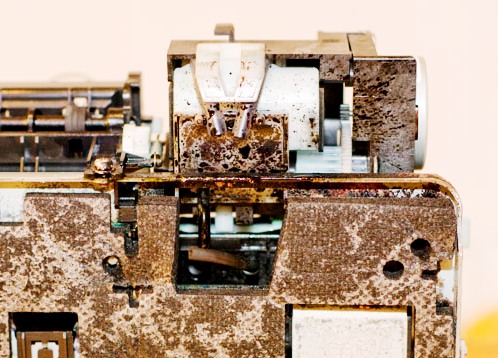
This next picture shows the bottom of the printer and I have cropped his initial picture and increased the closeup so you can see that the right pad hose is disconnected.
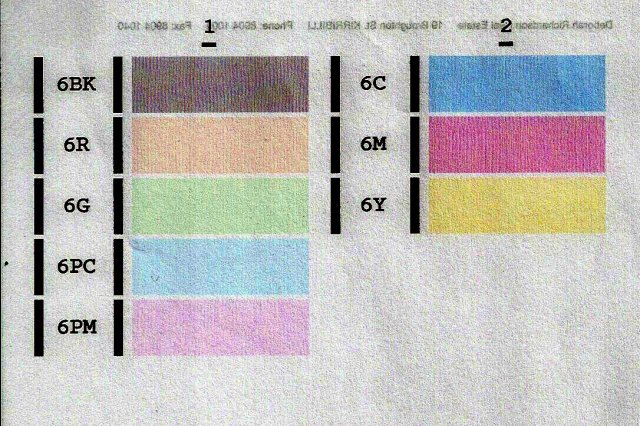
Once this pipe was re-connected and the rest of the printer was cleaned, Peter sent me a new Nozzle check print to show that the printer is now working perfect.
A key point to this note is that Peter would have never been able to see the disconnected purge unit hose. Getting the printer competely apart is the only way to fix something like this. Peter has his printer back working and will be able to keep it working for a long time now that he has the knowledge on how to maintain it. It cost him $25 for the Repair Manual but he save the $500 the Service center was going to charge him.
Peter---09-12-08
Hi Trigger
Let me bore you with my saga.
I have an i9950 which is the problem. (Also have a pixma i6000D).
I have been using generic inks for 18 months and the head ( for whatever reason) has blocked up. I took it apart, cleaned it but it was not completely successful. Next was a purchase of a new head from Precision Roller in the US. (I am in Australia). The new print head refused to print M, C and Y. They sent me a replacement, this had the same problem. I took the printer to a service place where they pronounced sanctimoniously that I was using non-genuine inks, so the head was not guaranteed; and by the way they wanted to change the purge unit and adjust something with the rollers - $550. I said no thanks and brought the printer home. Turned it on and got 8 consecutive amber flashes between greens. I have reset the EEPROM and the flashes have disappeared. (Since I wrote to you yesterday). I am not a forum participant, just read, so I saw your comment to the person before me and posted a message. Then I worked it out that I can email you directly.
Do you have any suggestions? A manual would be useful but more so for the i6000D.
Cheers, Peter
Trigger--09-12-08
Peter,
That is some "Saga" you had to endure. However, I think I know what went wrong to begin with. Originally the Printhead looked bad and all attempts to clean it did not work, at least the ones you knew about. Then you took the head apart hoping you could fix it, and of course it would never work again. Now you purchased a new head which was a good thing to do but you couldn't get it to work either. Even with a 2nd head. Then you got the bad news from the repair shop.
I've seen this happen in a similar way to all kinds of Canon printers. The problem is like a run away train. First a clog starts in some color because of lack of use, or the type of prints you were making didn't evenly use up the inks. So a clog begins. The clog prevents the "Purge Unit" from successfully sucking ink. These units typically have separate suction pads for colors and black. Without sufficient ink the purge unit can become clogged and then everything will stop. The Purge unit can fail in about 37 ways and this stops all suction of ink into the printhead. Without the suction, the printhead heats up what ink is left and soon it can get totally dried up and clogged. Now if you put in a brand new printhead and the purge unit is still not working, you will get exactly the same results. It is not a bad printhead, it is that you are getting the same action from the old Purge unit. I will bet you can still fix you iP9950, that is if you still have the good head.
One of the steps in my Repair Manuals is to take out the Purge unit from the printer and to clean, inspect, and repair where possible. On the ones that I have fixed, 9 out of 10 of them were simple problems and once the unit was cleaned and tested the problem was resolved. The one that was broken had to be replace, but those parts can be ordered directly from Canon Parts Department and shipped to you.
I do not have a Repair Manual for the iP9950 because I have never had one of those printers. All of my Manuals are written directly from my efforts to repair an existing unit.
As far as the iP6000D, I have not done that printer either, but I have the Service Manuals and the Parts Catalog for it plus all the other documentation. I do have the Canon iP6600D and the iP5000, & iP4200. In looking at the internal drawings and parts, the iP6000D is much closer to the iP5000 once you have the covers off and need to disassemble the rest of the printer including the Purge unit. The Service Manual and the Parts Catalog for the iP6000D show in some detail how to get the covers off and the basic concept on how to take things apart. However, there are no detailed pictures or step by step instructions and detailed digital pictures as my Repair Manuals typically have.
I will be happy to work with you and provide whatever manuals you require. I doubt if I will ever get my hands on the iP6000D as I am not buying anymore printers at this time. I already have over 50 and my wife will divorce me if I get one more printer. I believe we can put together a set of documents, instructions, and pictures that will help you do the repair you need to do, If you can't get the parts in Australia, I can order them here and ship them to you. I get all my parts directly from Canon, since this is the lowest possible price and without any overhead markup. Everything you buy on the internet has been marked up in price.
Let me know what you want to do......Trigger
Peter---09-13-08
Hi Trigger
Thanks for the reply.I still have both new print heads and the one I took apart. The latter is actually sort of working. Magenta is the only problem now. It sounds like the purge unit is a good start. Where do we go from here?
Cheers,...Peter
Trigger,--09-13-08
Peter,
The printer you need to fix the most is the i9950, which is a very expensive printer. That is why the repair shop wanted to dig into your pockets. The key to fixing this printer is 3 parts.
Part 1 is getting the covers off without breaking one of them. Part 2 is getting the main printer asm out of the base. Part 3. is getting the Purge unit out of the main printer asm and then cleaning it and testing it.
To purchase any manual from me, you need a PayPal account or you can send me a Money order or Cashiers check. Once those are verified I can send you the CD with all the information. As I indicated before, this will effectively be more than one manual on the CD just to give you sufficient information to get the job done. I am hoping that the iP9950 is not that much different from the iP9000, especially for the removal of the covers. Once the covers are off, I am confident that my standard repair manual will show you how to get the main printer asm out of the case. Once that is done we will work together on the internet to get the Purge Unit removed. Once it is removed, again my standard manual will explain how to clean and test the purge unit. Once the printer is down to this level, you will also be able to remove and clean all of the waste ink pads. The final big step will be to re-assemble just enough of the printer so we can test everything and visually see what is going on with the Purge unit cycle, the printhead, and the cleaning action. This can only be done while the entire printer is disassembled and sitting on some temporary blocks.
Trigger
Peter,...09-15-08
Hi trigger
Attached is the scan from the brand new head. The left column is perfectly uniform and is what I would expect. The second brand new head shows the same pattern. The 6C, 6M, 6Y patches are clean white paper, not a mark. When I had put the old head back, I got patchy (streaky) colours from all 8 inks. Dont have the printout anymore. I will scan some service test prints & EEPROM data to you soon. Yust paid your invoice worst possible exchange rate in months .Got U$0.80 for A$1.00. A week ago it was 0.96. Never mind, no big deal.
Cheers, ..Peter
Trigger,.. 09-27-08 (to make this story much shorter I have eliminate non-essential information and only added what would help)
Peter, Those are some great pictures. OK, from the information you have provided and the pictures, this printer insides looks Identical to the i960 mechanism so that is the unit I will use. Some of the screw position are different than the i960 but the pictures you sent seem to be sufficient.
From the information you provided and the pictures, it appears that one of the suction tubes for the right side pad has come loose. The purge unit can not suck any ink out of the ink carts and down into the printhead for the C<M<Y because the tube is open or loose, or clogged. What is strange is that the right pad is clean and has not ink stains. It should be "Black" with ink. It pulls ink from the C,M,Y, and the combination of those three inks equal "BLACK". It is clearly not sucking any ink and if there is no suction the printhead can not get primed and therefore it can not print. I would not do anything else with the printer until you take it apart and take out the purge unit and check the tubes.
Rather than wait for snail mail, I sent all of the large (15MB) files directly to Peter over the Internet. Peter was able to get the printer apart and examine the insides. The picture below shows the ink pads and you can clealy see that the right side pad is still white which means no ink ever passed through it from the printhead. This had to be a Purge unit problem.
This next picture shows the bottom of the printer and I have cropped his initial picture and increased the closeup so you can see that the right pad hose is disconnected.
Once this pipe was re-connected and the rest of the printer was cleaned, Peter sent me a new Nozzle check print to show that the printer is now working perfect.
A key point to this note is that Peter would have never been able to see the disconnected purge unit hose. Getting the printer competely apart is the only way to fix something like this. Peter has his printer back working and will be able to keep it working for a long time now that he has the knowledge on how to maintain it. It cost him $25 for the Repair Manual but he save the $500 the Service center was going to charge him.

