CANON ip4500 cover removal video

martop

Getting Fingers Dirty
Joined
Aug 23, 2008
Messages
56
Reaction score
0
Points
29
Location
Prescot UK
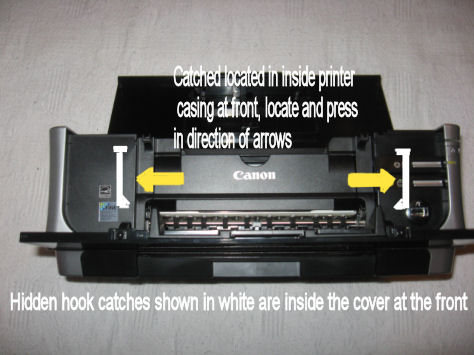
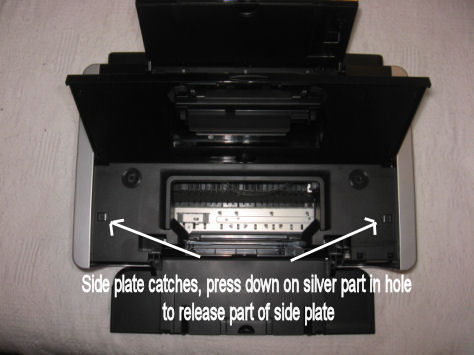
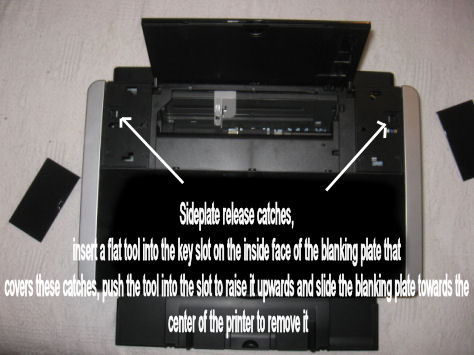
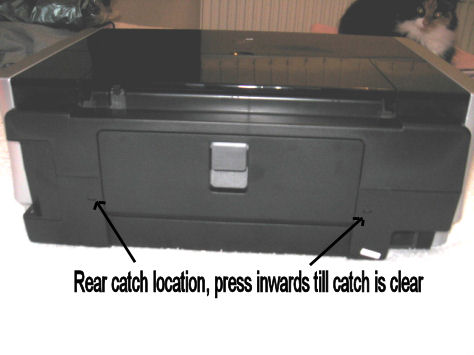
I had to remove the cover on a IP4500 printer, took a few attemps to get the covers off so I thought I would make a video to show any one else who may need to take the covers off and replace them.

Bear in mind this is one of my first attemps of home made how to video, I even listed them on youtube in the wrong order due to be rushed for time !

The video is in two parts part one is here :

http://uk.youtube.com/watch?v=xFXkK9PyqWA

And the second part is here :

http://uk.youtube.com/watch?v=iQdHDR6po80

If any one wants the origonal AVI files thne pleaee feel free to email me.
 

wilko

Print Addict
Joined
Feb 20, 2008
Messages
234
Reaction score
66
Points
173
Location
leeds, UK
Printer Model
Canon Pixma
Absolutely brilliant. Thank you so much
 

martop

Getting Fingers Dirty
Joined
Aug 23, 2008
Messages
56
Reaction score
0
Points
29
Location
Prescot UK
Here are the locations and method to release the catches, I know a lot of forum members will already know this, so this is for those who dont know where these things are located, including the front catches that are hidden behind the front part of the case, to the right and left, inside the printer head section for want of a better description. there can be located by placing your fingers inside the front casing and feeling for the catches, they will move outwards when pressed. Be careful when removing the top casing as it may catch on the print carriage if you have moved the print head to the centre service position.

3527_hidden_catches_front.jpg


The side plate catches are in two pairs, one of each pair is under the printer top lid at the front, the second of each pair are located under a pair of plastic blanking plates, each of these plates has a key slot on the side facing the centre of the printer, use a flat tool slid in to these slots and gently raise the blank plate up, just enough so it can be slid towards the centre of the printer, its fitted on slotted keys so it will slide off easily.

3527_hidden_side_plate_catches.jpg


3527_side_plate_rear_catches.jpg


The side plates on the 4500 have a keyed guide underneath its lower edge, this must mate with the protrusions on the lower case when they are replaced, there are also two small plastic pins on the lower case at the front that must match to the front part of the side plate, these can be seen from underneath.

The two rear release catches are easy to find. Before removing the covers, remove the power module thats located under the printer, its held in with two catches, the power cable attached to the power module is not very long and is a little tricky to unplug. it is keyed so can only go in one way.

3527_rear_catch.jpg
 

Aussieinker

Getting Fingers Dirty
Joined
Sep 5, 2008
Messages
41
Reaction score
0
Points
22
Location
Melbourne
Hi Martop
Well done!! Just what us silly old blokes need, no use reading about it, better to see it done.
 
Top