canon i560 - "banding" on last part of print & "teeth" on alignment pa

rtsy

Printing Apprentice
Joined
Jul 16, 2007
Messages
5
Reaction score
0
Points
12
Hi everyone,

I've been helped so much by all of you. Thank you! I have learned to refill my carts and clean my printheads. But I have some confusion about something happening with my printer and have searched the archives, but do not find a definitive answer. I'm hoping that someone may be able to shed some light on my problem.

I use a Canon i560 mainly to print greeting cards of my artwork. I print a 5" x 10" card centered on an 8.5" x 11" page. It consists of a photographic image on the front half and mostly text on the back half. I use refilled carts with Image Specialists ink, and print using the high quality setting on matte photographic paper. I've had the printer for about 1.5 years.

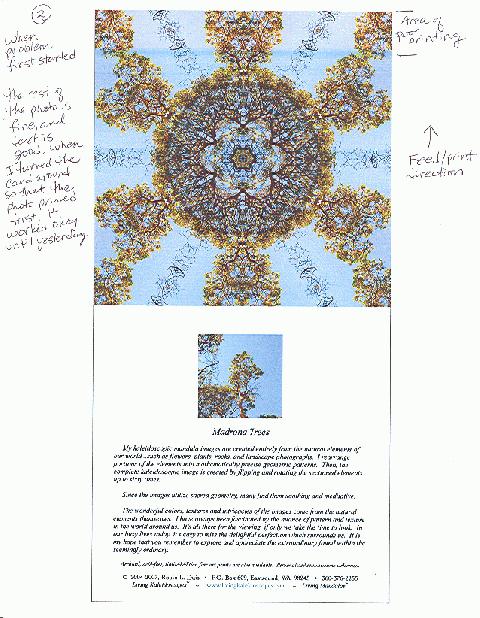
A couple weeks ago, I began getting "banding" - I use quotes because it wasn't exactly banding, but I'd get a lessening of print quality on the last 1-2 inches of the image. It would only happen on the photographic image, and not on the text or spot color items on the page. I initally had my cards laid out such that the text printed first, and the image last until I had this problem. When I tried to turn the layout around so that the image printed first, and the text last, it worked again with no problems in output.

I tried some tests, and printed some purge pages. It seemed that I only had a problem when printing a photographic image, but not if I printed a vector image or text or lines. I reinstalled my printer driver, ( and even downloaded a newer version) thinking that might be the problem, but that didn't change things. I don't know if it's relevant, but I'm printing out of Corel Draw on a Win98SE machine with lots of ram.

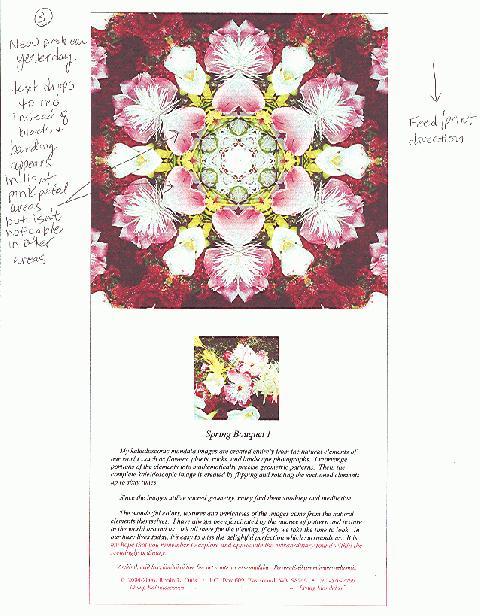
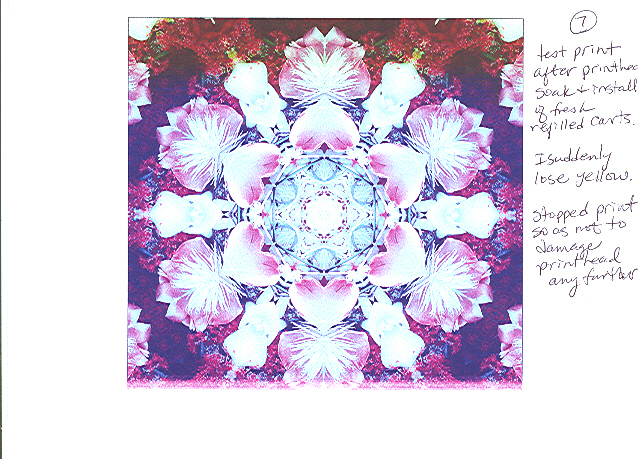
Now, today, the problem is back again, but worse. It now prints the last couple of inches of black text in red, and the print quality of the photo has degraded. I now see definite banding (but this is the part which confuses me - it's only on part of the image, say the light pink petals of a flower - though not on the darker pink petals), but not all the way across, which would indicate to me that the printhead is clogged.

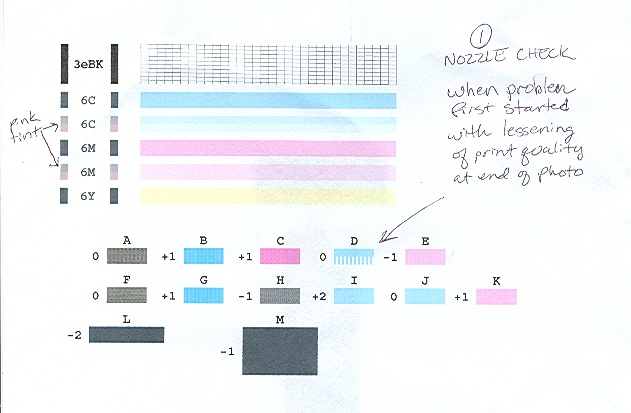
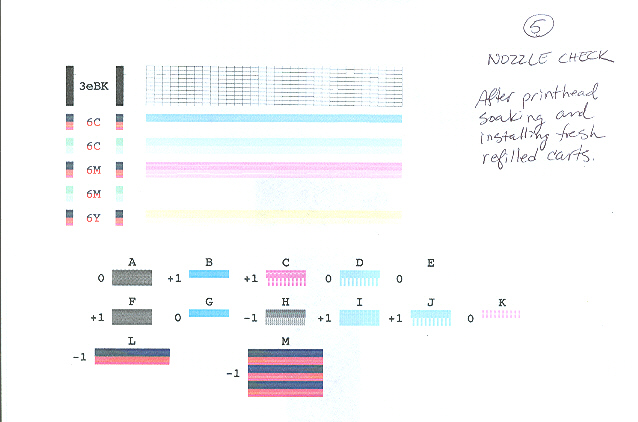
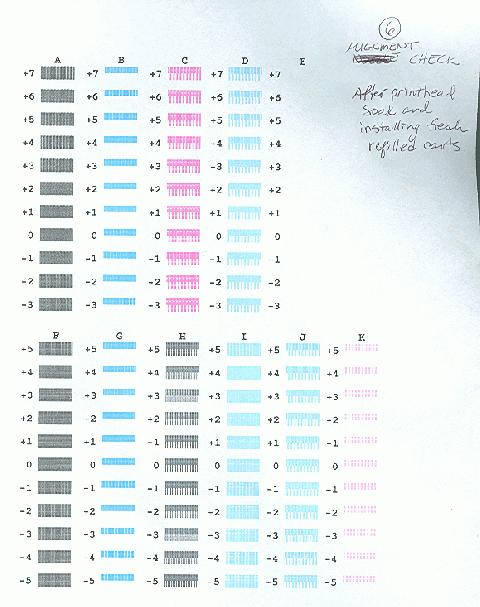
I also now have red on the bottom half of the black lines on either side of the 6C, 6Y, 6M text on the nozzle check page and have "teeth" or upside down picket fences on the bottom half of my magenta (and only sometimes, the cyan) blocks on the alignment page.

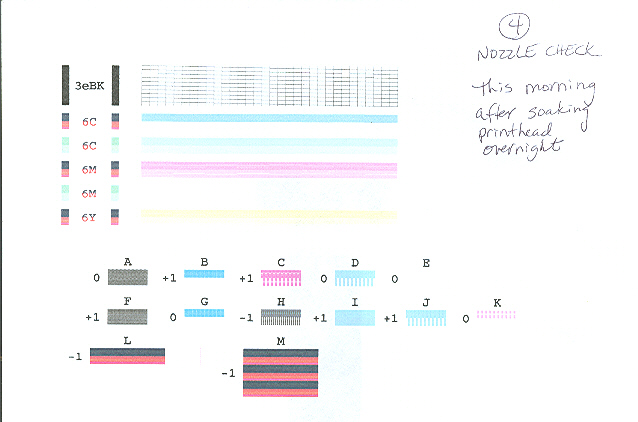
I have cleaned the printead and get good flow. I have replaced my refilled carts with OE carts. I have done everything I can think of, and all that I have found suggested, short of taking the printhead apart ala Granddad35's method.

I seem to remember finding something in my searches here that the "teeth" or fence problem suggests that the printhead is burning/burnt out, but I can't find that post again so I'm not sure. (I've searched for all manner of teeth, fence, pickets, etc, and don't remember what I used to find that particular post).

My questions are:
Do the teeth indicate the death knell for my printhead, or can they indicate something else?
Is it true that my printhead is burning out/burnt out?
Is there a way to tell definitively? I'm mostly confused by how it could print well for most of the page, and then mess up only at the end.
Is there any way to fix this problem other than just getting a new prinhead?

Of course, murphy's law applies. I live on a little island, and I have a big juried art fair coming up this weekend. I won't be able to get a new printhead in time, or go buy a new printer. I hate to take the prinhead apart to clean it, since I can still print signage with it, but could if that's my only chance.

Can any one of you fine folks help me?

Thank you very much,
Robin
 

Grandad35

Printer Master
Platinum Printer Member
Joined
Feb 24, 2005
Messages
1,669
Reaction score
182
Points
223
Location
North of Boston, USA
Printer Model
Canon i9900 (plus 5 spares)
Can you scan and post an example of the problem on a photo and a nozzle check? To post your images, follow the "Upload" link at the top.
 

rtsy

Printing Apprentice
Joined
Jul 16, 2007
Messages
5
Reaction score
0
Points
12
Hi, Granddad! I'm at work now, but will scan and upload when I get home tonight. Thanks very much for trying to help me. :)
 

rtsy

Printing Apprentice
Joined
Jul 16, 2007
Messages
5
Reaction score
0
Points
12
Hi all,

I tried to print out another nozzle check to upload, and found that some of the color bars were not printing as they did this morning. So, the plot (and perhaps the ink) thickens. Subsequently, I've given the printhead another cleaning, and will soak overnight and will upload the images in the morning.

Thanks again,
Robin
 

Tin Ho

Print Addict
Joined
Apr 24, 2006
Messages
866
Reaction score
26
Points
163
rtsy said:
My questions are:
Do the teeth indicate the death knell for my printhead, or can they indicate something else?
Is it true that my printhead is burning out/burnt out?
Is there a way to tell definitively? I'm mostly confused by how it could print well for most of the page, and then mess up only at the end.
Is there any way to fix this problem other than just getting a new prinhead?
Robin:

There is no easy way to tell if your print head has burnt out. Your print head is in serious trouble. But I always believe in preparing for the worst and hope for the best. You just got the problem not too long ago there is always a possibility it can be restored.

Do you have a set of 3 empty BCI-6 cartridges? It's better if you have 3 OEM BCI-6 cartridges. Follow Gradad's purging method to clean up the cartridges and fill them with Windex fluid. There are different Windex products. You will want the one with Ammonia in it. Use these 3 cartridges as cleaning cartridges. If you also have an empty BCI-3EBK you can purge it and fill it with water or Windex.

Before plugging in these home made cleaning cartridges the print head needs to be soaked in the same Windex fluid for a few minutes. Use a flat bottom coffee dish filled with Windex of about 1/4" deep then submerge the print head in it. When it is being soaked you can use a tea spoon to pour some Windex fluid from above the print head from the round mesh of the ink intake. This is to help clean out most of the remaining ink in the print head. Ink will flow out of all 4 set of nozzles the Windex fluid will turn into a black color. Replace the blackened Windex with fresh one. Soak the print head this way for a few minutes should be enough to flush out most of the remaining ink in the print head.

During such soaking of the print head watch and see if ink does come out from all 4 set of nozzles. If any of them shows no or little amount of ink flowing out it is the color that is clogged. You can use a syringe with no needle to shoot Windex fluid into the round ink intake of that color from half an inch above the intake. This is to force some Windex fluid into the intake to penetrate into the nozzles.

Reinstall the print head back into the printer and install your home made cleaning cartridges containing Windex in them. Do a few rounds of deep cleaning. This is to force the Windex fluid into the print head again but this time it is from the cleaning cartridges. Once this is done just power off the printer for a day or two. You can power up the printer every few hours to do a light cleaning. Let the Windex do the work to unclog the print head. It needs time to do it.

The next is to reinstall a set of good ink cartridges with ink and test the print head. You do not want to use the set that gave you problems in the first place. If you have a set of OEM cartridges use it.

If your print head is not burnt out already it can be recovered this way. If it does not work after repeating this process a few times then the print head is likely already burnt out. Prepare for the worst and hope for the best. Give it a try. It's a long process and it's not simple. But it has worked for me a couple of times.

Another easier method is simply soak the print head for 24 hours. But it increases the risk of damaging the print head. Using cleaning cartridges is the safest method. Grandad has many innovative ideas dealing with problems of print head and ink cartridges. Search his posts in the past or wait for him to step in on this thread.
 

rtsy

Printing Apprentice
Joined
Jul 16, 2007
Messages
5
Reaction score
0
Points
12
Hello again,

Thank you Granddad and Tin Ho for trying to help me.

I'm still stumped. I cleaned and soaked the printhead overnight, but did not get any better results. I've scanned and will upload the images. I don't think that my annotations will come out very well on the scans so I've copied them in this post. Here goes:


Scan 1.jpg - Nozzle check from when I first encountered a problem with the lessening of print quality at the end of the photo in scan 2. There's a pinkish tint to the bottom halves of the 6C and 6M vertical grey bars.


Scan 2.jpg - This is when I first noticed a problem. The print fed from the text towards the photo, and the last inch or so of the photo lessened in quality. The rest of the photo was fine as well as the text. I turned the graphic around in my program so that the photo would print first, and all was well (the text printed fine at the last inch), or so I thought until yesterday. I'm sorry that I don't have a copy of a print at this stage, but I've sold them. :)


Scan 3.jpg - New problem which started yesterday. I'm still using the new feed direction (photo towards text). The black text drops to red (with a little black - 1/2 of the text height on one line in the middle of all the red), and there is now some definite banding on the light pink (heart-shaped) petal areas, but is not noticable in the other areas.


Scan 4.jpg - Nozzle check this morning after soaking printhead overnight in Windex with ammonia. I now have a red tint on the bottom halves of the black vertical bars surrounding 6C, 6M, and 6Y, and have a weird greenish tint to the vertical (normally) grey bars surrounding the 6C and 6M. I also have "teeth" on the bottom halves of blocks C, D, H, J, and K; I'm missing the bottom half of blocks B and G; E is missing altogether; and have red and black banding on blocks L and M.


Scan 5.jpg - I tried to install fresh refilled carts (I don't have any more OE carts right now) to see if that helped the nozzle check any. After a cleaning and a deep cleaning, I got a similar nozzle check to the one before the cartridge changes.


scan 6.jpg - Alignment check after the printhead soak and installation of fresh refilled carts.


scan 6A.jpg - This is a reference alignment check which I printed yesterday, upon seeing the banding of the light pink petals and the black text which turned to red. This is before my cleaning and soaking of the printhead last night. I had at that time the bottom half (but in teeth configuration) of blocks E and K, and a more filled in C. There was also a magenta line on the bottom half of blocks H. (The circles are what I "thought" the alignment might be based on incomplete printing.) It seems that I have even less ink output than I did before the cleaning and soaking of the printhead last night.


scan 7.jpg. Test print after soaking of printhead and installation of fresh refilled carts. I suddenly lost the yellow. I stopped the print so as not to damage the prinhead any further.


scan 8.jpg - Nozzle check after cleaning and deep cleaning after losing yellow. The yellow is back, but is spotty/streaky.


Whew. I hope these images help. I can get some more (I hope) OE carts tomorrow morning and can try those, but I'm concerned about spending more (they are very expensive here on the island) on BCI-6 carts in case I need to get a new printer (I've read the posts on replacing the printhead vs. getting a new printer altogether).

I will go to the hardware store to get supplies to flush some old carts to make cleaning carts out of them, and will try that.

Thank you all again for your time and willingness to help. I do very much appreciate it.

Robin
 

Grandad35

Printer Master
Platinum Printer Member
Joined
Feb 24, 2005
Messages
1,669
Reaction score
182
Points
223
Location
North of Boston, USA
Printer Model
Canon i9900 (plus 5 spares)
It is always helpful to know what a "normal" nozzle check looks like to have a good comparison when there is a problem. I keep a folder with prints of the nozzle check, extended nozzle check and alignment tests for just this reason. Without this knowledge, it is necessary to make some assumptions about what is shown.

According to on-line documentation, your i560 has C/M/Y dye carts that will be used to print photos. The nozzle check would also seem to indicate that the cyan and magenta may have an extra set of small nozzles to emulate the "photo" cyan and magenta inks.

The following observations were made from your scans:
1. The "light cyan" seems to be missing from half of the bottom half of the "light cyan" - all of the other colors look OK. The pink on the bottom of the vertical bars is caused by the loss of 1/2 of the light cyan.
2. The light cyan background areas at the top of your print look normal on the magenta and yellow channels. The cyan channel is lighter in these areas, exactly as indicated by the nozzle check. When you print a photo, watch how the paper advances while printing the last part of a page. Does it seem to advance the paper 1/2 as fast as before? It could be that your printer slows down near the end to allow more drying time, and only uses 1/2 of the nozzles during this time. As a test, tape on a small square of paper (like a "Post-it") onto the bottom of the right edge of paper to fool the printer into thinking that the paper is longer than it actually is. This can fool the printer into printing at normal speed to the end of the paper.
3. Given the color problems seen in the nozzle check (scan 4), it's not surprising that the colors are way off.
4. The "dark cyan" is missing on the bottom half of the nozzles, and the "light cyan" is the same as before. The "dark magenta" is now missing from half of the bottom half, and the "light magenta is completely gone. The yellow is now missing from half of the bottom half of the nozzles.
5. Looks to be the same as scan 4.
8. Looks to be the same as scan 4.

Your scans are a good example of why it is helpful to post examples of a problem. A pattern that is this regular, especially when multiple colors show the same problem, usually indicates an electrical problem in the print head, the contact pins between the print head and the carriage, the flexible cables connecting the print head to the mother board or the mother board itself. Pull the print head and use a soft pencil eraser to LIGHTLY clean the gold contacts on the back. There is a spring loaded pin in the printer carriage for each of these contacts, so make sure that each pin is free to move to its full out position. If this doesn't help, you can try buying a new print head. However, you first have to decide if you want to put that much money into an old printer and whether buying a new print head is worth the risk - if the problem isnt in the print head you will have wasted your money. If you could still buy a new 560, the decision would be easy - buy a new printer. You can refill the chipped carts in the new Canon printers, but you lose the ink level monitoring function.

Sorry that none of this helps you get your printer fixed for this weekend.
 

Tin Ho

Print Addict
Joined
Apr 24, 2006
Messages
866
Reaction score
26
Points
163
rtsy said:
Hello again,

I'm still stumped. I cleaned and soaked the printhead overnight, but did not get any better results. I've scanned and will upload the images. I don't think that my annotations will come out very well on the scans so I've copied them in this post.
I am not able to tell with more specific detail other than saying the print head is probably badly clogged. You have to prepare for the worst but hope for the best by trying to unclog it the best way you can.

The reason it was unsuccessful after soaking overnight is obvious. I have been there done that. The cleaning fluid did not reach the clogged nozzles.
They are clogged. The cleaning fluid won't get in to dissolve the clog. Did you use Windex with ammonia? I used it with no dilution. It is safe to use. Try the syringe method. Fill a syringe with Windex (without the needle) then shoot the Windex from the syringe into the round ink intake for 1/2 inch above. I have done soaking method longer than 24 hours but it did not work. The cleaning cartridge method was very successful on the other hand.
 
Top