I ordered the kit from inkcontinuous.com for about $100US which included the full ink tanks. It came with a mini CD with the various manuals however I was unable to use it as the CD was cracked. They did however provide a link to EchoStore.com that had a .pdf to download, which is what I did. The manual was for a similar printer and the MG6120. All it really shows is the general installation process. The kit arrived about 3 days ago and I just finished installing it which took about 1hr. I never installed a CIS before so I'm sure I could knock that down quite a bit if I had to do it again.
There really isn't much information out there for a CIS for this printer, and the instructions are not really detailed and actually leave out at least one step. A search of Youtube revealed a video of a CIS install for the MG6220 which is actually pretty useful since it appears that it is the same as the 6120. You can watch it here: http://www.youtube.com/watch?v=fN-8QLHe3tw&feature=related
The step that the manual does not tell you is that you need to insert the rubber/silicon gaskets in the print head nozzle area before installing the cartridges. It's easy to do as the above video shows, but the manual does leave this step out.
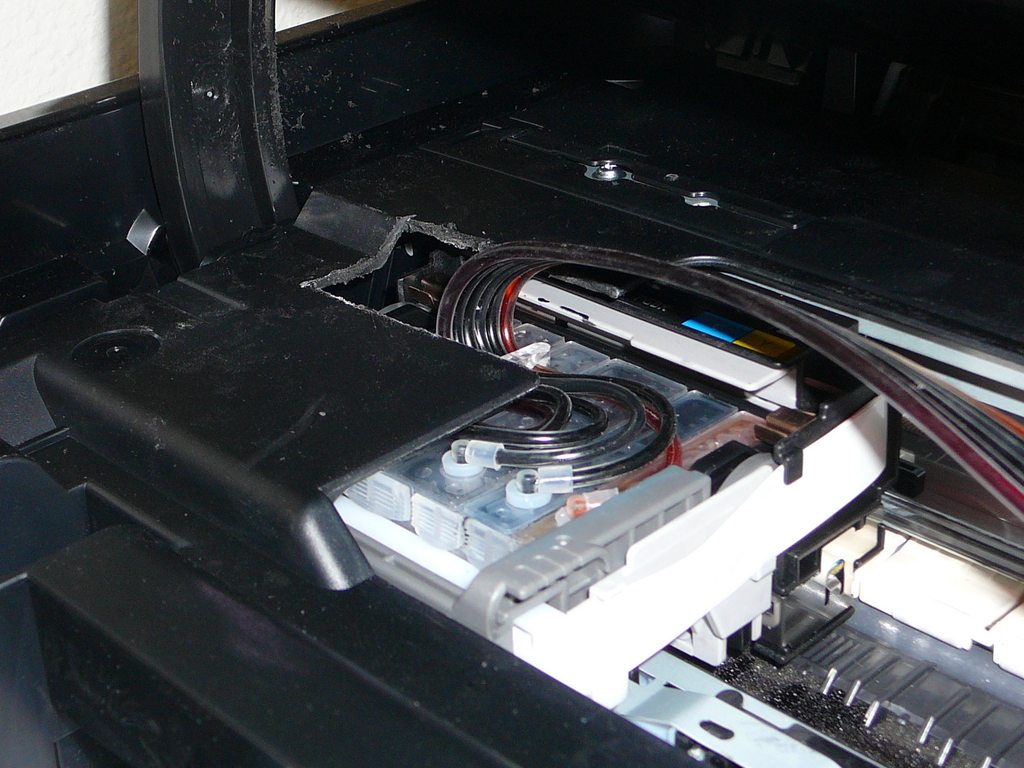
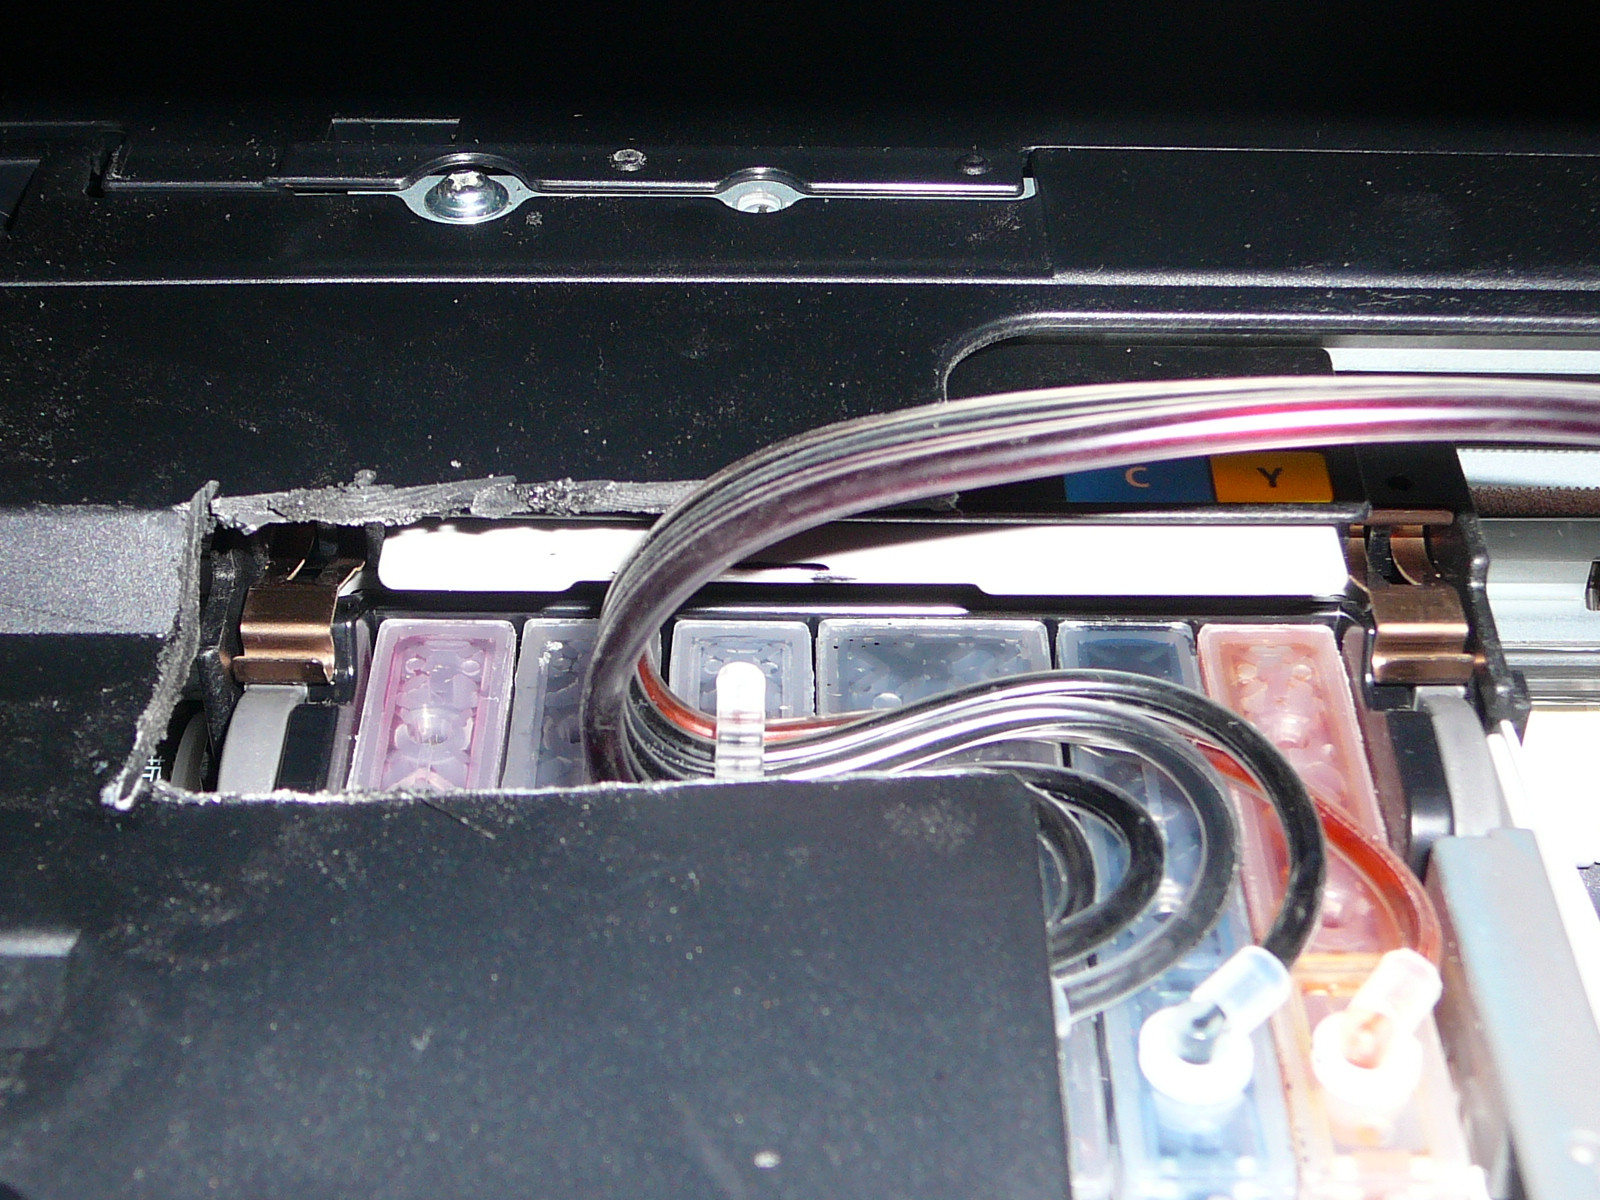
The above video also does not mention anything about needing to cut a piece of the tray out. If you look at 6:16 you can see where he slides the ink tray all the way to the left, it appears to fit nicely under the shield, and barely goes under it, however when I installed mine, the tubes were way too snug against the underside of the shield. I didn't like how tight it was so I cut out a piece of the shield with a Dremel. What's odd is that the above video has the tubes attached to the Cyan cartridge which is the second cartridge from the right. My system had the attachment on the gray cartridge which is the third one from the left, therefore the tubes need to go further under the shield than his does. Since the attachment sticks up a little as it is, it makes for a tight squeeze when you include the tubing. However, this may explain why he didn't mention anything about that in his video. As mentioned a lot in other posts and forums, Cannon designs their printers (especially these models) so that a CIS is difficult to make work, but it is possible.
Anyway, I've printed about 20 photos so far and they look great. I cannot tell the difference between them and ones printed from the original cartridges.
At one point I did get an error "U150 The following ink tank cannot be recognized" for the large black cartridge. I just swabbed the contact with a Q-tip dipped in rubbing alcohol and the error code cleared.
While it may seem a little drastic to have to cut up a perfectly good printer, I figured that the reward would more than make up for it. Prior to getting the kit, I was constantly telling my 8 eight year old that she couldn't print anything because we were running low on ink, or that we had to save the ink for something more important. I think a full new set of cartridges costs around $60.00US and they didn't last long at all. In fact I think the ink level continues to drop ever so slightly even when not in use. At that price, the printer was hardly worth using. Now I don't have to worry about that again. It's complete printing freedom.
After further review, I think I may have been able to unsnap the clip holding down the tubes from the gray cartridge and snap it into the cyan cartridge. It's pressed in pretty good though. Don't think I'll mess with it. Everything is running fine, so I don't want to mess with it. Besides, it's a little later to worry about it. I also think it's possible to further modify the right side of the printer so that the tubes actually come out the side which would allow the lid to completely close. I think I'll do this another time though after I've had a chance to use it for a while.
Here's a video of the printer in action: youtube.com/watch?feature=player_detailpage&v=4_w1_q1ihUc
I think that's it for now. If I remember anything I will add it later.
If you pause the video at :36 and 43 you can see how far under the shield the tubes would have needed to go if I didn't cut that section out
There really isn't much information out there for a CIS for this printer, and the instructions are not really detailed and actually leave out at least one step. A search of Youtube revealed a video of a CIS install for the MG6220 which is actually pretty useful since it appears that it is the same as the 6120. You can watch it here: http://www.youtube.com/watch?v=fN-8QLHe3tw&feature=related
The step that the manual does not tell you is that you need to insert the rubber/silicon gaskets in the print head nozzle area before installing the cartridges. It's easy to do as the above video shows, but the manual does leave this step out.
The above video also does not mention anything about needing to cut a piece of the tray out. If you look at 6:16 you can see where he slides the ink tray all the way to the left, it appears to fit nicely under the shield, and barely goes under it, however when I installed mine, the tubes were way too snug against the underside of the shield. I didn't like how tight it was so I cut out a piece of the shield with a Dremel. What's odd is that the above video has the tubes attached to the Cyan cartridge which is the second cartridge from the right. My system had the attachment on the gray cartridge which is the third one from the left, therefore the tubes need to go further under the shield than his does. Since the attachment sticks up a little as it is, it makes for a tight squeeze when you include the tubing. However, this may explain why he didn't mention anything about that in his video. As mentioned a lot in other posts and forums, Cannon designs their printers (especially these models) so that a CIS is difficult to make work, but it is possible.
Anyway, I've printed about 20 photos so far and they look great. I cannot tell the difference between them and ones printed from the original cartridges.
At one point I did get an error "U150 The following ink tank cannot be recognized" for the large black cartridge. I just swabbed the contact with a Q-tip dipped in rubbing alcohol and the error code cleared.
While it may seem a little drastic to have to cut up a perfectly good printer, I figured that the reward would more than make up for it. Prior to getting the kit, I was constantly telling my 8 eight year old that she couldn't print anything because we were running low on ink, or that we had to save the ink for something more important. I think a full new set of cartridges costs around $60.00US and they didn't last long at all. In fact I think the ink level continues to drop ever so slightly even when not in use. At that price, the printer was hardly worth using. Now I don't have to worry about that again. It's complete printing freedom.
After further review, I think I may have been able to unsnap the clip holding down the tubes from the gray cartridge and snap it into the cyan cartridge. It's pressed in pretty good though. Don't think I'll mess with it. Everything is running fine, so I don't want to mess with it. Besides, it's a little later to worry about it. I also think it's possible to further modify the right side of the printer so that the tubes actually come out the side which would allow the lid to completely close. I think I'll do this another time though after I've had a chance to use it for a while.
Here's a video of the printer in action: youtube.com/watch?feature=player_detailpage&v=4_w1_q1ihUc
I think that's it for now. If I remember anything I will add it later.
If you pause the video at :36 and 43 you can see how far under the shield the tubes would have needed to go if I didn't cut that section out