Anet A2 The Build Experience

RichardM

Getting Fingers Dirty
Joined
Oct 19, 2018
Messages
35
Reaction score
41
Points
45
Location
Old Leake, Boston<Lincolnshire,England
Printer Model
Anet A2
Wow, crazy!

Makes me glad my first printer (MP Select Mini) was ready-to-print out of the box, and my 2nd printer (CR-10) was a quick assembly. I was feeling slightly more confident about more of a "kit" (like the Ender 3), but now I'm not so sure.


It all looks great to me! :thumbsup
Go for it, to me building the kit will I hope give me a deeper understanding of what could be done to improve the thing (like a good rap with a hammer), once this 'thing' fires up and I get a decent print I'm not sure what I'll do with it apart from add some improvements,,,,,, Printing pink elephants and blue Unicorns isn't really my thing. I doubt if my CAD skills will improve to a level where I can print anything useful i.e. engineering wise.
Still one lives in hope.
 

RichardM

Getting Fingers Dirty
Joined
Oct 19, 2018
Messages
35
Reaction score
41
Points
45
Location
Old Leake, Boston<Lincolnshire,England
Printer Model
Anet A2
My assembly instruction was supposed to be on a Micro card, but no card was included in my box of bits, so @Redbrickman kindly provided me with a Video installation guide, that done the trick..

No Chinese interpreter was harmed during instalation.. :D
Harming a Chinese interpreter is high in my TO DO LIST.
 

The Hat

Printer VIP
Platinum Printer Member
Joined
Jan 18, 2010
Messages
15,618
Reaction score
8,691
Points
453
Location
Residing in Wicklow Ireland
Printer Model
Canon/3D, CR-10, CR-10S, KP-3
The first (MP Mini) worked straight out of the box but it left me wondering was there more, and I was afraid to interfere with it in case I broke it, I didn’t want the enjoyment and pleasure to stop, now its game on.. :ya
I found the assembly of the Ender 2 less a challenge than I expected, because I got a better understanding of the printer and since completing it I have change quite a few pieces, and hope there's still more I can do, all for the better, but the CR-10 is still the work horse...
If it Ain't broke...:D
 

RichardM

Getting Fingers Dirty
Joined
Oct 19, 2018
Messages
35
Reaction score
41
Points
45
Location
Old Leake, Boston<Lincolnshire,England
Printer Model
Anet A2
3rd Edition.........29th October 2018
It's Precision by loosness:
Assemble the carriage assemblies, locate in frame, loosen bolts holding the bearings until the assembly slides smoothly, not exactly the "Best Practice" with respect to precision engineering - but if it works, don't knock it.
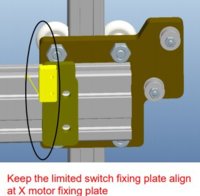
Again not sure if I agree with positioning of the X 'Limited Switch'. This will be modified!
Just had to remove X motor to reposition the drive wheel, the gear was too far in towards the motor thus not aligned with the belt. I had to remove the motor as the grub screws were below the level of the acrylic plate. George the gorilla did up the grub screws, so quite a challenge to release them.
Interesting aside, all the screws supplied are countersunk. Non of the plates are countersunk. If you do countersink the acrylic, the screws bottom out. Ho Ho Ho.
......................31st October [Halloween - a portent ?]
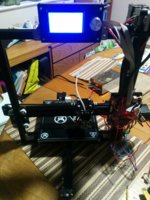
Anyway IT's Alive.............
It's Alive.jpg
It has been a challenge. I followed the instructions on the supplied USB stick. Should have known better I suppose example;
XlimitSwitch-WrongSide.JPG

Note the fixing plate is not the motor fixing plate but...
XlimitSwitch-WrongSide2.JPG

this image from later in the instructions (fitting the Z limit (sorry limited) switch) shows the same position as previous. The limit swith needs fitting on the motor plate side.
This caused quite a lot of headscrathing trying to get the home position working.
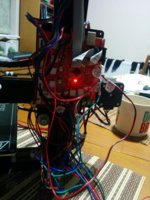
Still, there it is in all it's pre tidy up glory.
Wiring Rats Nest.jpg
Note the Empty coffee cup lurking in the background. To Do hide the wires somewhere.

POST MORTEM.
It could have been worse.
Usually I worry if there are a few bits left over but in this case I just dont care. It works (at least it moves x,y,z and the LCD displays things..) I just need to get some filament now & see what happens. I thought they would supply at least a minimal amount to road test but nothing that looks like plastic... a few bits of wire, lots of screws, miscellaneous acrylic bits, a spare limitless switch but no filament.. ah well hello ebay.

Hints for new 3DP enthusiasts:
If the A2 is your first venture into mechanical assemblies, buy something else.
Make sure you have some decent tools - the ones supplied are questionable, for example the 1 spanner supplied will fit a 6mm nut, there is not one 6mm nut in the whole kit.
Check the quality / fit of supplied T nuts. Buy some decent ones if necessary.
Check all screws that secure items to the extrusion for length. If they bottom out then the unit being secured will not be tight to the extrusion thus causing misalignment.
Loosen all motor drive gears before fitting the belts. after fittingthe belt move the sliding bed backwards and forwards to align the gear on the motor. Now tighten the grub screws.
Z Axis. Leave the motor assemble loose on the extrusion. Secure the trapezoid rod into the motor's flex drive. Wind the rod into the brass screw (mounted on the X axis, turn the rod until the motor assembly is at a suitable level.
Pulll up the X axis to it's maximum travel. Give the Z motor assembly a shake as the screws are tightened into the T nuts. This ensures alignment of the Z axis.
Keep calm, have another coffee, don't give up. If I can do it (think I have anyway) so can you.
Cheers.
 

Redbrickman

Printer Master
Joined
Dec 27, 2010
Messages
1,102
Reaction score
1,184
Points
293
Location
UK
Printer Model
MB5150
Bit after the event now but before I received my CR-10 I collected a plethora of You Tube videos associated with building and setting up. I usually find the YT stuff much superior to the rubbish Chinesium manuals.

For getting the first layer correct (Pt 1 of your apprenticeship) I recommend this video. It's lengthy but some very good hints and tips

https://www.youtube.com/watch?v=gkZUAyTxU1Q&t=9s

You will soon wonder what you actually did before you got your printer - but be warned it can lead to relationship breakdowns :)
 

RichardM

Getting Fingers Dirty
Joined
Oct 19, 2018
Messages
35
Reaction score
41
Points
45
Location
Old Leake, Boston<Lincolnshire,England
Printer Model
Anet A2
Don't think it will replace the golf (not in summer anyway), nice if it replaced mowing the grass but I daresay other family members will have something to say about that. Still waiting for the PLA , or is that something to do with (ex) Gadaffi ?
Have decided the first mod of the A2 will be to rip out the blxxdy buzzer.
 

RichardM

Getting Fingers Dirty
Joined
Oct 19, 2018
Messages
35
Reaction score
41
Points
45
Location
Old Leake, Boston<Lincolnshire,England
Printer Model
Anet A2
To conclude this post I must say that having created (my first CAD realisation) a small four part box 9two 'Us' and two flat end plates I am bloody impressed with the accuracy and quality of this printer. Despite all the challenges of bolting the Anet together it's pretty bloody good so far.
Since building it I've been inundated with serious work so haven't been able to play. I will get around to it at the earliest opportunity but must admist that all the 'enhancements' I've browsed through (Thingyverse Etc) have moved down a great deal in must haves due to the quality of the print.
Ta Da points out of 10 (Ease of build) 1.16
points of 10 build challenge 8 (plus 2 for build fun)
Points out of 10 for production quality 9 (only deducted 1 'cause I jammed the extruder up !
Value for money 10 out of 10.
 

The Hat

Printer VIP
Platinum Printer Member
Joined
Jan 18, 2010
Messages
15,618
Reaction score
8,691
Points
453
Location
Residing in Wicklow Ireland
Printer Model
Canon/3D, CR-10, CR-10S, KP-3
Good to see you have been bitten by the 3D bug, Congratulations is in order...
It helps not to heat the extruder up to full operating temperature till your just about ready to print in (Seconds)...
 
Top