There had been an ongoing reliability issue with a percentage of Redsetter resetters especially when it comes to the Pro-100 CLI-42 models...and to a lesser degree...the Pro-10 and PGI-9 ones.
The problem is that they might suddenly stop working. To remedy the problem, more often than not, a cable changeout solved the problem.
Noting that I test each and every resetter sent out, I was surprised when I get reports that they stop working. On initial testing prior to being sent out, I was typically getting failure rates of 2% or so and this was tolerable but they would be fixed with a new cable.
On the last batch of resetters I was getting failures of 20%. Changing the cables hardly helped the situation and further retesting showed that failures were reoccurring intermittently. This was unacceptable.
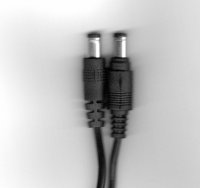
The first thing I noticed was that the cables were packaged differently. Upon closer inspection, they were indeed different in that the shape of the round plug was different. Also the extension of the round plug was also different. I always knew that the problem surrounded the round plug but typically once a matching cable was found, it was good.
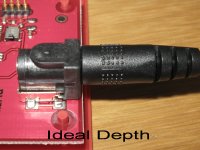
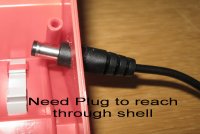
Upon removing the outer shell of the resetter and testing the connector and plug, the problem surrounding the resetter was immediately apparent. The plug and connector was meant to be inserted fully. When the resetter shell was placed in front of the plug, the insertion depth was reduced by the thickness of the shell body and the gap. This reduced the insertion depth of the plug. As a result, the contact was borderline.
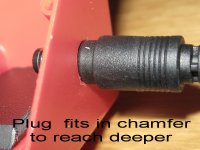
The solution..restore the full insertion depth. To accomplish this, the hole through the body needed to be enlarged to provide greater insertion depth. On the older cable connectors, this could be accomplished by simply by enlarging or chamfering the exposed hole at an angle to allow the connector to go in deeper. No disassembly needs to be be done. A sharp knife will do this.
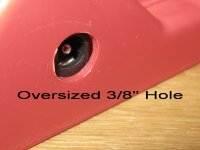
Where this does not work, enlarge the hole to 3/8" diameter.....removing the shell first. This will allow the body of the round plug to fully mate with the female connector...as it was meant to be.
I spent a full day/weekend drilling out resetters to incorporate this change.... I had to.
All reliability problems will be banished now.
The real electronic failure rate of the resetters is in reality about 0.1% or approx 1 in 1000. More in line with standard electronics.
The problem is that they might suddenly stop working. To remedy the problem, more often than not, a cable changeout solved the problem.
Noting that I test each and every resetter sent out, I was surprised when I get reports that they stop working. On initial testing prior to being sent out, I was typically getting failure rates of 2% or so and this was tolerable but they would be fixed with a new cable.
On the last batch of resetters I was getting failures of 20%. Changing the cables hardly helped the situation and further retesting showed that failures were reoccurring intermittently. This was unacceptable.
The first thing I noticed was that the cables were packaged differently. Upon closer inspection, they were indeed different in that the shape of the round plug was different. Also the extension of the round plug was also different. I always knew that the problem surrounded the round plug but typically once a matching cable was found, it was good.
Upon removing the outer shell of the resetter and testing the connector and plug, the problem surrounding the resetter was immediately apparent. The plug and connector was meant to be inserted fully. When the resetter shell was placed in front of the plug, the insertion depth was reduced by the thickness of the shell body and the gap. This reduced the insertion depth of the plug. As a result, the contact was borderline.
The solution..restore the full insertion depth. To accomplish this, the hole through the body needed to be enlarged to provide greater insertion depth. On the older cable connectors, this could be accomplished by simply by enlarging or chamfering the exposed hole at an angle to allow the connector to go in deeper. No disassembly needs to be be done. A sharp knife will do this.
Where this does not work, enlarge the hole to 3/8" diameter.....removing the shell first. This will allow the body of the round plug to fully mate with the female connector...as it was meant to be.
I spent a full day/weekend drilling out resetters to incorporate this change.... I had to.
All reliability problems will be banished now.
The real electronic failure rate of the resetters is in reality about 0.1% or approx 1 in 1000. More in line with standard electronics.