- Joined
- Nov 3, 2004
- Messages
- 3,149
- Reaction score
- 1,527
- Points
- 337
- Location
- Bay Area CA
- Printer Model
- CR-10, i560 ,MFC-7440N
Ok, I'm posting some info about the drybox I built for my filament.
I don't burn through my filament quickly like some of you other guys do, and I definitely noticed some of my filament was getting brittle... one of the signs of humidity problems.
Here's the final (mostly) project with two full-sized spools:

Parts / Things I Used:


I don't burn through my filament quickly like some of you other guys do, and I definitely noticed some of my filament was getting brittle... one of the signs of humidity problems.
Here's the final (mostly) project with two full-sized spools:
Parts / Things I Used:
- This airtight box from Amazon: https://amzn.to/2Lz59fD
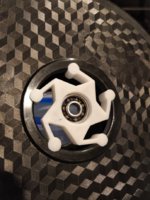
- Customizable filament spool hub for 608 bearings: https://www.thingiverse.com/thing:735213
- Quick change filament spool holder with 608 bearings: https://www.thingiverse.com/thing:1241566
- The bowden / ptfe tube port in this setup: https://www.thingiverse.com/thing:814597
- Spool rod mount... not this one, but pretty similar: https://www.thingiverse.com/thing:2460606
- 3/8 Dowel
- Filament Clip: https://www.thingiverse.com/thing:224791
- Color changing desiccant: https://amzn.to/2ITNBsA
- Hygrometer: https://amzn.to/2kwZeeC
- I don't swap filament often, so I thought I'd just have one bowden exit hole in the middle of the box for both spools to use (I'd just open the lid and swap the lines). It works fine in the middle, but now I wish I had just done two holes so when I do end up opening the box, I don't let a bunch of new humid air into the box.
- I had problems with the filament feeding freely through the box into the extruder. It was causing all kinds of problems like this. It was some combination of friction through the exit port, through the bowden tube, but I think mostly the way the filament was wound / unwound and how I loaded it into the extruder. I've replaced the long bowden tube with just a small piece, and am now way more careful about how the line feeds direct into the extruder without any weird kinks or bends
- I've got a dial hygrometer to keep an eye on humitidy, but I'm going to add a digital one soon. I simply poured in about 3 cups of desiccant and am keeping an eye on the color change and also the hygrometer. So far, the dial stays at almost zero and after 4 days I'm not seeing much change in the color of the desiccant beads. (in the pic you can see the humidity level in the box (around 5%) and outside the box (56%).
 but in this photo here,
