- Joined
- Jan 18, 2010
- Messages
- 16,185
- Reaction score
- 9,134
- Points
- 453
- Location
- Residing in Wicklow Ireland
- Printer Model
- Now have 3 Ender-3 V3 Plus SE/
I specially bought this small dry box to use with cardboard reel filament, they are an unusual size and shape which are different than most other filament reels and the core sizes also varies.
I used a single central axel to fit two filament reels in the box to start with, which also make it cumbersome to change reels for another colour, or new one.
 Click to enlarge...
I was going to use a similar method that was installed in the first bigger dry box and later removed it, I had only fitted the brackets on the side walls when I abandon that idea for a better solution. visible in Pic 1 above

I created a centre support to hold two axels which was very easy and then printed two small cylinders with a big rim on one end to hold the cardboard reels in place, I then made a second cylinder set to fit over the first to complete both ends.

All that was left to do was to fit two cardboard reels into position and feed the filament out through the new larger outlet holes and then fit a bung in place to seal and hold the filament.


The pieces of foam you see are fitted on the inside of the dry box to gently wipe the filament as it comes off the roll ensuring it stays clear of any debris that might had collected on the filament.
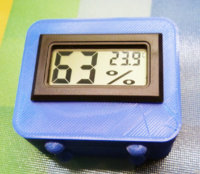
I have a 500-gram bag of silica to place on the bottom of this dry box because nothing else will fit, I also have a spare replacement bag ready when and if the humidity starts to climb above 60%, I also got one of these inside..Pic 6...
I used a single central axel to fit two filament reels in the box to start with, which also make it cumbersome to change reels for another colour, or new one.
Click to enlarge... I was going to use a similar method that was installed in the first bigger dry box and later removed it, I had only fitted the brackets on the side walls when I abandon that idea for a better solution. visible in Pic 1 above
I created a centre support to hold two axels which was very easy and then printed two small cylinders with a big rim on one end to hold the cardboard reels in place, I then made a second cylinder set to fit over the first to complete both ends.
All that was left to do was to fit two cardboard reels into position and feed the filament out through the new larger outlet holes and then fit a bung in place to seal and hold the filament.
The pieces of foam you see are fitted on the inside of the dry box to gently wipe the filament as it comes off the roll ensuring it stays clear of any debris that might had collected on the filament.
I have a 500-gram bag of silica to place on the bottom of this dry box because nothing else will fit, I also have a spare replacement bag ready when and if the humidity starts to climb above 60%, I also got one of these inside..Pic 6...