Unclogging Canon Printheads

Trigger 37

Printer Guru
Joined
Dec 23, 2006
Messages
607
Reaction score
4
Points
136
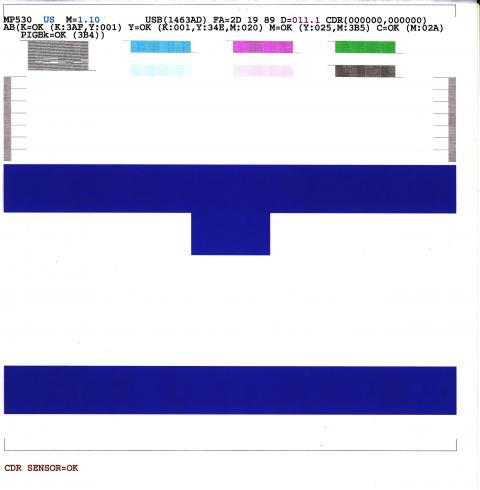
Inkoholic,.... I am posting below a picture of the Service Test print for the MP530. The MP610 is virtually the same but I don't happen to have a good copy. The Service Manual for the MP610 has and example. I have photo enhanced the colors on this image to make them more visible, otherwise the Photo Magenta would barely be visible because it is only 1 pico liter nozzles. If you can copy the image to your PC then you can enlarge the image and see it much closer. Each tiny lines that are printed in "ONE" nozzle firing for about 1/4". While the next line appears at the same location it is actually the next lower nozzle firing. The pattern appears jagged because the first group is printed moving right to left and the next group prints moving left to right. The pattern is continued unit all nozzles have printed. The Green pattern is a combination of yellow and Magenta and Cyan, since they long ago discovered that yellow is very hard to see. As you look at the Black matrix you will see sections that are completely missing. These are clogged nozzles. While it is possible to have a "Burnt out Nozzle", the probability is VERY low, since typically when a nozzles is burnt out the head overheats and the temperature sensor in the head goes way up and the logic card generates an error and shuts the head off for good. These nozzles are so tiny, if they get a clog and it is not taken care of right away, it will continue to clog more and more until finally one day the nozzles burns up. Since the logic card has no knowledge of the clog it continues to try and print. The extra ink that surrounds the nozzle is there to "Keep the nozzle" cool. When that ink dries up and makes a clog it "Can not keep the nozzle Cool". The logic card again has no knowledge of this and as you continue to print whatever you want this will eventually burn out the head.

Proper care of the printhead requires that you print a nozzle test print at least once a week, and print something everyday if you can. The instant you see a problem in the test you should do a cleaning cycle to get rid of the clog. You may even need to print a Service Test Print to confirm just how bad the clog is. If it is really bad then you should remove the head and clean it in the laundry room sink using hot water only. Anyone that wants more information on how to do this correctly,...just send me a note and I will respond.

Once you understand how and why things happen to a printhead you will ALSO UNDERSTAND WHY CANON HAS GONE TO SO MUCH TROUBLE IN THEIR DESIGN TO KEEP THE HEAD CLEAN AND TO PREVENT ANYONE FROM PRINTING IF THE INK IS LOW OR GETTING LOW.

1854_service_test_pattern-dark.jpg
 

mrelmo

Print Addict
Joined
Apr 1, 2007
Messages
427
Reaction score
36
Points
161
Location
Buffalo, New York
most recent post for cleaning printheads seem to be using windex, what is the active ingredient that is getting results, soap or is it the ammonia that is in the solution
 

Trigger 37

Printer Guru
Joined
Dec 23, 2006
Messages
607
Reaction score
4
Points
136
Years ago I fooled around with Windex, but after years of working with printers I have settled on nothing but HOT WATER. I feel the best solution or liquid process is the "HOT" part of the incredent and it is very easy to get lots of hot water focused directly on the nozzles and on the input filter screen. Try doing that with Windex. Since ink is "Soluble",...water is the best solution to dissolve dried up ink. The only better way is Hot water and some way to agitate the clog,..like if you could scrub it with an abrasive pad,... which we can't do.
 

Parhs

Getting Fingers Dirty
Joined
Aug 19, 2010
Messages
62
Reaction score
0
Points
29
Inkoholic, i have the same printer and cyan is the color that i am having problems. I think that octoink cyan is the problem or a problem with the printer somehow..
 

inkoholic

Fan of Printing
Joined
Sep 9, 2011
Messages
116
Reaction score
2
Points
59
Trigger 37 said:
Years ago I fooled around with Windex, but after years of working with printers I have settled on nothing but HOT WATER. I feel the best solution or liquid process is the "HOT" part of the incredent and it is very easy to get lots of hot water focused directly on the nozzles and on the input filter screen. Try doing that with Windex. Since ink is "Soluble",...water is the best solution to dissolve dried up ink. The only better way is Hot water and some way to agitate the clog,..like if you could scrub it with an abrasive pad,... which we can't do.
Isn't distilled water more safe? Water from the tap still contains a number of contaminants. Seeing how small the nozzles are, I'm wondering if ordinary tap water could make things worse. Heating up distilled water is more difficult of course because it doesn't flow from the tap. Also I've heard heating up a bowl of distilled water in the microwave will go kaboom.
 

inkoholic

Fan of Printing
Joined
Sep 9, 2011
Messages
116
Reaction score
2
Points
59
Status update: the printhead has been soaking in Windex for 2 days now. It's in a little bowl with folded paper towels. On top of the printhead are also little rolls of paper towels to suck up any fluid that may go up through the printhead. And quite a lot has come up already. But mostly through the pigmet hole only... The cyan is clogged the most I suspect however. While flushing the printhead with hot water a LOT of cyan came flowing out of the printhead however. I've been rinsing the thing for ten minutes or so. I'm being very patient, unlike the previous times I tried to clean the printhead.
 

Trigger 37

Printer Guru
Joined
Dec 23, 2006
Messages
607
Reaction score
4
Points
136
Inkoholic,... You should DRY the head very carefully and make sure you have removed all of the water that got beind the circuit board. Compressed air is the best for this but a Hair dryer set on MAX air and Lowest heat will also work,..it just takes longer. After that you need to install the head and "KNOWN GOOD" ink carts,...i.e., carts that you have tested and then do a cleaning cycle to get ink "Primed" into the head. Then print ONLY a nozzle test print. What you are looking for is "ANY KIND OF IMPROVEMENT" to verify that the cleaning that you are doing is working. Go into Service Mode and print the test print there.
 

inkoholic

Fan of Printing
Joined
Sep 9, 2011
Messages
116
Reaction score
2
Points
59
Wall of text incoming in 3,2,1...:p

I had some trouble uploading the 10MB pics but the cleaning is done, test prints have been made and everything has been scanned :). I've compared old and new nozzle checks and though I was disappointed at first, I see now minor improvements in the cyan. Interestingly the pigment black has now developed a very minor clog, which wasn't there before! This will go away easily I suspect. The magenta also looks less solid than before, but nothing major.

The problems before and after cleaning:
-strange banding in the cyan. Some kind of decreased ink output either because of an uber stubborn clog or an electrical failure. The cyan does look cleaner and better than before. But the banding is still there though.
-Cyan seems to shift longitudinally as well. Look at the edges of the tropical island picture: it's fickle with displaced cyan blobs. Printing text with cyan colour will look especially ugly thanks to this shifting. BUT: the shifting is less after cleaning. Look at the cyan bars in the old and new service print. After cleaning the blue lines are lined up more closely like they should.

How I cleaned
Rinsing the printhead with very hot water from the tap for about 10 minutes. A lot of cyan came flowing out of the head, which also is the problematic colour (any relation?). Then the printhead sat in a little Windex bath for about 3 days. About 0,5cm of Windex was in the bath, and I put some folded paper towels in the bottom.
I dabbed the printhead into the towels regularly, so Windex fluid would slowly be pushed upwards through the printhead. I rolled up strips of paper towel and put them on the ink ports, to pick up Windex and ink that came flowing upwards. A lot of stuff came through the pigment black port, both Windex and innk.The other ports stayed fairly dry.
Eventually also cyan came flowing upwards on day 3. But I quit cleaning on day 3 and may have done so prematurely. I could have let it sit even longer perhaps, so more cyan could be removed.
After taking the printhead out of the Windex bath on day 3, I rinsed it again with very hot water for a couple of minutes.

Images of test prints
http://i.imgur.com/NoFZB.jpg Old nozzle check of the original situation. Ugly banding in the cyan bar, and a complete white line in the lower cyan.
http://i.imgur.com/IRhkD.jpg First nozzle check after 3 days of cleaning. The printer primed the head with ink automatically. The PGBK showed new clogs so I did a manual cleaning cycle.
http://i.imgur.com/OcG5V.jpg Second nozzle check, after the extra cleaning cycle mentioned above. The banding in the cyan is still showing, the clogs in the PGBK are less. The white line in the lower cyan bar appears smaller as well, so that clog is somewhat less I guess?
http://i.imgur.com/IS993.jpg Print of an island image with lots of cyan. Note the banding which shows up in many areas. The lower edge is very fickle due to banding: cyan is bleeding outside the image area.

Uploading the service test prints is giving me problems right now. The new service print looks somewhat better than the previous one, again in the cyan area. I found some prints I made 2 years ago with this same printer/printhead. And the quality was just so much better back then, it's unbelievable. Yet the ink was the same compatible stuff. So the printhead was slowly deteriorating over time. The first two years I've had this printer I didn't do a lot of cleaning and nozzle checking. So I don't know what killed the printhead: compatible ink or my laziness.

Conclusion
The whole Windex bath treatment has improved the nozzle check pattern and print quality. But only slightly... But it did help. I think I could do more cleaning because cyan was finally flowing out of the head when I stopped cleaning, albeit in minute quantities. So I guess I'm going to put the printhead for a full week in the little Windex tub... Aargh I hate waiting :/;)
 

The Hat

Printer VIP
Platinum Printer Member
Joined
Jan 18, 2010
Messages
15,632
Reaction score
8,700
Points
453
Location
Residing in Wicklow Ireland
Printer Model
Canon/3D, CR-10, CR-10S, KP-3
inkoholic
I hate to break it to you but youre wasting your time and its not going to get any better
no matter how hard you clean your print head.

The cyan on your nozzle check doesnt look any better than it did before it still has the same gap in it.
The best thing you can do is to start again and get a new MP610 or a new print head then OEM cartridges and good quality inks and then stay away from everything else otherwise your problems will surly return again.. :th
 

turbguy

Printer Master
Platinum Printer Member
Joined
Sep 10, 2007
Messages
1,558
Reaction score
1,427
Points
293
Location
Laramie, Wyoming
Printer Model
Canon i960, Canon i9900
Examing the "streaking" on your photo, it reminds me of printhead wear-out, where the nozzles are depositing ink in the wrong places (misdirected dots). A service test print (showing the pattern of EACH nozzle) would confirm this. I'm bet a service test print can be produced for your printer, but I don't know how, offhand.

Wayne
 
Top