Sealing the refill hole BCI-6 BCI-3

Grandad35

Printer Master
Platinum Printer Member
Joined
Feb 24, 2005
Messages
1,669
Reaction score
182
Points
223
Location
North of Boston, USA
Printer Model
Canon i9900 (plus 5 spares)
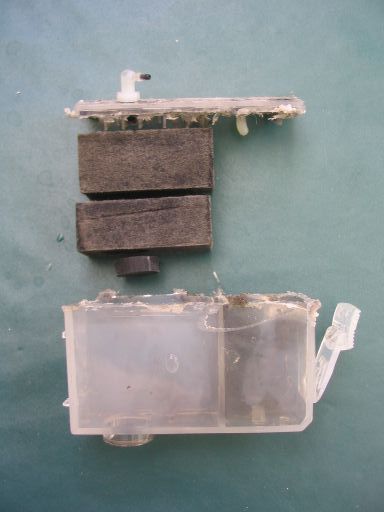
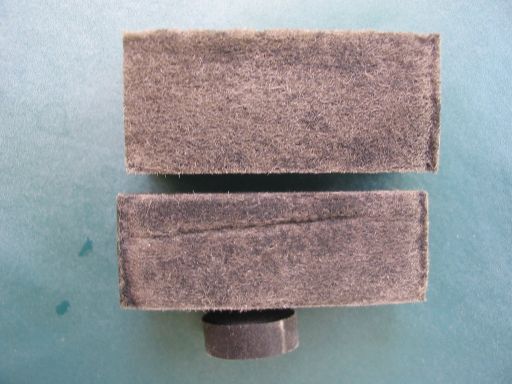
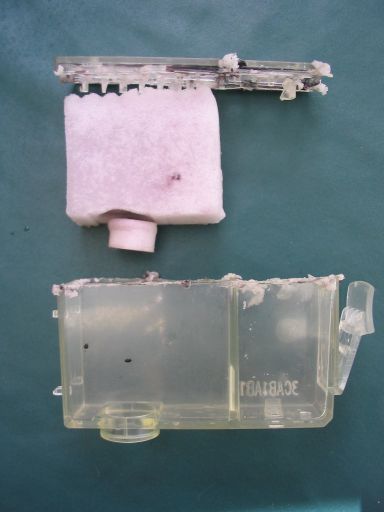
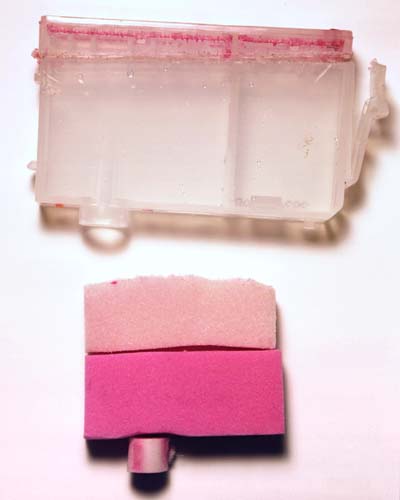
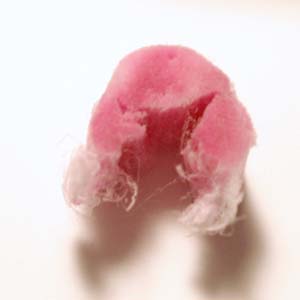
Because it is cost prohibitive to manufacture the print head and carts to such precise tolerances that the filter (the small cylindrical part that is about 8 mm in diameter by 8 mm tall) will always be in exactly the right position to "just touch" the ink pickup in the print head, they are apparently designed so that the bottom of the filter is always a little lower than the top of the print head's pickup when a cart is inserted into the print head. The filter is then forced to float up, compressing and giving good contact with the sponge

Ideally, when a cart is removed from the print head, the sponge will have enough force to push the filter back down to its original position (it must be free to "float" back down). If the filter or sponge fit too tightly into the case, there may not be enough force to push the filter or sponge all the way down, and good contact is not assured the next time that the cart is installed. It is doubtful that every manufacturer of replacement carts understands all of the design requirements of these carts and how important it is that the filter remains free to float and that the sponge material is stiff enough to push it back down. How many other design features are there that aren't obvious?

Perhaps I wasn't clear on what I meant by "tapping". I meant exactly what you did when you tapped your cart on the table. As you noted, this forced the filter back down into position. Because it so easy to do and I dont see any downside in doing it, I tap every cart every time that it is installed. If you run low on ink and dont notice it immediately, you may not burn out the print head, but you will probably cook some of the residual ink in the small holes and be in for extended cleaning cycles to clear the problem (an ounce of prevention ).
 

Mark

Getting Fingers Dirty
Joined
Mar 8, 2005
Messages
28
Reaction score
0
Points
22
Consistent with some recent posts and the theme of this thread, I'd like to add the following re: sealing cartridges. I'd like to encourage anyone that is not married to the idea of using tapes, adhesives, etc. to seal the tank or the discharge port to consider using another method. There are over 3000 nozzles on the i960, for example, so you can easily imagine how tiny those passages are. The danger of introducing any adhesive or other contaminate to your ink by i.e. temporarily taping over the bottom of the cart. while refilling or using glue to seal over the refill hole could potentially spell clogged nozzles. It seems that this thread contains some great alternatives that are proven to work that eliminate that hazard. I have had great personal success using the caps that come on some brands of cartridges to seal during refilling using the rubber band method Grandad described. Nifty's clips are another great method. I have seen instructions that simply suggest that you place the cart. on a small rubber pad and hold it in place while refilling. (See http://customer.stratitec.com/support.php?products_id=811&source=support). There are also at least 3 variations on sealing the refill hole with a screw technique listed including Ocular's tapped opening, Grandad's tapered head screw and the one I use by adding an O-ring. Others swear by the rubber plugs available.

Anyway, take advantage of some of the great ingenuity available here, and print lots of really cool stuff without influencing the national debt or damaging your printer. P.S. I am sending some shots of the materials I use and some finished cartridges to Nifty for posting if he deems them useful.
 

Nifty

Printer VIP
Administrator
Joined
Nov 3, 2004
Messages
3,046
Reaction score
1,405
Points
337
Location
Bay Area CA
Printer Model
CR-10, i560 ,MFC-7440N
Mark, thanks for the images! Here they are for everyone's viewing pleasure:

ink_carts_screw_1.jpg


ink_carts_screw_2.jpg


A quick note: Notice that this o-ring combination is not intended for the hole that is already in the cartridge. Leave the original fill hole intact and create a new hole for the screw / o-ring. The original fill hole is too big for the #6 screw.
 

Grandad35

Printer Master
Platinum Printer Member
Joined
Feb 24, 2005
Messages
1,669
Reaction score
182
Points
223
Location
North of Boston, USA
Printer Model
Canon i9900 (plus 5 spares)
I had a dead cart that had air in the sponge, so I decided to dissect it to see what's inside. The "SpongeFilter" shot shows that the sponge is actually 3 separate pieces. The top piece is a soft "open cell" foam (you can easily blow through it). The middle piece is fairly stiff and is a "closed cell" foam (you can't blow through it) This explains why it is practically impossible to get ink back into the cells of this foam if it is allowed to become empty. The bottom part (commonly called the filter) actually is a filter - it is very similar to the filter material used on cigarettes. The "FilterDetail" is a closeup after it was pulled apart - it is composed of very small fibers that are aligned vertically to allow the ink to easily flow down to the printhead while providing a fine filtration.

The "TopDetail" shot shows that the air vent is a long, narrow passage (traced in black to make it visible). There is a "pothole" in the middle of the vent passage, but it doesn't connect into the cart. The area that is covered by the top tape is tinted; the tape forms the top cover on the air vent passage and seals the fill port.

The two "PrismDetail shots show the design of the "prism" that is used to detect an empty cart. Detail 1 is a side view, and Detail 2 is an end view of a cut through the prism (parts of the cut have been colored with a black pen to make them visible). As I understand it, a beam of light passes up on one side of the prism. When ink covers the prism, the difference in the index of refraction between the plastic and the ink reflects the light first to the side and then back down to a sensor. As the prism is uncovered, some of the light just passes straight up into the ink chamber and the sensor gets a lower signal. There is a hole in the print head directly under the prism on each cart, so there must be a single light/sensor located in a position where the head passes every cart over the sensor when the head goes offline. Detail 2 also gives a good view of the passage connecting the bottom of the ink chamber with the bottom of the sponge chamber.

CaseSpongeFilter.jpg

FilterDetail.jpg

TopDetail.jpg

PrismDetail1.jpg

Prism_Detail2.jpg
 

Nifty

Printer VIP
Administrator
Joined
Nov 3, 2004
Messages
3,046
Reaction score
1,405
Points
337
Location
Bay Area CA
Printer Model
CR-10, i560 ,MFC-7440N
Holy Cow! Great work! So I guess you're ready to start producing your own cartridges now? ;)

BTW, is this an OEM cart or a NON-OEM cart?
 

Grandad35

Printer Master
Platinum Printer Member
Joined
Feb 24, 2005
Messages
1,669
Reaction score
182
Points
223
Location
North of Boston, USA
Printer Model
Canon i9900 (plus 5 spares)
This is a NON-OEM cart - I don't have any dead OEM carts at this time. Maybe some else has a dead OEM cart that they would like to test - all it takes is a hacksaw.

As Neil said in his write-up at:
http://www.neilslade.com/Papers/inkjetstuff11.html

"I have found that the PHOTO CYAN and PHOTO MAGENTA colors are used up two to four times faster than any other color. On top of this, if the cartridge goes completely empty before refilling-- nine times out of 10 you are screwed and you will never be able to get that cartridge to work properly again. Why? Air inside the sponge ink filler inside the cart will block the flow of ink, and there is NOTHING you can do to remedy this once it happens except replace the cartridge."

His statement is too much of a challenge to ignore. The purpose of the dissection was to find out why this happens and to try to find a way to rescue even carts that have air in the sponges. You should understand a problem in detail if you want to fix it.
 

Nifty

Printer VIP
Administrator
Joined
Nov 3, 2004
Messages
3,046
Reaction score
1,405
Points
337
Location
Bay Area CA
Printer Model
CR-10, i560 ,MFC-7440N
Grandad, after your analysis do you believe that it is impossible to rescue this section of the cartridge? Do you think there is a way to vacuum and/or pressurize ink into this section?

There is of course diminishing returns with the time spent recovering a $5 cartridge.

I think the solution is constant topping off of the cartridges and when one slips into oblivion it is replaced.
 

Grandad35

Printer Master
Platinum Printer Member
Joined
Feb 24, 2005
Messages
1,669
Reaction score
182
Points
223
Location
North of Boston, USA
Printer Model
Canon i9900 (plus 5 spares)
I know one thing for sure - the carts are empty when they are first filled at the factory, and they get the air out. It may be impractical to rescue a $5 (or less) cart, but I don't think that it's impossible. At this point, it's not about the $$, it's the challenge.

Given the design, it appears that the cart should be refilled before the ink in the outer chanber reaches the top of the passage connecting the two chambers, meaning that you will have to refill some colors every (25) 8x10 prints. Even with this precaution, the ink in the lower sponge will probably continue to drop over time.

I don't believe that pressure is the answer for several reasons - the main one being that air bubbles will just re-form as soon as the pressure is removed. Plus, I don't like the idea of a case failing and spraying ink all over me.

I built a high volume vacuum pump (27" Hg) this afternoon for $1.60, using parts that almost everyone already has at home, and I plan on running some experiments when I get a chance.

Is there anyone out there who knows the secret of how to get bubbles out of the sponge (and is willing to share it)?
 

ocular

Printer Guru
Joined
Feb 20, 2005
Messages
132
Reaction score
6
Points
131
Here is a dead OEM black cartridge and looks very similar to Grandad's Non OEM cartridge. It has the maze venting track over the sponge chamber with the maze traveling to the hole to nowhere. It has the two sponges + filter with the denser sponge at the bottom.

Note the right angled spigot tapped in the cartridge - this is off a CIS


OEMBlacksm.jpg


OEMBlackspongesm.jpg
 

ocular

Printer Guru
Joined
Feb 20, 2005
Messages
132
Reaction score
6
Points
131
Here is a nonOEM cartridge that is quite different. It came from

http://www.123inkjets.com.au/shopexd.asp?id=3

which is the same as
http://store.monsterinkusa.com/ccb3eb.html @0.84 US each

NonOEMblack.jpg


The top is structured so that the vent over the sponge compartment is just a hole with no associated maze. This vent hole is surprisingly large and can easily fit a pin in it.

There is a second hole that is over the reservoir chamber. This hole has been plugged with silastic- something useful if you wish to bleed the air out of the reservoir chamber. You can stick a fine needle (25g) into the silastic hole and leave it in to bleed out air. When the needle is removed from the silastic plug the hole is self sealing.

NonOEMtop.jpg


Interestingly the sponge is not divided into two types like the OEM cartridge.

NonOEMonesponge.jpg


I wonder if the black in this BCI-3eblk equivalent was dye rather than pigment as the black sponge easily washed clean with water, whereas the OEM black sponge didn't?

In fact after looking at this cartridge I think it would be possible to refill this cartridge without drilling holes or having to use plugs. A fine 25G needle could be put into the silastic plug over the reservoir chamber. A 20ml syringe filled wih ink with a 1/2" length of soft silastic tubing (used as fuel line in glow plug engines and obtainable from hobby shops) over the end. Push the syringe end over the vent hole and use the soft silastic tube to seal around the vent hole and inject the ink. Make sure the exit port is sealed securely. The fine needle in the silastic plug over the reservoir chamber will allow the air to bleed out and the cartridge to fill as the ink is injected. When full remove syringe and the fine needle and there will be no holes to plug or seal. This reminds me of how I refill my existing HP no 26 cartridge.
 
Top