CLI-8 and CLI-521/526 swap

The Hat

Printer VIP
Platinum Printer Member
Joined
Jan 18, 2010
Messages
15,639
Reaction score
8,705
Points
453
Location
Residing in Wicklow Ireland
Printer Model
Canon/3D, CR-10, CR-10S, KP-3
Yes is the answer you can over ride the Cartridge prism just like in the old chip-less BCI-6 cartridges.
On those printers if a cartridge showed empty and it was removed but not replaced with another one and the slot remained empty.

Then the printer would be completely fooled by this action and will carry on printing regardless and be unaware of the consequences. (Enter the Chipped cartridges)

While your method of partially filling the reservoir with just enough ink to cover the prism
and then resetting the chip will work it doesnt however fool the printer at all.

It will show low ink just as soon as the reservoir is empty and the chip will drop to that level also, however if you reset the chip once more this time the printer will ignore the prism and run the cartridge dry..:(

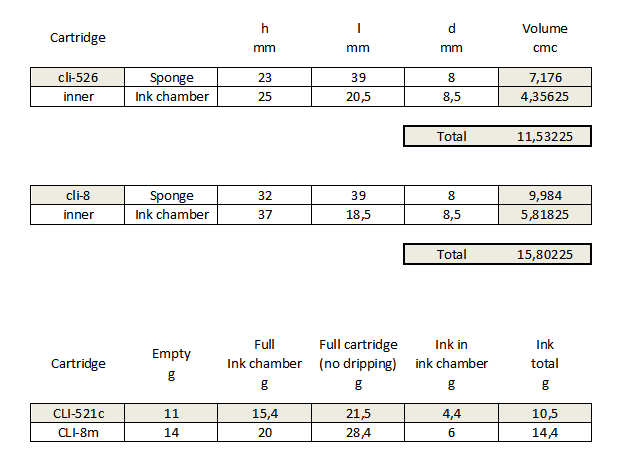
Tudor's test results in post #17.
 

mikling

Printer VIP
Platinum Printer Member
Joined
Jul 2, 2006
Messages
3,239
Reaction score
1,471
Points
313
Location
Toronto, Canada
There is a logic arrangement between prism and chip. If the chip is seen as full and the prism is empty, the printer will ignore the prism for a period then it will reassess the situation. Once the prism is empty for an extended period, it then begins a countdown that warns of low and then empty. The chip count is forced into the low point to resync at that point and the countdown to empty is retained on the chip.
 

The Hat

Printer VIP
Platinum Printer Member
Joined
Jan 18, 2010
Messages
15,639
Reaction score
8,705
Points
453
Location
Residing in Wicklow Ireland
Printer Model
Canon/3D, CR-10, CR-10S, KP-3
OK here is an up-date on my cartridge conversion. :barnie

I was running the printer to-day and got that terrible whirring sound
like the gears were slipping; it only happen the once on start-up.

When the print head goes over to the left hand side of the carriageway
the cartridges are bumping into a clip that holds on the top cover.

So it looks like a bit more surgery is required to trim down that clip to prevent this happening again, the printer is still working fine and finished printing my 20 page document. :thumbsup

I will return..:fl
 

The Hat

Printer VIP
Platinum Printer Member
Joined
Jan 18, 2010
Messages
15,639
Reaction score
8,705
Points
453
Location
Residing in Wicklow Ireland
Printer Model
Canon/3D, CR-10, CR-10S, KP-3
I was right; surgery was needed as it turned out.

The little clip on the top cover was about 6mm in depth and had a clamp attached to it that held on the side panel, so I decided it had to go because it was sticking down just enough to catch the edge of the cartridge.

I managed to drill holes right around this clip and then remove the whole thing without having to take the cover or sides of the printer.

I then taped over the hole and tried the printer again this time success no more grinding and it now works normally.
Job done..

5128_new_hole.jpg
5128_new_fill.jpg
 

Tudor

Print Addict
Platinum Printer Member
Joined
May 6, 2011
Messages
505
Reaction score
202
Points
183
Location
Cluj-Napoca, Romania
Printer Model
Epson L800, 1400; ML-2165W
It seems this modification was a success. Well done, Brian!

Still curious about ink levels, though. How many ml would you say your cli-8s had in the ink chamber? Do you fill right up to the original fill hole?
 

PeterBJ

Printer VIP
Platinum Printer Member
Joined
Nov 27, 2010
Messages
5,064
Reaction score
4,913
Points
373
Location
Copenhagen Denmark
Printer Model
Canon MP990
I see no problem with the ink levels as the CLI-8 has both a larger ink reservoir and larger sponges than the CLI-521/526.

The CLI-8 has a nominal capacity of 13 ml and the CLI-521/526 has a nominal capacity of 9 ml. To determine the capacity of the ink chambers I refilled a CLI-8 and a CLI-526 using the German method and weighed the cartridges empty and after having refilled the ink chambers. I found that the ink chamber of the CLI-8 contains 6 ml, which means the sponges should contain 7 ml in a properly refilled CLI-8. The ink chamber in the CLI-526 contains approximately 3.8 ml meaning the sponges should contain approximately 5.2 ml. It is a bit harder to determine when the ink chamber is filled 100% and no ink has entered the sponge with the opaque CLI-526, than it is with the fully transparent CLI-8.

This is also a chance to verify the operation of the prism/sensor system. If it is active one should expect to get the low ink warning at the time the ink chamber is empty, not after approximately 3.8 ml of ink has been used. So could you please report your findings, The Hat?
 

The Hat

Printer VIP
Platinum Printer Member
Joined
Jan 18, 2010
Messages
15,639
Reaction score
8,705
Points
453
Location
Residing in Wicklow Ireland
Printer Model
Canon/3D, CR-10, CR-10S, KP-3
Tudor said:
It seems this modification was a success. Well done, Brian!

Still curious about ink levels, though. How many ml would you say your cli-8s had in the ink chamber? Do you fill right up to the original fill hole?
I treat these CLI-8's as I would any other no different, in fact they were been used
as CLI-8 carts prior to me putting the 521 chips onto them.

The answer in converting any of these printers over to using the bigger carts
easier would be to use a Dremel tool; its probably the best tool for the job.

I would suggest that anyone contemplating this upgrade to check whats under the top cover first, to see what surprises are awaiting them, there is very little head room inside the newer printers.

Upgrading what you can see inside your printer when the top lid is open are the easy bits,
like the Print head carriage and the top cover itself, but its the bits you cant see that are the ones that will catch you out, I even got a few surprises myself so please look under the top cover to be sure first.

All my printer now use the clear larger cartridges which makes my refilling so much easier and convenient, I just have to add another ten cartridges to my refilling stock.

If you fail in your attempts to get the CLI-8 cartridges to fit and work properly,
there is no real long term damage done, the smaller original carts can and will still work just like normal..
 

Tudor

Print Addict
Platinum Printer Member
Joined
May 6, 2011
Messages
505
Reaction score
202
Points
183
Location
Cluj-Napoca, Romania
Printer Model
Epson L800, 1400; ML-2165W
Did some measurement on a cli-521 and a cli-8 (weight and dimensions):

<--- click to enlarge

The sponges were completely saturated (overfilled) with no dripping.

A cli-8 has 36% (1,6ml) more ink in the ink chamber than a cli-521/526. That's significant increase in usage if the prism works.


The Hat said:
The answer in converting any of these printers over to using the bigger carts
easier would be to use a Dremel tool; its probably the best tool for the job.
Wouldn't that make a lot of plastic dust?
 

The Hat

Printer VIP
Platinum Printer Member
Joined
Jan 18, 2010
Messages
15,639
Reaction score
8,705
Points
453
Location
Residing in Wicklow Ireland
Printer Model
Canon/3D, CR-10, CR-10S, KP-3
If you first remove your carts and print head then you can handle the dust
by lining the inside of your printer with tissue paper.

When your finished with all of your cutting the tissue paper is so easy to remove
and if there is still any tiny bits of plastic left inside you can blow them out yourself or use compressed air to do it.

I used a drill and junior hacksaw to do the cutting but I reckon the dremel would do a much neater and cleaner job.

I noticed after I had finished the job that Lidl had a similar tool in stock this week at the local store.. :(
 

PeterBJ

Printer VIP
Platinum Printer Member
Joined
Nov 27, 2010
Messages
5,064
Reaction score
4,913
Points
373
Location
Copenhagen Denmark
Printer Model
Canon MP990
The Hat wrote:

I used a drill and junior hacksaw to do the cutting but I reckon the dremel would do a much neater and cleaner job.
I noticed after I had finished the job that Lidl had a similar tool in stock this week at the local store.. :(
Wouldn't it have been much easier to do the cutting on the top part of the casing after having removed it from the printer? In case you don't already have it, here is a simplified service manual for the iP4700: http://www.gondack.com.ar/media/useruploads/files/ip4700-ssm.pdf

At a quick glance the disassembly procedure in this manual seems to be the same as for the iP4600.
 
Top