- Joined
- Jan 18, 2010
- Messages
- 15,915
- Reaction score
- 8,923
- Points
- 453
- Location
- Residing in Wicklow Ireland
- Printer Model
- Canon/3D, CR-10, CR-10S, KP-3
The NEW guide to the PGI-9s cartridge made very easy.
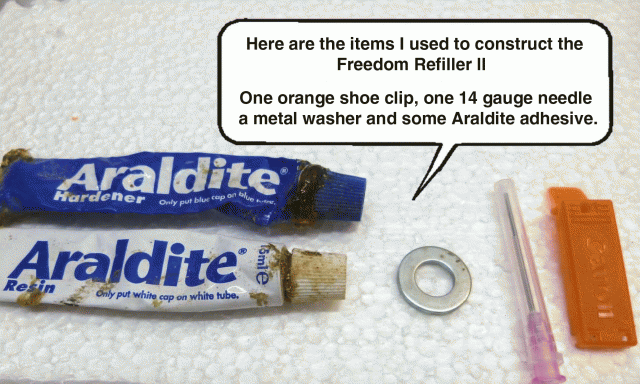
The items needed.
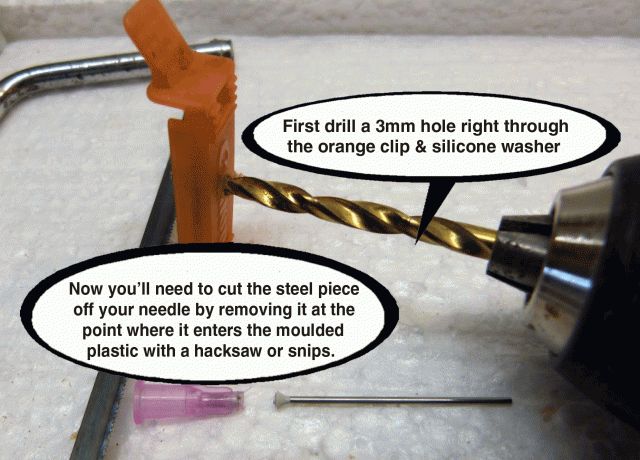
(1) Drilling and cutting.
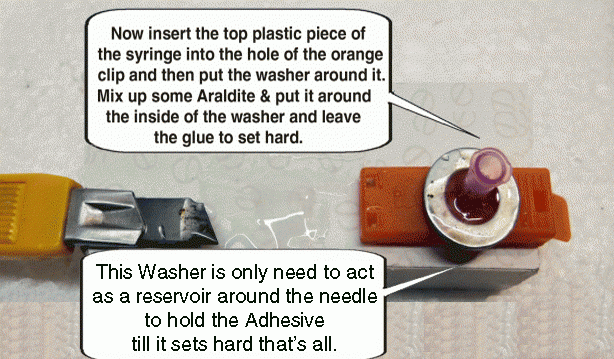
(2) Putting it all together.
By following these four easy steps you now should have your own new freedom refiller.
-------------------------------------
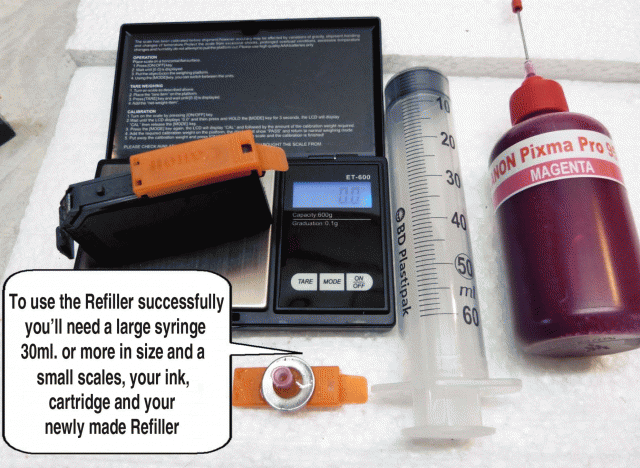
Now the items needed for refilling.
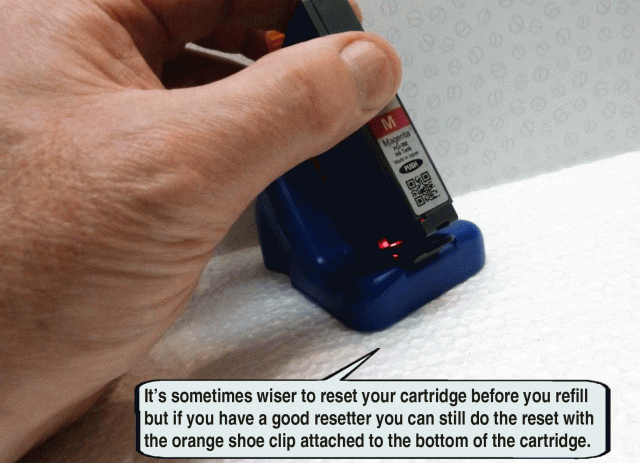
Please remember to reset the chip before you start to do your refilling.
First turn the cartridge for refilling upside down and place the original orange clip on the cartridge,
next place the cartridge on your scales and check its weight (new cartridge weighs 34gm. approx).
Now using this formula (1 gm. = 1 ml.) Subtract the weight of your empty cartridge from 34 gms.
and the amount left is the maximum amount of ink you can safely put back into your cartridge.
This is the added extra edited section to make the refilling so much easier than before.
Remove the orange shoe clip from the bottom of the cartridge and replace it with your newly constructed refiller.
Then take your syringe and attach it to your refiller while holding the syringe below the cartridge
pull back on the plunger gently till you feel some resistance then stop.
This removes all the air out of the cartridge.
Now if you dont have a scales you can use the method described above to fill any of your cartridges at any time
by just removing the remaining ink and air left in your cartridge and then top-up or refill
the syringe again to 16 ml and reinject the ink back into the cartridge,
your cartridge is now full and ready for instant use.
----------------------------------------------------------------------------------
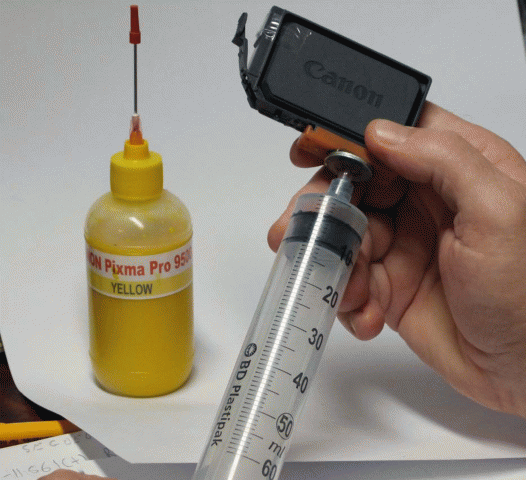
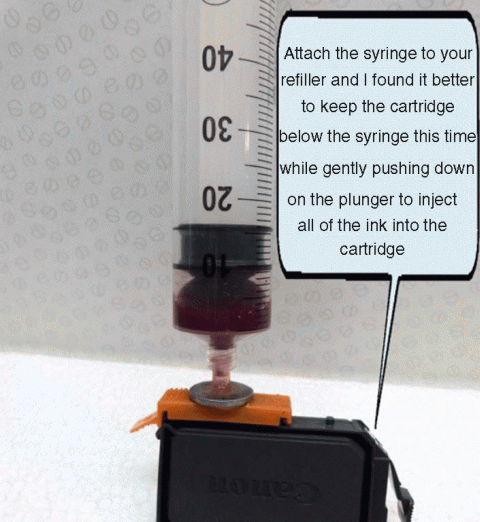
Now youre ready to refill your cartridge.
Fill your syringe with the right amount of ink then attach it to your refiller, as before
I found it better to keep the cartridge below the syringe this time while GENTLY
pushing down on the plunger to inject all of the ink into the cartridge.
Next you slowly remove the syringe from your refiller, Then the refiller itself
just give the cartridge a little wipe and replace your original orange shoe clip.
Thats all there is too it All done EASY ! ! ! AND NO MESS.
So Happy Refilling..
-----------------------------------------
Please Note
I would like to point out a clarification here of one big significant difference between the CLI-8 and PGI-9 cartridges during refilling,
and its only in relation to using The Freedom Refill Method for Canon CLI-8 cartridges,
that its clearly understood that you NEVER push down on the plunger
but in fact hold it back so it doesnt go in to fast during the entire refilling operation.
----------------------------------------------------------------------------------
The information above does not relate to this refilling method.
When refilling your cartridges there is no need to try and overfill them
and make a mess so long as it weighs more than 32 gm. it will be fine.
The preferred method I like to use is to replace a cartridge when showing low ink
rather than waiting for the printer to stop when its out of ink altogether.
Please remember that the resetter only works on eight of the cartridges and
youll have to make your own arrangements regarding the other two namely the (PBK and Grey).
There are three ways you can overcome this little problem by:-
Disabling the ink monitoring on these two particular cartridges only
or use a onetime chip and replace it every time you refill
and lastly you can use the ARC chip.
All three of these methods work and youll have to use one of them if you wish
to continue to print or you can take the most expensive route by purchasing new OEM cartridges each time,
but that takes the fun out of having this printer altogether.
-----------------------------
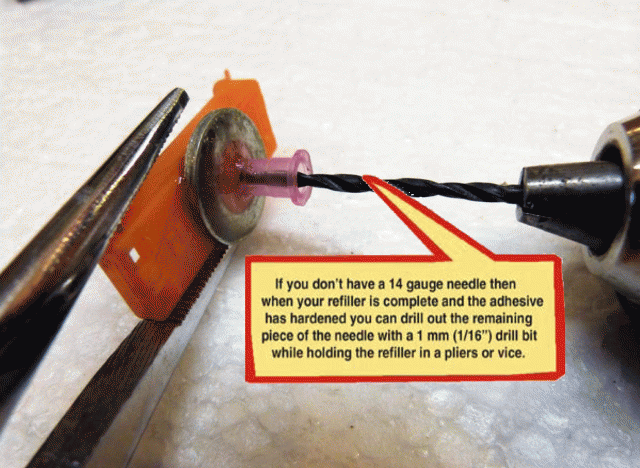
The washer is not really need for anything other than to act as a reservoir
around the needle to hold the adhesive till it sets and goes hard thats all.
You can use a plastic, rubber or a paper washer if you dont have a one big enough and or dont use one at all.
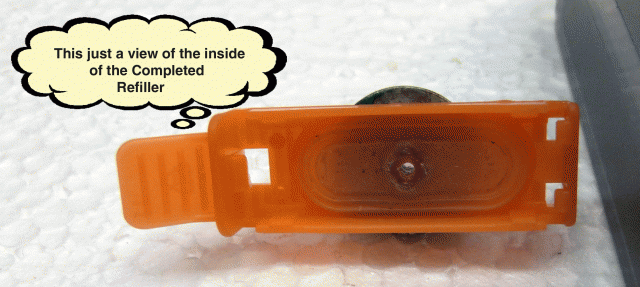
I have tried to explain it all in as much detail and illustrated pictures as I can on how to construct this little refiller,
so it shouldnt pose to much a problem for most DIY guys.
These little refillers work perfectly for me so they should work for anybody who wishes to make them.
a quick video is available on this refiller :- http://www.youtube.com/watch?v=fnaWgfQDMJQ
E&OE.
The items needed.
(1) Drilling and cutting.
(2) Putting it all together.
By following these four easy steps you now should have your own new freedom refiller.
-------------------------------------
Now the items needed for refilling.
Please remember to reset the chip before you start to do your refilling.
First turn the cartridge for refilling upside down and place the original orange clip on the cartridge,
next place the cartridge on your scales and check its weight (new cartridge weighs 34gm. approx).
Now using this formula (1 gm. = 1 ml.) Subtract the weight of your empty cartridge from 34 gms.
and the amount left is the maximum amount of ink you can safely put back into your cartridge.
This is the added extra edited section to make the refilling so much easier than before.
Remove the orange shoe clip from the bottom of the cartridge and replace it with your newly constructed refiller.
Then take your syringe and attach it to your refiller while holding the syringe below the cartridge
pull back on the plunger gently till you feel some resistance then stop.
This removes all the air out of the cartridge.
Now if you dont have a scales you can use the method described above to fill any of your cartridges at any time
by just removing the remaining ink and air left in your cartridge and then top-up or refill
the syringe again to 16 ml and reinject the ink back into the cartridge,
your cartridge is now full and ready for instant use.
----------------------------------------------------------------------------------
Now youre ready to refill your cartridge.
Fill your syringe with the right amount of ink then attach it to your refiller, as before
I found it better to keep the cartridge below the syringe this time while GENTLY
pushing down on the plunger to inject all of the ink into the cartridge.
Next you slowly remove the syringe from your refiller, Then the refiller itself
just give the cartridge a little wipe and replace your original orange shoe clip.
Thats all there is too it All done EASY ! ! ! AND NO MESS.
So Happy Refilling..
-----------------------------------------
Please Note
I would like to point out a clarification here of one big significant difference between the CLI-8 and PGI-9 cartridges during refilling,
and its only in relation to using The Freedom Refill Method for Canon CLI-8 cartridges,
that its clearly understood that you NEVER push down on the plunger
but in fact hold it back so it doesnt go in to fast during the entire refilling operation.
----------------------------------------------------------------------------------
The information above does not relate to this refilling method.
When refilling your cartridges there is no need to try and overfill them
and make a mess so long as it weighs more than 32 gm. it will be fine.
The preferred method I like to use is to replace a cartridge when showing low ink
rather than waiting for the printer to stop when its out of ink altogether.
Please remember that the resetter only works on eight of the cartridges and
youll have to make your own arrangements regarding the other two namely the (PBK and Grey).
There are three ways you can overcome this little problem by:-
Disabling the ink monitoring on these two particular cartridges only
or use a onetime chip and replace it every time you refill
and lastly you can use the ARC chip.
All three of these methods work and youll have to use one of them if you wish
to continue to print or you can take the most expensive route by purchasing new OEM cartridges each time,
but that takes the fun out of having this printer altogether.
-----------------------------
The washer is not really need for anything other than to act as a reservoir
around the needle to hold the adhesive till it sets and goes hard thats all.
You can use a plastic, rubber or a paper washer if you dont have a one big enough and or dont use one at all.
I have tried to explain it all in as much detail and illustrated pictures as I can on how to construct this little refiller,
so it shouldnt pose to much a problem for most DIY guys.
These little refillers work perfectly for me so they should work for anybody who wishes to make them.
a quick video is available on this refiller :- http://www.youtube.com/watch?v=fnaWgfQDMJQ
E&OE.


")