Testing print head flow.

Ron350

Print Addict
Joined
Mar 7, 2007
Messages
428
Reaction score
77
Points
176
Location
Alabama
Printer Model
-
Testing print head flow out of the printer.


Once you have cleaned your print head using one of the many methods listed on this forum see how well it flows.
One method is to remove the intake port rubber seals and push on vinyl tubes.

The small ports take 5/16OD x 3/16ID tubing.

The large black port takes 7/16OD x 5/16OD tubing.

In the US most hardware stores sell the vinyl tubing by the foot and hopefully they do the same in other countries.

To test how open the print head screens and passages are fill each vinyl tube with distilled water (filtered water) and see how fast the level in the vinyl tube drops. To break surface tension you can put one drop of Windex in the water.

From what little testing I have done the water should flow through an unclogged print head in one or two minutes. Occasionally an air bubble will prevent flow but blowing on the tube will cure that.
If the water just sits in the tube I know there is still blockage some where between the intake screen and the nozzle chamber.

Just to be safe I place the print head on a damp sponge in a plastic container to prevent scratching any part of the print head.

Before placing any print head back in a printer I use caned air to dry out the eprom chip and circuit board.

Link to Manuchau post that made me think to post this.

http://www.nifty-stuff.com/forum/viewtopic.php?id=3960


2056_canon_tubes_001b.jpg


2056_canon_tubes_003b.jpg


2056_canon_tubes_006b.jpg


2056_canon_tubes_008b.jpg


2056_canon_head_003a.jpg


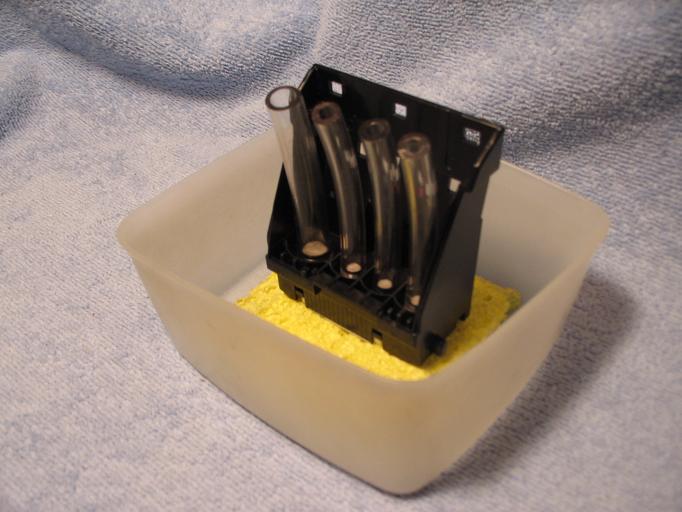
The picture above is supposed to be showing where to place the canned-air to dry off the print head circuit board. I am paranoid about getting any fluid down in those holes and shorting out the eprom.

.
 

embguy

Printer Guru
Joined
Mar 9, 2009
Messages
331
Reaction score
3
Points
141
This is a good way to test the blockage without using ink. I can just dry it and put it away for storage without worry about the residue ink left in the printhead.
 

embguy

Printer Guru
Joined
Mar 9, 2009
Messages
331
Reaction score
3
Points
141
When I installed my MX850 two weeks ago, I noticed there is a light blue liquid at the printhead and shipping printhead holder. It may be a good idea to leave some distilled water or Windex in the nozzles before storing the printhead.

I am saving the shipping printhead holder to protect the printhead during unclogging processes discussed in this forum.
 

websnail

Printer VIP
Platinum Printer Member
Joined
Oct 27, 2005
Messages
3,661
Reaction score
1,345
Points
337
Location
South Yorks, UK
Printer Model
Epson, Canon, HP... A "few"
embguy said:
When I installed my MX850 two weeks ago, I noticed there is a light blue liquid at the printhead and shipping printhead holder. It may be a good idea to leave some distilled water or Windex in the nozzles before storing the printhead.
The light blue liquid is a shipping liquid to keep the printhead clean and it gets flushed out during the initial priming process... Windex might be a bit aggressive though... I'd probably go with distilled water myself.

I think there was some discussion about storing printheads elsewhere on the forum that might help there.
 

pharmacist

Printer VIP
Platinum Printer Member
Joined
May 29, 2007
Messages
2,575
Reaction score
1,287
Points
313
Location
Ghent, Belgium
Printer Model
Epson SC-P800,WF-7840,XP-15000
Ron350,

What is equivalent metric size for the OD en ID for these tubes "?
 

Ron350

Print Addict
Joined
Mar 7, 2007
Messages
428
Reaction score
77
Points
176
Location
Alabama
Printer Model
-
The dimensions of the vinyl tubing I listed above are the numbers stamped on the tubing.
The small tubing is stamped 5/16OD x 3/16ID tubing.
The large tubing is stamped 7/16OD x 5/16OD tubing.

Actual approximate dimensions of the vinyl tubing are.

Small tubing = .190ID = 4.8mm ID with 1.7mm wall thickness.
Large tubing = .325ID = 8.25mm ID with 1.6mm wall thickness.

Print head intake port approximate OD are.

Small port = .210 = 5.34mm.
Large port = .365 = 9.27mm.

This vinyl tubing fits so tight sometimes I have to warm it up with a hair dryer or warm water before putting it over the print head ports. This vinyl tubing is fairly stiff so once it is on the port dont worry about it falling off.

Putting the vinyl tubing over the ports is not my idea several people talked about this in the past.
 

pharmacist

Printer VIP
Platinum Printer Member
Joined
May 29, 2007
Messages
2,575
Reaction score
1,287
Points
313
Location
Ghent, Belgium
Printer Model
Epson SC-P800,WF-7840,XP-15000
Ron35,

thanks for your information.
 

Smile

Printer Master
Joined
Aug 23, 2006
Messages
1,914
Reaction score
417
Points
253
Location
Europe EU
Printer Model
Canon, Brother, HP, Ricoh etc.
I have used ultrasonic cleaner (yes I know canon print head die and should not be cleaned this way.)

But I have filled the ultrasonic cleaner with tap water to the top, then I took a small plastic container, and filled 1/3rd of it with distilled water, I added some 1.5ml ammonia 10%

Then I positioned the container on the side if the ultrasonic cleaner where the waves are very weak. It took just about 10sec. to unclog a print head. The longer you keep the ultrasonic cleaner working the more risk you take.

However caution should be taken, as I've also killed ip1000 print head by holding it in the center of the cleaner where the waves are strongest. So if you can't soak the head back to life, this method should be attempted before you discard of the print head as it may save you :)
 

Iprintstuff

Getting Fingers Dirty
Joined
Aug 12, 2011
Messages
13
Reaction score
0
Points
22
Location
USA
I too have used a Ultra sonic cleaner. I have a mx870 the colors stop working and also when I do a test print I have missing lines on the pigment black (about 33 broken/missing lines.) Well, after I ran it thru the Ultrasonic cleaner all the lines were restored back to normal but I was still having problems with the color. I did a flow test where I would use a syringe and some vinyl tubing and pressurize each ink intake port on the print head. I notice on the pigment black and the black I get a very nice fine mist but the colors just guzzle or drizzle sloppy ( so I'm guessing my colors are clogged). Whats weird is before I clean I would switch sometimes before the colors worked but not the black. Would anyone know if canon might of put some sort of haywire mode on these printer? just a thought lol.
 
Top