SOLVED: Canon MP830, new PGI-5BK and new (reman) print head - no black

mikeasmel

Getting Fingers Dirty
Joined
Sep 24, 2009
Messages
10
Reaction score
0
Points
21
Thank you for the reference to the #19 photos. Unfortunately, I still don't really know or understand where that is? I can't seem to locate those on my Canon MP830. Please advise how to find those.
 

embguy

Printer Guru
Joined
Mar 9, 2009
Messages
331
Reaction score
3
Points
141
I added text labels on the photos.

4064_mp830-cover_open.jpg


4064_mp830-purge-pads.jpg
 

ghwellsjr

Printer Master
Platinum Printer Member
Joined
Jun 16, 2006
Messages
3,645
Reaction score
85
Points
233
Location
La Verne, California
Printer Model
Epson WP-4530
mikeasmel said:
I have the same problem with my Canon MP830...my PGBK doesn't work though it is half filled. Where exactly is the print pad that I am supposed to flood with Windex and what does it look like? I have taken out the print cartridges as well as the black plastic unit that holds all 5 cartridges, however I don't understand where I am supposed to put Windex? Please advise and/or post photos and specific locations. Thanks much!
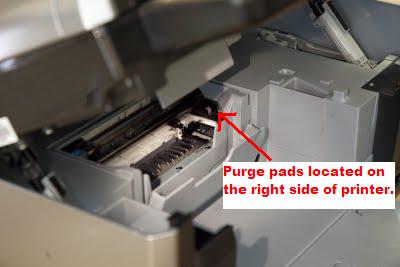
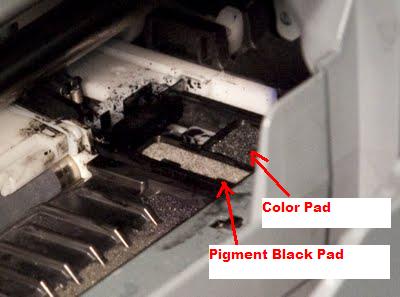
You don't need to, nor should you, remove the cartridges or print head (the black plastic unit) to access the purge pads (not print pads). When you open the printer cover, the print head will move to the center of the printer so that you can gain access to the purge pads. The photos that embguy editted show clearly where the pads are located but they may be very difficult to see on your printer. But once you know what to look for, I'm sure you be able to identify them.
 

mikeasmel

Getting Fingers Dirty
Joined
Sep 24, 2009
Messages
10
Reaction score
0
Points
21
Does anyone know where the "wiper contacts of the purge unit" are and if so, can you please describe and/or show a photo pointing to them? I was instructed to clean them with paper towel and Windex. Thanks!
 

ghwellsjr

Printer Master
Platinum Printer Member
Joined
Jun 16, 2006
Messages
3,645
Reaction score
85
Points
233
Location
La Verne, California
Printer Model
Epson WP-4530
I think this must be the thin rubber blades that stick up just behind the purge pads. You can see them in the bottom photo a few posts above this one. They are the black pieces located in the photo just to the left of the purge pads. There are two rows of them, one that spans the width of both pads and one that contains two blades, a narrow one for the pigment black nozzles and a wider one for the dye ink nozzles.

However, I would not recommend that you clean them with a paper towel unless you have taken the whole printer apart because you will probably get ink on the timing strip which goes across the printer behind the print head. It would be better to use Q-tips (cotton swabs).
 

mikeasmel

Getting Fingers Dirty
Joined
Sep 24, 2009
Messages
10
Reaction score
0
Points
21
ghwellsjr...Thanks very much!

Ok, so now I have followed Trigger37's instructions for putting water on the purge pads and unfortunately, the water doesn't seem to drain. Before I concede that the purge unit is completely faulty and needs to be replaced, should I do anything else, like use Windex on the purge pads? Or?

If in fact I need to replace the purge unit, does anyone have any advice how to do that?
 

ghwellsjr

Printer Master
Platinum Printer Member
Joined
Jun 16, 2006
Messages
3,645
Reaction score
85
Points
233
Location
La Verne, California
Printer Model
Epson WP-4530
Did you try what pourhaus did in post #19? He removed the pigment black purge pad and cleaned it and the rubber tray it fits in and put it back and then did some cleanings and that fixed his problem.

I tried this on another MP780 belonging to a friend of mine and it fixed his printer too.

Another thing I did was put a syringe on the small opening the tube connects to and suck on it. I don't know if this made any difference but you might want to try this too. On my printer, there are two of these holes but one of them is very hard to get to without taking the cover off the printer.

I'm thinking that what appears to be a purge pump clog may really be simply a clogged purge pad and I think on the other printers I was trying to fix by simply putting lots of Windex on the pad, I ended up forcing the clog down the purge tubing and making it worse.

Note when you remove the pad how it is placed in the rubber tray it sits in so you can get it back in the same way. You will see that one corner is cut off. This corner goes in the far right position.
 

mikeasmel

Getting Fingers Dirty
Joined
Sep 24, 2009
Messages
10
Reaction score
0
Points
21
I will try to remove the purge pads and clean them and do what pourhaus did in #19.

For further clarification:

1) Any ideas on how to remove the purge pads? Tweezers?

2) I don't know how Pourhaus got the printer to print all of the colors including the black, after he cleaned the purge pads if he didn't then load all of the ink cartridges and print head back in? I presume that is what is being instructed after the purge pad cleaning?
 

embguy

Printer Guru
Joined
Mar 9, 2009
Messages
331
Reaction score
3
Points
141
Let me summarize the purge unit unclogging procedure.
1. Take out the purge pads. Clean the purge pad holder inlet port(s). Do the purge unit test again by flooding the pads with Windex or water.
2. May need to suck the clog out by using a syringe if clog persists.
3. Time to open the printer and visually inspect the purge unit tubing.
 
Top