HowTo? Remove plastic ball from CLI-8 inlet port?

l_d_allan

Fan of Printing
Joined
Feb 2, 2011
Messages
420
Reaction score
1
Points
64
Location
Colorado Springs, CO
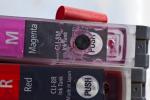
So far, I've been pushing the plastic ball that seals the oem Canon CLI-8 carts into the reservoir. It is under the "PUSH" on the top.


I'm considering removing this plastic ball, and would appreciate suggestions.

* Are there pro's and con's to pulling the plastic ball out rather than pushing it through into the reservoir?

* From other posts, it seems like one method is to push a heated paper-clip or needle or stick-pin throught the plastic ball to melt a small hole in it. Then thread in a small eyelet screw and pull it out. The smallest eyelet screw I found at Lowes was #216 x 11/16" SKU 490965. I also got the somewhat larger #14 x 1-1/16" SKU 490953.

* Ok to use very small drill bit like 1/16" ?

* I'm hesitant to drill another hole into the cartridge, and am inclined to use the existing hole that is designed for this purpose.
 

on30trainman

Printer Guru
Joined
Jan 22, 2006
Messages
310
Reaction score
0
Points
109
Location
Philadelphia, PA area
I have used versions of both methods you describe:
1. Use a small diameter drill (1/16" or #50 or so) in a pin vise (can be bought at any hobby shop) to hand drill a hole in the ball. Use the screw/eyelet screw to pull the ball out. Would not try drilling the hole with a power drill.

2. I have a 15W soldering iron with a fine tip. Make a hole in the ball with the hot iron and use the screw/eyelet in the same way to pull the ball. Have to be careful that the soldering iron tip doesn't hit the surrounding wall. Not good for someone with shaky hands :D.

Both methods work fine.

Steve W.
 

Redbrickman

Printer Master
Joined
Dec 27, 2010
Messages
1,105
Reaction score
1,189
Points
293
Location
UK
Printer Model
MB5150
By trying a few methods you will arrive at the best technique to suit you.

I prefer to use a pointed steel tool held in a hobby craft handle. A few seconds heating over a gas ring, then careful aim and a steady hand allows me to push the point gently through the ball and make a small hole in the top (not right through to the other side of the ball).

As soon as I do that when the plastic is still warm I insert a small screw hook and screw it in until it hits the bottom of the ball.

You know when you have the hook screwed in as far as it will go as the ball usually begins turning in the fill hole.

It's easy then to just pull the ball out on the end of the hook.

Using the method above I feel has some advantages...

1 Less chance to damage the cartridge (unless you slip and melt the side) :) and less chance to damage yourself :)

3 Nothing is left inside the reservoir.

Just one caveat... don't burn your hand with the point ;)


BTW Emerald - I use the same squeezy bottle technique you use to purge the cart through the top hole. I have to, as the tap water is loaded with calcites, so economic use of distilled water is easy with the bottle.

I use the empty bottle to force air through the cart when finished flushing. It take the surplus water out, and then I just let them dry naturally.

I did use the folded paper towel technique on a few, but now I'm too nervous of a few paper fibres staying on the outlet port, and maybe finding their way into the print head. Small risk I know, but one that is easily avoided unless in a hurry to dry the carts.
 

l_d_allan

Fan of Printing
Joined
Feb 2, 2011
Messages
420
Reaction score
1
Points
64
Location
Colorado Springs, CO
Redbrickman said:
By trying a few methods you will arrive at the best technique to suit you.
Thanks for the guidance from each of the repliers ... Here's a description of my current technique ... #22 rather than #21. Suggestions / refinements / corrections appreciated. I've removed about 10 plastic balls successfully, but I think there is room for improvement. I'm glad you only have to do this once per cart.
 

l_d_allan

Fan of Printing
Joined
Feb 2, 2011
Messages
420
Reaction score
1
Points
64
Location
Colorado Springs, CO
Since the OP, I've done two batches of virgin, empty CLI-8 and PGI-5bk carts. I use top-filling through the inlet port, which involves removing the plastic sealing ball at the top above the reservoir. My practice is to purge/flush carts from unknown sources.

There were three steps, and I did each step to all the carts before doing the next step to all of the carts. The process goes pretty quickly once you get the hang of it. It took about 35 to 40 minutes to prep 30 carts for subsequent purging and refilling.

* Used a small pen knife to cut off a small circle of the label tape above the plastic ball.

* Used a diaper-like safety pin, heated with a candle until the tip of the pin is a dull red-hot.
- The pin tip was pushed all the way through the plastic ball.
- As I removed the pin, I twirled it around a bit off-center to slightly enlarge the still semi-molten hole for the eyelet screw to enter.
- I found it to be easier to have the candle lit throughout this step for all carts, so I did each step in batches.
- Obviously, be careful of an open flame.
- You'll get some molten plastic residue from the plastic ball on the pin. I burned this off when heating the pin for the next cart.
- Note that you want to be careful not to touch the surrounding plastic of the cart itself with the heated pin, which could deform it and detract from ... if not ruin ... the top seal.

* Threaded in a very small eyelet screw I got at Lowes (#216 x 11/16"), and pulled out the plastic ball.
- Generally, you need to thread it in just enough so you can feel the plastic ball spinning a bit within the inlet port.
- Don't go all the way through the plastic ball as that can wedge it more tightly within the inlet port.
- If the plastic ball is stubborn to remove, put a small screw-driver through the eyelet to get better pull, but that usually wasn't necessary.
 

nche11

Printing Ninja
Joined
Mar 3, 2008
Messages
230
Reaction score
0
Points
79
Why are people still tampering the original plugs of OEM cartridges. It is a lot easier to drill a new hole next to it and use a pug to plug it up. I have been happily using plugs come with Hobbicolors refill kits for years. It is so much easier to leave the original plug alone and drill a new small hole. You can see a Hobbicolors refill kit here that shows the plugs: http://cgi.ebay.com/Hobbicolors-5C6.../260767406659?pt=BI_Toner&hash=item3cb6f2da43
 

slocumeddie

Fan of Printing
Joined
May 12, 2010
Messages
139
Reaction score
6
Points
66
Location
Phoenix(It's a dry heat!)
nche11 said:
Why are people still tampering the original plugs of OEM cartridges. It is a lot easier to drill a new hole next to it and use a pug to plug it up.
I have tried and tried, but my pug just won't stand for it. I think he may have even called the ASPCA to report me
for abuse........................:D
 

The Hat

Printer VIP
Platinum Printer Member
Joined
Jan 18, 2010
Messages
15,628
Reaction score
8,698
Points
453
Location
Residing in Wicklow Ireland
Printer Model
Canon/3D, CR-10, CR-10S, KP-3
nche11
Well done that was a real nice plug for Hobbicolors thanks, I will read it later.. :)
 

rodbam

Printer Master
Joined
Mar 9, 2011
Messages
773
Reaction score
173
Points
213
Location
Australia
Printer Model
Canon Pro 9000 mk2 & Pro 9500
Maybe having one plug is considered better than having two plugs as potential leak sites. I've just done my first refill & found removing the OEM plugs in the BCI6 cartridges a real pain but it did get easier after doing a couple & once the aftermarket plugs are installed it becomes an easy job to refill. On my CLI8 cartridges I used the German method method & felt more comfortable with that for a first refill but I do have doubts about disturbing the sponges each time I will have to refill whereas with the top fill method it means just removing the top plug.
Regards Rod
 
Top