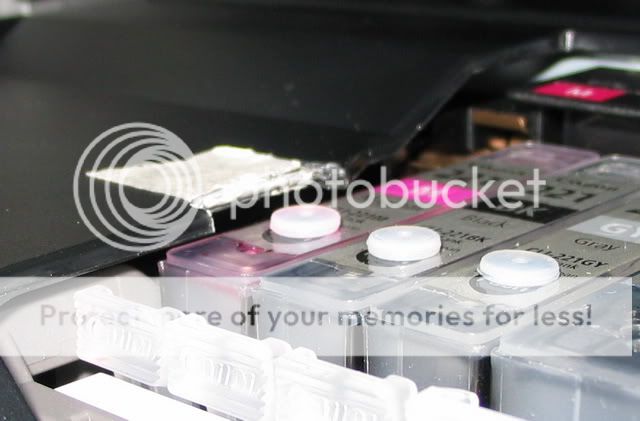
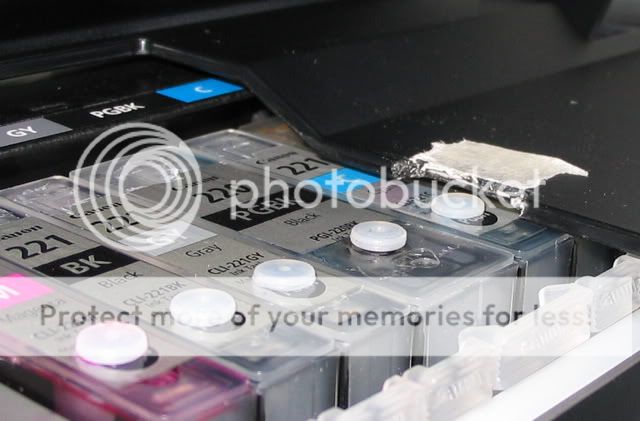
DOES the MP990 have clearance issues for top fillers?

lowepg

Getting Fingers Dirty
Joined
May 8, 2011
Messages
64
Reaction score
0
Points
29
Location
Raleigh, NC
I did a search, but found nothing that was based on actual experience- only conjecture.

Are there any MP990 OWNERS out there that have experience with refilling this machine? Im getting ready to refill my first set for this printer and would rather hear from an experienced owner.

I've topfilled my cli-8's, and would prefer to continue this way, but also open to trying the german method if the clearance issue causes problems.

PS- big reasons I'd PREFER to topfill:
1. the topfill port makes flushing really easy
2. Ive simply got more experience doing it this way

So, nothing insurmountable.


Thanks!!
 

mrelmo

Print Addict
Joined
Apr 1, 2007
Messages
427
Reaction score
36
Points
161
Location
Buffalo, New York
if you open the cover to allow the printhead to move to the cartridge replacement position, then unplug the printer you should be able to slide the print head to the right and look to see how much clearance is between the case and the top of the cartridges on the 560s and 640s it's not much more than the double thickness of a match book cover. i just received my mp990 and haven't put it into service yet, to check it myself.
 

The Hat

Printer VIP
Platinum Printer Member
Joined
Jan 18, 2010
Messages
15,630
Reaction score
8,698
Points
453
Location
Residing in Wicklow Ireland
Printer Model
Canon/3D, CR-10, CR-10S, KP-3
If there is a height problem with some of these new Canon printers would it not be
just as simple to trim a little off the inside of the casing and be done with it.
Thats what Id do..:ya
 

mikling

Printer VIP
Platinum Printer Member
Joined
Jul 2, 2006
Messages
3,239
Reaction score
1,471
Points
313
Location
Toronto, Canada
What the Hat said is what I already had done.

On the MP980/990 the edge of the panel above the cartridges curves down to make the panel appear thicker.

This curve downwards is just enough to catch the top of plugs. Once you remove the curved edge, there is enough clearance for plugs. So just mark off where the travel path of the plug will be and all you'd really need to remove is around 3/8" length of the edge to the left and right.

It would appear as if Canon intentionally added this to this model. On the MP560, the panel above the carts have a straight edge and no problems exist.

edge2.jpg


Edge1.jpg


I used masking tape to mark off the path or guide me. After the snipping/trimming is done, remove the tape. Using tape seemed like the easiest way to put down a guide. Black pencil on a gray panel somehow doesn't work well!

I'd recommend removing the printhead and cartridges while carrying this mod out as well. To move the printhead back and forth freely, simply remove the power cord after removing the printhead. The printhead can now be easily moved back and forth when there is no power. Line the inside with something to catch pieces of plastic during this operation. What I used was a pair of electronic wire cutters and a mini nail puller plier to nibble off the edge. It was done in less than 5 minutes.
 

mikling

Printer VIP
Platinum Printer Member
Joined
Jul 2, 2006
Messages
3,239
Reaction score
1,471
Points
313
Location
Toronto, Canada
BTW, for users using my 980/990 - MG6xx20, MG8x20 inkset that has the 221 on the labels here is a link for ICC profiles for this fabulous printer:

http://www.mediafire.com/file/1musa0e12fjxigc/Canon MP980_MG8220_(6_11).rar

If you want the best quality and to eliminate microbanding, you should use the manual alignment process. The automatic alignment process might not be good enough and I never use it anymore.
First you need to go to the Maintenance Tab and under Custom Settings, you tell the printer that you prefer to use manual alignment.
Now when you choose Head Alignement, the process will involve your judgment and not the printers' sensor. Usisng a magnifying glass might help if your eyes are not that good.
This is possibly why some users report that their 980/990 have alignment problems. I just about never use the automatic process as I discovered long ago that automatic is hit and miss; with miss the more frequent likelihood.
 

lowepg

Getting Fingers Dirty
Joined
May 8, 2011
Messages
64
Reaction score
0
Points
29
Location
Raleigh, NC
Yikes - at first glance that seems like an extreme way to avoid moving to the german method.... but perhaps its not that bad...

think I might "Go Dutch" before taking a dremel to my printer case..... ARG.

Those plugs look bigger than the ones I use (from hobbicolors), but it DOES look like a tight fit regardess.
 

transworld

Newbie to Printing
Joined
Jun 13, 2011
Messages
7
Reaction score
0
Points
6
Printer warranty voided if you trim your printer like that. German refill method is the answer.
 

mikling

Printer VIP
Platinum Printer Member
Joined
Jul 2, 2006
Messages
3,239
Reaction score
1,471
Points
313
Location
Toronto, Canada
Yes, warranty was always voided when the chips arrived and we all overrode the ink monitoring since what 7 or 8 years ago. . A gent preferred the top fill and here is the solution if you top fill.
On all those 225/226 carts that don't have a resetter, the warranty is voided anyways once you refill.
 

The Hat

Printer VIP
Platinum Printer Member
Joined
Jan 18, 2010
Messages
15,630
Reaction score
8,698
Points
453
Location
Residing in Wicklow Ireland
Printer Model
Canon/3D, CR-10, CR-10S, KP-3
mikling If you want the best quality and to eliminate microbanding, you should use the manual alignment process.
The automatic alignment process might not be good enough and I never use it anymore.
First you need to go to the Maintenance Tab and under Custom Settings, you tell the printer that you prefer to use manual alignment.
Now when you choose Head Alignement, the process will involve your judgment and not the printers' sensor.
Using a magnifying glass might help if your eyes are not that good.
We seem to be working on the same wavelength thats exactly the way
I do all my printer alignments with magnifying glass in hand..
:old
 

websnail

Printer VIP
Platinum Printer Member
Joined
Oct 27, 2005
Messages
3,661
Reaction score
1,345
Points
337
Location
South Yorks, UK
Printer Model
Epson, Canon, HP... A "few"
Just quickly... I just got the alternative plugs (without the lip) quicker than expected.

There is about a 0.1mm - 0.3mm of the plug protruding (barely discernible) but for use in MP/MG models with little clearance they are considerably better than the lipped models.

I'd probably suggest using a little aluminium tape to cover the plug and provide an extra seal but that's probably just belt & braces type thinking.


Here are two pictures of the two types taken so you can see horizontally across the top of the cartridges.

Lipped
http://www.octoink.co.uk/product_images/t/840/plug-lipped-01__84469_zoom.jpg
(Bit fuzzy but you get the idea)

Without Lip
http://www.octoink.co.uk/product_images/d/433/plug-nolip-01__67927_zoom.jpg


Quite a significant difference between the two..
 
Top