This is where broken printers come in. If you retrieve the purge pad unit and attach a syringe where the tube will go, you can do all sorts of things by putting it over the nozzles. I've used some Epson parking pads before for this.
You are using an out of date browser. It may not display this or other websites correctly.
You should upgrade or use an alternative browser.
You should upgrade or use an alternative browser.
Clogged Canon print head
- Thread starter Grandad35
- Start date
- Thread starter
- #202
- Joined
- Feb 24, 2005
- Messages
- 1,669
- Reaction score
- 183
- Points
- 223
- Location
- North of Boston, USA
- Printer Model
- Canon i9900 (plus 5 spares)
Not for a clog that can be cleaned in a "normal" way, but for a really stubborn clog it's not all that hard to completely remove the electronics and the sensitive nozzle plate once you get the hang of it. Now that I have done it twice, if/when I have a similar problem in the future my plan is to install pieces of the 3/16" ID vinyl tubing on each ink pickup and fill them with distilled water. If the flow in any channel is much slower than the rest, I'll just remove the nozzle plate and use brute force clean the flow channels in the plastic body. There is probably less risk in removing the nozzle plate than in getting aggressive with the nozzle plate in place.ghwellsjr said:Are you saying that it is easy to remove the electronics, brutally clean the rest of the print head and then reassemble it?
I just ordered some (#2x56) screws and a drill/tap set for that thread pattern. A while ago I was given a print head that fits my printer and which leaks somewhere in the ceramic nozzle plate. The plan is to tap the plastic for the #2-56 thread pattern so that I have a supply of screws that can be installed/removed with an Allen wrench instead of the Phillips head screws used by Canon. This will allow me to disassemble/reassemble the head numerous times to see where it is leaking and to try out some ideas on stopping the leak. The reason for changing the screws is that the Canon screws can be difficult to turn, and it is easy to strip out the head. With a properly drilled and tapped hole, the screws will be much easier to turn and the Allen drive will be less likely to strip out. There is also the problem that I was unable to find replacement screws that are the same as those used by Canon, so there is little other choice.
That characteristic was also seen with my recent clog. With a partial clog in the ink flow channel that prevented the nozzles from getting enough ink, the missing area in the nozzle check moved around.ghwellsjr said:Most of the bad clogs are in the pigment nozzles and some of them "move around". That is, each time I do a nozzle check, a different set of nozzles don't print.
- Joined
- Sep 10, 2007
- Messages
- 1,564
- Reaction score
- 1,445
- Points
- 293
- Location
- Laramie, Wyoming
- Printer Model
- Canon i960, Canon i9900
Actually, if there is a tough clog in the ink channels, you don't want it to enter the admission side of the nozzles, do you? It makes sense to remove the nozzle plate and get aggressive. And with the nozzle plate off, you've got better access to backflush the nozzles, no?
Wayne
Wayne
- Joined
- Jun 16, 2006
- Messages
- 3,645
- Reaction score
- 85
- Points
- 233
- Location
- La Verne, California
- Printer Model
- Epson WP-4530
Thanks for the idea. Have you done this with Canon printers? There are actually two tubes on each purge pad unit which means one of them will need to be plugged. Also, do you leave the ceramic purge pad in place while you're doing this?mikling said:This is where broken printers come in. If you retrieve the purge pad unit and attach a syringe where the tube will go, you can do all sorts of things by putting it over the nozzles. I've used some Epson parking pads before for this.
- Joined
- Jun 16, 2006
- Messages
- 3,645
- Reaction score
- 85
- Points
- 233
- Location
- La Verne, California
- Printer Model
- Epson WP-4530
Grandad35 and turbguy, I've got so many electrically defective print heads (one half of a set of nozzles not working), that also have additional random clogged nozzles, I think now I will practice on these to gain some experience. Actually, up until recently, I never thought it was worth while to spend too much time on restoring print heads because I could get brand new ones from my local Canon repair shop for $55 but not any more.
Now if there were away to repair those electrical problems, I'd really be set.
Now if there were away to repair those electrical problems, I'd really be set.
- Joined
- Oct 27, 2005
- Messages
- 3,671
- Reaction score
- 1,356
- Points
- 337
- Location
- South Yorks, UK
- Printer Model
- Epson, Canon, HP... A "few"
Just note on this... Remember the purge pads allow the printer to clean the pigment black separately from the other colours and vice versa so you should be able to use either part of the purge pad without plugging the other.ghwellsjr said:Thanks for the idea. Have you done this with Canon printers? There are actually two tubes on each purge pad unit which means one of them will need to be plugged. Also, do you leave the ceramic purge pad in place while you're doing this?mikling said:This is where broken printers come in. If you retrieve the purge pad unit and attach a syringe where the tube will go, you can do all sorts of things by putting it over the nozzles. I've used some Epson parking pads before for this.
The only potential problem I could see from using this part however would be in using active pressure to force anything into the printhead via the nozzles "side" as the skirt on the purge pad wouldn't take a huge amount of pressure at all before it blew out. Probably sufficient for more aggressive suction or gravity pressure but just a thought.
- Joined
- Jun 16, 2006
- Messages
- 3,645
- Reaction score
- 85
- Points
- 233
- Location
- La Verne, California
- Printer Model
- Epson WP-4530
Then I should have said there are four tubes coming off the purge pad and one of them on which ever side you are using will need to be plugged.websnail said:Just note on this... Remember the purge pads allow the printer to clean the pigment black separately from the other colours and vice versa so you should be able to use either part of the purge pad without plugging the other.ghwellsjr said:Thanks for the idea. Have you done this with Canon printers? There are actually two tubes on each purge pad unit which means one of them will need to be plugged. Also, do you leave the ceramic purge pad in place while you're doing this?mikling said:This is where broken printers come in. If you retrieve the purge pad unit and attach a syringe where the tube will go, you can do all sorts of things by putting it over the nozzles. I've used some Epson parking pads before for this.
Use something from an Epson. One tube and you can use pressure to back out the clog and not subject the nozzle plate to delamination. Like putting the printhead in reverse gear. When you mess with all sorts of printers, you never know what you're gonna find and learn.
- Thread starter
- #209
- Joined
- Feb 24, 2005
- Messages
- 1,669
- Reaction score
- 183
- Points
- 223
- Location
- North of Boston, USA
- Printer Model
- Canon i9900 (plus 5 spares)
I finally got around to playing with a spare print head that I got when I bought a spare i9900 on Craigs List. The seller told me that he somehow damaged the print head while cleaning it with compressed air.
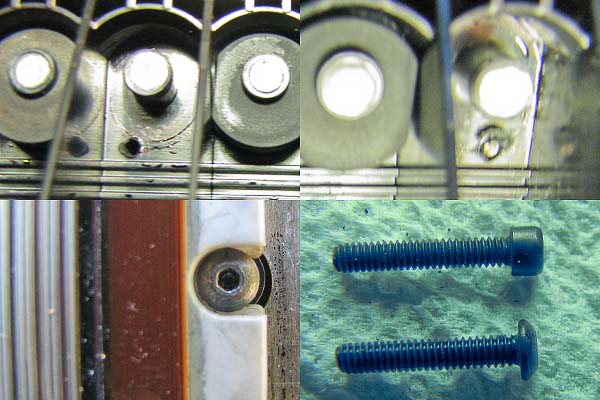
I took this as a chance to try replacing the screws that hold the nozzle plate with #2-56 screws. I bought some 3/8 long and some long socket button head screws. I also bought this tap and drill set to cut threads for these screws. The 3/8 long screws do not require any drilling or tapping, as the existing holes are slightly oversized and the new screws form their own threads. In one of the two holes, however, the existing hole was slightly too large and the screw didnt provide enough holding power to be useful.
The screws are too long and bottom in the existing holes, so the holes were drilled through as shown on the top left. After the holes were tapped and the screws installed, the tips of the screws were almost perfectly flush with the surface as shown on the right. I recommend that anyone doing this just go directly to the drill/tap/ long screw approach. Note that the rubber seals obviously have to be removed before drilling and tapping. The screw head in position is shown on the bottom left. The socket heads on these screws are much easier to loosen and tighten than the Phillips head screws, so these screws are much more suited to multiple disassembly/reassembly cycles. On the bottom right is a comparison of button head and socket cap screws the socket cap head is too tall and sticks up past the ceramic, and cannot be used.
This questionable print head has been stored as I received it a few years ago partially cleaned and unsealed. I didnt even try to clean the print head with the ceramic and electronics in place. By holding the ceramic up to the light, it was obvious that it was already clean, as light could be seen through all 10 banks of nozzles. The push/pull syringe method was tried on the plastic body, and the PM, Red and Yellow channels were all found to be initially completely blocked. The other 5 channels had some flow, but only a fraction of what was expected. After playing around for a while, things began to open up. Compressed air was blown into the outlets, with the result that the PM and Yellow became blocked again. Subsequent push/pull cycles opened them up again, but the pressure required was not constant over time.
It was assumed that dried ink in the flow channels had broken free and was floating around in the ink channels. To attempt to fix this, the plastic portion of the head was placed in boiling water for 20 minutes, and the push/pull cleaning was repeated. 7 of the 8 channels were now consistently clean and required the same (low) pressure. As with the other heads, the PM channel required about twice as much pressure as the other 7 channels (but it was consistent over time).
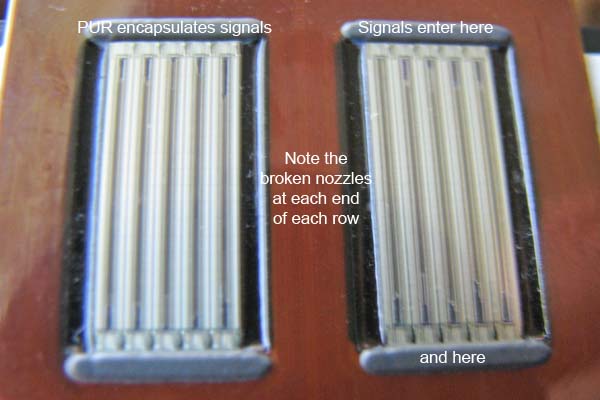
The print head was reassembled and installed, but the results were terrible. There was almost no ink in any color in the nozzle check. The head was disassembled and everything looked OK until I used a magnifying glass to look at the nozzles themselves. I dont have access to a microscope with a camera any longer, but this is a macro photo of the nozzles. It is far from a perfect image, but you can see that there appear to be 2 separate thin silicon layers that contain the nozzles themselves, and that these two layers have been destroyed at the end of the nozzle bank typical of 19 of the 20 ends of the nozzle banks. This appears to be the area destroyed by pressure not the rubber gasket or the bonding of the nozzle banks to the ceramic carrier plate. It also looks like the head design should be fairly tolerant of alcohol or ammonia (Windex).
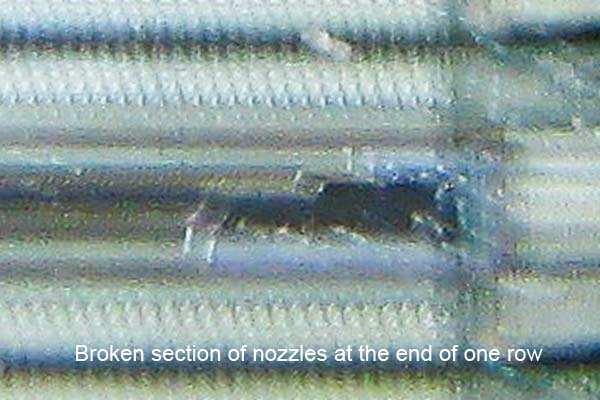
This photo is included to show some of the construction details of a Canon print head. This is my take on what I have seen anyone with alternate explanations is welcome to chime in with their input. Several nozzle banks appear to be fabricated onto a single die, and each die bonded directly to the ceramic carrier. This bond appears to be quire robust. These dies are surrounded by a flexible printed circuit, and the signals to the nozzles are brought onto the dies at the top and bottom. These connections are then sealed with a (urethane?) sealant.
****EDIT****
After thinking about the damage to the nozzles, there is no way thst this damage was caused by internal pressure, since all 10 of the nozzle banks were damaged and there is no internal connection to the last 2 banks.
I then used a 100 psi compressed air nozzle (100 real psi, not a wimpy "safety nozzle" that reduces the air pressure) and was not able to cause any additional damage to the nozzles by blowing compressed air on the bottom of the nozzles (as judged visually under a 10x loupe). Blowing air into the ink pickup gave the same result, as did removing the ceramic plate and blowing directly into the ink inlet (which couldn't have been done by the previous owner since the head had never been disassembled when I received it). I have to wonder if the damage was from mishandling?
In any case, now that I see the fragile construction used for the nozzles, I'll certainly treat them with much more care than before. Since removing the nozzle plate has proven to be quick and easy, this will be my first step when I run into future clogs. A Windex soak or running water over the nozzle plate as a flush after the nozzle plate has been removed makes it easy to do a visual inspection for clogs with no danger of damage to the nozzles. In any case, I suspect that many of our clogs are in the ink channels rather than in the nozzles, and cleaning the plastic body is a snap once the nozzle plate has been removed.
I took this as a chance to try replacing the screws that hold the nozzle plate with #2-56 screws. I bought some 3/8 long and some long socket button head screws. I also bought this tap and drill set to cut threads for these screws. The 3/8 long screws do not require any drilling or tapping, as the existing holes are slightly oversized and the new screws form their own threads. In one of the two holes, however, the existing hole was slightly too large and the screw didnt provide enough holding power to be useful.
The screws are too long and bottom in the existing holes, so the holes were drilled through as shown on the top left. After the holes were tapped and the screws installed, the tips of the screws were almost perfectly flush with the surface as shown on the right. I recommend that anyone doing this just go directly to the drill/tap/ long screw approach. Note that the rubber seals obviously have to be removed before drilling and tapping. The screw head in position is shown on the bottom left. The socket heads on these screws are much easier to loosen and tighten than the Phillips head screws, so these screws are much more suited to multiple disassembly/reassembly cycles. On the bottom right is a comparison of button head and socket cap screws the socket cap head is too tall and sticks up past the ceramic, and cannot be used.
This questionable print head has been stored as I received it a few years ago partially cleaned and unsealed. I didnt even try to clean the print head with the ceramic and electronics in place. By holding the ceramic up to the light, it was obvious that it was already clean, as light could be seen through all 10 banks of nozzles. The push/pull syringe method was tried on the plastic body, and the PM, Red and Yellow channels were all found to be initially completely blocked. The other 5 channels had some flow, but only a fraction of what was expected. After playing around for a while, things began to open up. Compressed air was blown into the outlets, with the result that the PM and Yellow became blocked again. Subsequent push/pull cycles opened them up again, but the pressure required was not constant over time.
It was assumed that dried ink in the flow channels had broken free and was floating around in the ink channels. To attempt to fix this, the plastic portion of the head was placed in boiling water for 20 minutes, and the push/pull cleaning was repeated. 7 of the 8 channels were now consistently clean and required the same (low) pressure. As with the other heads, the PM channel required about twice as much pressure as the other 7 channels (but it was consistent over time).
The print head was reassembled and installed, but the results were terrible. There was almost no ink in any color in the nozzle check. The head was disassembled and everything looked OK until I used a magnifying glass to look at the nozzles themselves. I dont have access to a microscope with a camera any longer, but this is a macro photo of the nozzles. It is far from a perfect image, but you can see that there appear to be 2 separate thin silicon layers that contain the nozzles themselves, and that these two layers have been destroyed at the end of the nozzle bank typical of 19 of the 20 ends of the nozzle banks. This appears to be the area destroyed by pressure not the rubber gasket or the bonding of the nozzle banks to the ceramic carrier plate. It also looks like the head design should be fairly tolerant of alcohol or ammonia (Windex).
This photo is included to show some of the construction details of a Canon print head. This is my take on what I have seen anyone with alternate explanations is welcome to chime in with their input. Several nozzle banks appear to be fabricated onto a single die, and each die bonded directly to the ceramic carrier. This bond appears to be quire robust. These dies are surrounded by a flexible printed circuit, and the signals to the nozzles are brought onto the dies at the top and bottom. These connections are then sealed with a (urethane?) sealant.
****EDIT****
After thinking about the damage to the nozzles, there is no way thst this damage was caused by internal pressure, since all 10 of the nozzle banks were damaged and there is no internal connection to the last 2 banks.
I then used a 100 psi compressed air nozzle (100 real psi, not a wimpy "safety nozzle" that reduces the air pressure) and was not able to cause any additional damage to the nozzles by blowing compressed air on the bottom of the nozzles (as judged visually under a 10x loupe). Blowing air into the ink pickup gave the same result, as did removing the ceramic plate and blowing directly into the ink inlet (which couldn't have been done by the previous owner since the head had never been disassembled when I received it). I have to wonder if the damage was from mishandling?
In any case, now that I see the fragile construction used for the nozzles, I'll certainly treat them with much more care than before. Since removing the nozzle plate has proven to be quick and easy, this will be my first step when I run into future clogs. A Windex soak or running water over the nozzle plate as a flush after the nozzle plate has been removed makes it easy to do a visual inspection for clogs with no danger of damage to the nozzles. In any case, I suspect that many of our clogs are in the ink channels rather than in the nozzles, and cleaning the plastic body is a snap once the nozzle plate has been removed.
ThrillaMozilla
Printer Master
- Joined
- Jan 18, 2011
- Messages
- 1,212
- Reaction score
- 352
- Points
- 253
Wow.
I should mention that you can take reasonably good photomicrographs just by putting your camera up to the microscope eyepiece. It's best to use a tripod. If the camera has no focus aid, focus at infinity. You may want to stop down somewhat and not use the maximum camera lens aperture, but with a bit of experimentation it should work pretty well, I would think.
I should mention that you can take reasonably good photomicrographs just by putting your camera up to the microscope eyepiece. It's best to use a tripod. If the camera has no focus aid, focus at infinity. You may want to stop down somewhat and not use the maximum camera lens aperture, but with a bit of experimentation it should work pretty well, I would think.
Latest posts
-
-
 Bought a used Epson 3880. No yellow ink being printed
- Latest: Ink stained Fingers