Pro 1 with B500 error

kestreltom

Printing Apprentice
Joined
Oct 20, 2019
Messages
9
Reaction score
9
Points
15
Location
Albququerque, New Mexico USA
Printer Model
Canon Pixma Pro-1 & Pro9000
I recently acquired a used Canon Pro 1 with a set of OEM inks all above 80% full. I live in the Southwestern US where it is dry, and I don't know how long this printer sat unused... it might have been years. The printer looks as if it has not seen much use at all.

The problem with the printer is that when powered up at about the 2 minute mark, it will display 8x alternating amber/white flashes:
https://youtu.be/bgMGMsXDCkI
The Canon My Printer utility reports a B500 "Support Code". At this point the printer is completely un-responsive: I cannot run a nozzle check; or park the print head so it can be removed and soaked/cleaned.

Someone on this forum graciously posted a pdf from their copy of the Pro-1 service manual that indicates that this 8x cyclic blinking of the Alarm and Power LEDs is a service call error that indicates an ink supply pressure problem. To wit:

Ink supply pressure error
[B500] (1) Ink leakage from and around the ink
supply unit: Check where ink leaks from, andwipe off the ink.
Perform the following according to the point of ink leakage:
- Re-install or replace the ink tank(s) or the print head.
- Replace the ink supply unit.
(2) Ink tank and print head conditions and ink tube connection:
Re-install or replace the ink tank(s) or the print head.
(3) Cable connection (wrong or incomplete connection):
- Relay3 flexible flat cable (between the relay3 board ass'y and the logic board ass'y)
- Motor multi harness ass'y (between the ink supply pump unit and the logic board ass'y)
Re-connect the cables.
- Ink tank
- Print head
- Ink supply unit
- Relay3 flexible flatcable
- Motor multi harnessass'y
- Logic board ass'y


What I have done so far is open the ink tank doors by prying loose the sides of the printer and manually releasing the catch mechanisms. Then I pulled all 12 OEM ink cartridges and checked for dried ink and bent light pipes. The slots were remarkably clean - I did not see any evidence of dried clots of ink anywhere. The cartridges were in like-new condition and all of them weighed between 70 - 80 grams indicating they were nearly full of ink. I did see small droplets of liquid (not dried) ink in the vicinity of the sockets on the back of the cartridges, which leads me to believe that the seals are still in good shape. Very little ink spillage.

I would like to remove the print head so I can soak it in the "pharmacist's" solution.. Is there a way to remove the print head when the printer is un-responsive?

Thanks in advance for any help with this!
 

kestreltom

Printing Apprentice
Joined
Oct 20, 2019
Messages
9
Reaction score
9
Points
15
Location
Albququerque, New Mexico USA
Printer Model
Canon Pixma Pro-1 & Pro9000
More info...
I just read the entire How to remove PRO-1 printhead ? thread, which was very informative.
I am beginning to think that reviving this printer will be more trouble than it will be worth because of the possibility that I might not be able to source a new print head. However... since I have nothing left to lose, I am still willing to tear into it and see what can be accomplished. Perhaps I would be better off reviving the Prograf IPF5000... any thoughts.. ?
 

The Hat

Printer VIP
Platinum Printer Member
Joined
Jan 18, 2010
Messages
15,623
Reaction score
8,695
Points
453
Location
Residing in Wicklow Ireland
Printer Model
Canon/3D, CR-10, CR-10S, KP-3
Sorry @kestreltom, I ran out of time to post a reply to you..

The Pro 1 is not like your average printer, you can’t force it into anything it doesn’t deem appropriate, it has a live EPROM chip and monitors everything that you do to the printer, so you have to work plenty careful with lots of patients.

I have included a PDF that shows how to remove the print head when there is no response from the printer, but this is not the normal way of doing the head change.

The procedure is not difficult but you need plenty of room around the printer because you need access 360 to carry out the removal of the top casing, you can then soak the head in a bowl of warm water and Fairy/Dawn washing up liquid for 12 hours.

Once you have reinstalled the head again the printer should clear the error message and run a system clean and this will clear all the old ink from the Ciss tubing and then you should be able to print a nozzle check, you’ll need to run a new head alignment later.

Before powering on the printer remover all the carts and agitate (shake) them viciously for 10 seconds and then wait till it requests the carts to be reinstalled, the start-up can take up to 15 minutes to complete, don’t print anything other than nozzle checks till you get a nice clear print..
I am beginning to think that reviving this printer will be more trouble than it will be worth because of the possibility that I might not be able to source a new print head
If you take your time you won’t need a new head, because it’s the internal tubing that is normally blocked up but too much head cleaning can cause the loss of the head, only run normal head cleans every ½ hour to help get a clear print or 1 deep clean in 24 hours..

And yes this is all going to use up most of your ink, and it’s going to hit you financially, so weight up that cost too, the printer uses a sealed ink system so is not usually bother by humidity.. Good luck..
 

Attachments

  • Head Removel for Pro 1.pdf
    1.3 MB · Views: 472

kestreltom

Printing Apprentice
Joined
Oct 20, 2019
Messages
9
Reaction score
9
Points
15
Location
Albququerque, New Mexico USA
Printer Model
Canon Pixma Pro-1 & Pro9000
Hats off to The Hat.. Thank you!

I am perfectly willing to take my time with this.
I read the PDF twice just to make sure that I absorbed everything, but I have a few follow-up questions:

Since my printer is displaying the 8 cyclic amber/white flashes and shows the B500 error code - can the print head be removed anyway?

The instructions you sent specifically say that

" When an error occurs in the printer
The print head cannot be replaced."


I tried pressing the Resume/Cancel button for 5 seconds and then pressing the Tank Cover Open button as described in the instructions, but it did not move the carriage into the replacement position even after 4 minutes.

The carriage on my Pro 1 doesn't seem to lock in the right hand position, so I am able to slide it by hand into the replacement position after it is turned off. Is this normal?

In order to release the print head from the carriage, I try to press in on the blue release button to lower joint lever #1 - but the lever seems to be stuck.. it doesn't release or move at all. Do I need to remove the top case cover of the printer in order to get the #1 joint lever to release? Is it possible that the blue lock button is jammed or broken? I am not sure what the specific procedure is here...
 

The Hat

Printer VIP
Platinum Printer Member
Joined
Jan 18, 2010
Messages
15,623
Reaction score
8,695
Points
453
Location
Residing in Wicklow Ireland
Printer Model
Canon/3D, CR-10, CR-10S, KP-3
@kestreltom, I sent you that file because you had an error and head changes are usually not permitted in those circumstances, I hoped you’d read and ignore most of the information therein and skip down to the part with the photos to help you get the top cover off, and again trying to get into Service Mode while you have an error is also impossible.

Normally the print head stays locked when you get an error and the only way to get to the print head is to remover the cover, it also gives you plenty of room to work on the head, the lever should unlock with the head in in the correct position for removal..
P.S. don’t forget to remove the carts before powering on again..
 

kestreltom

Printing Apprentice
Joined
Oct 20, 2019
Messages
9
Reaction score
9
Points
15
Location
Albququerque, New Mexico USA
Printer Model
Canon Pixma Pro-1 & Pro9000
OK thanks Hat..
I will get the top cover off and see if I can release the catch on the print head lever. Maybe I can rig a waste ink bypass while I'm in there :)
More later..
 

kestreltom

Printing Apprentice
Joined
Oct 20, 2019
Messages
9
Reaction score
9
Points
15
Location
Albququerque, New Mexico USA
Printer Model
Canon Pixma Pro-1 & Pro9000
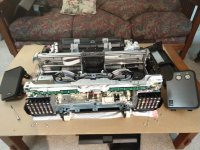
Well, as it turned out after tearing the printer apart, I didn't need to pull the top cover after all :(
torn apart.jpg
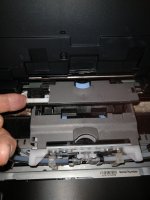
The cartridge release button on the lever labelled "1" can be unlocked by pushing in on the left side of the lever where there is a white button. I broke away part of the grey top cover so you can see how it works... !
pro-1 printhead release button.jpg
open

Anyway, I fear my Pro 1 is a boat anchor now.
I managed to unplug the RTC battery and now it has a fatal RTC error (6700) and won't go into service mode.
I did see the warning on page 5 of the instruction saying "Do not disconnect any plugs or wiring after this stage"
BUT.. on page six I saw the picture showing that the right hand ink door had been unplugged and removed!
So.. I just assumed that both doors could be unplugged and removed. What can I say - I'm a photographer and I pay attention to pictures more than words... ?
Anyway, unless someone can tell me how to get this printer into service mode so I can reset the ink counter and ink absorber values then it looks like I am off to the landfill.

note: I have tried the instructions for placing the printer into service mode outlined in the attache document and this printer seems to be locked out.
 

Attachments

  • Service Mode & Tools Instructions.pdf
    497.2 KB · Views: 417

The Hat

Printer VIP
Platinum Printer Member
Joined
Jan 18, 2010
Messages
15,623
Reaction score
8,695
Points
453
Location
Residing in Wicklow Ireland
Printer Model
Canon/3D, CR-10, CR-10S, KP-3
@kestreltom, OK despite all the advice given on what to do, and more importantly on what NOT to do, you disregarded all of the cautions and now you’ve got a big door stop.

There is no way of recovering your printer once the power was cut to the EPROM and I wouldn’t mind there is instructions about plugging the power lead back in while working on the carcass in case of accidental battery power loss.
Anyway, unless someone can tell me how to get this printer into service mode so I can reset the ink counter and ink absorber values then it looks like I am off to the landfill.
The printer now will not respond to any further inputs from any source because it has no memory of it’s being, and doesn’t even know it’s a Feckin printer, sorry it had to end like this…

Have a look for a Pro 10 in the black Friday sales as an excellent replacement for this beast, you can even use the inks you still have left in the carts from the Pro 1, you could also try and sell the print head on EBay…
 
Top