Help - i9900 Banding - Don't be a dumb*ss like me

OraDBA

Getting Fingers Dirty
Joined
Dec 6, 2005
Messages
14
Reaction score
0
Points
22
I'm a professional dumb*ss, and as such, I am licensed to do stupid things which I otherwise wouldn't recommend to folks who are not professional dumb*sses like me...

So the other night I fired up my i9900 opened the trays and put some paper in. I also have a ceiling fan in my office where the printer is and it was running. Hey I live in the desert and it can still be warm even in the winter! So I got distracted doing something else, yahda, yahda, yahda...I fell asleep while leaving the printer open with an overhead fan going...

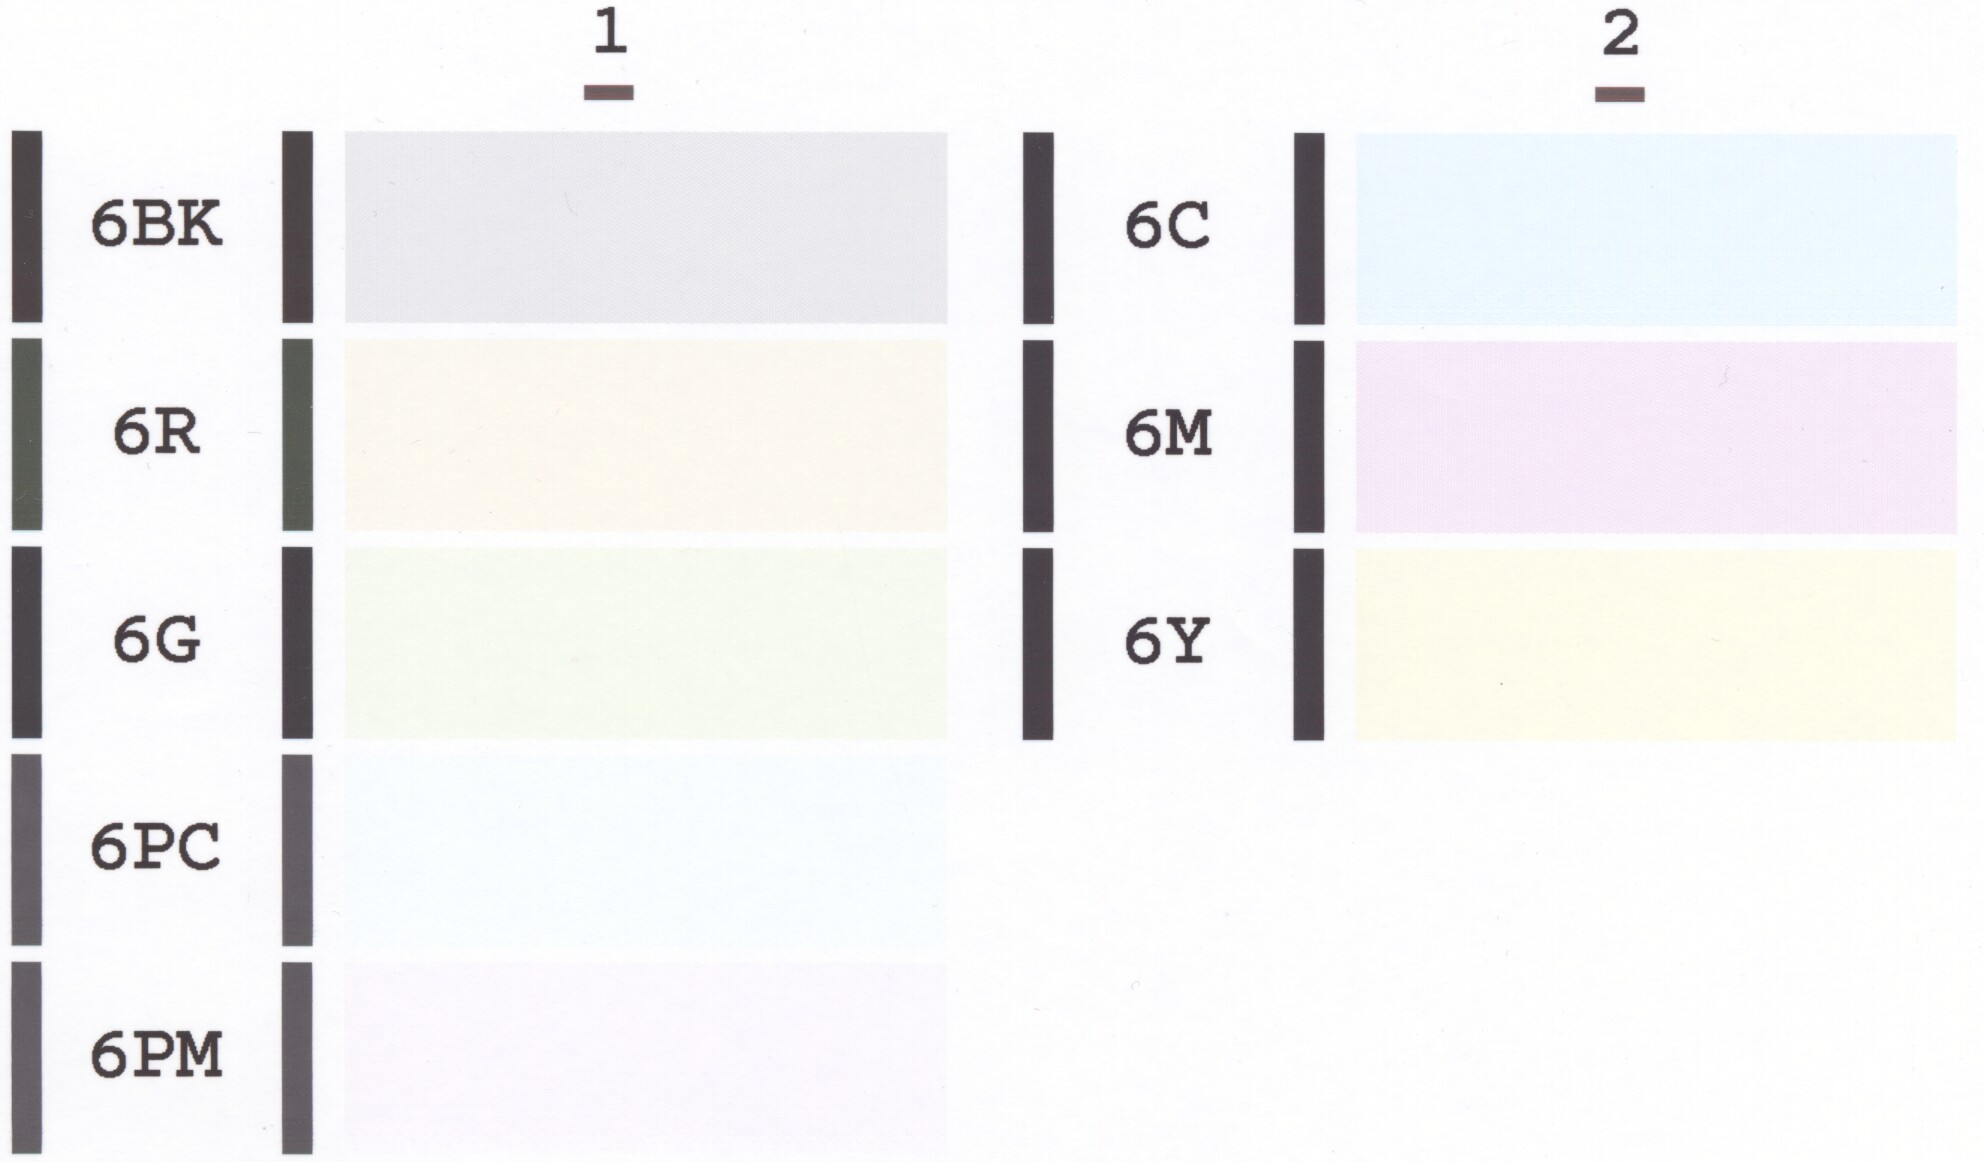
Next day I get back to it and get a print like this crop:

banding1.jpg


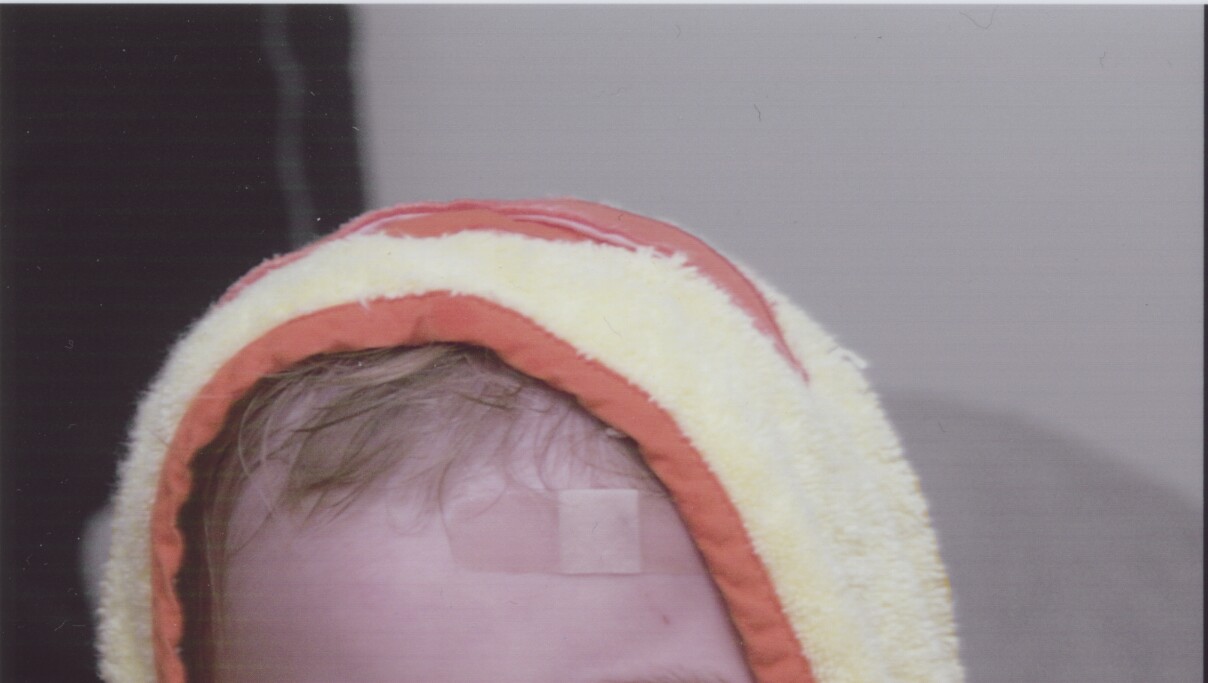
The nozzle check was worthless in identifying the culprit, so I ran some basic cleans & print head alignments via the driver. No better. So I ran a deep clean and another realignment. Still not much better. But since I ran the Deep clean, now some carts were running out of ink so I replaced them, did some more basic cleans again and things were considerably better. But if you zoom in to this crop (from an 8.5x11 print), you can still see the same banding, although it's very faint:

banding2a.jpg


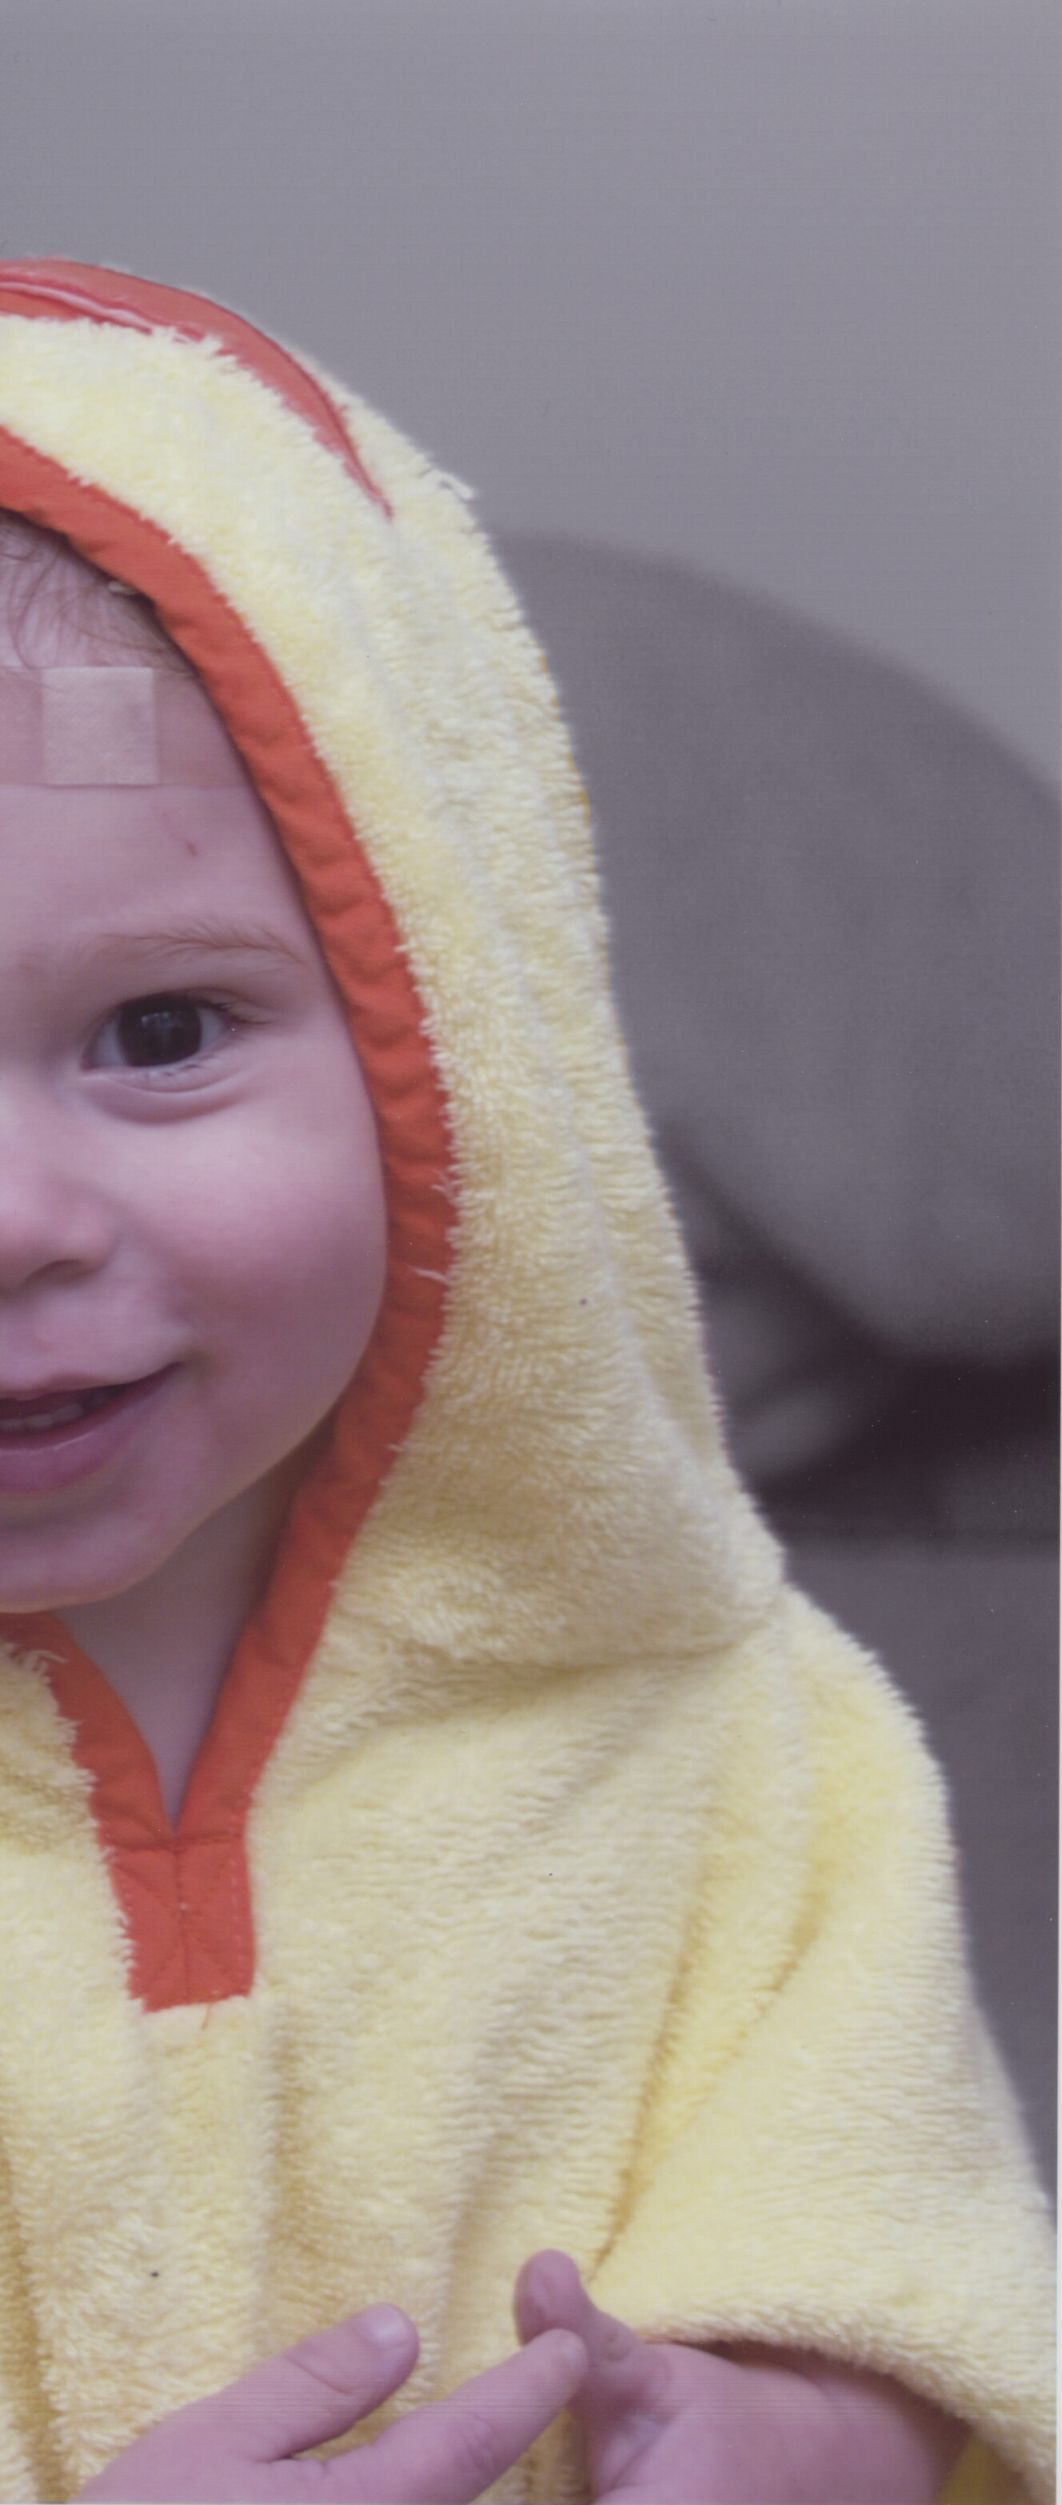
And if you zoom into the hands in the above crop, there's another defect that I'm not sure is banding or head alignment related (i.e., very close lines that aren't evenly distributed throughout the print).

So what would you recommend a dumb*ss like me do at this point? I'm thinkin' I need to pull out the printhead and try one of the many cleaning methods recommended throughout this forum. If someone knows of a link to exactly how you remove the printhead, that would be helpful, too.

Many TIA,
Dylan

P.S. I'm using Hobbicolors ink and their refillable carts.
 

panos

Print Addict
Joined
Apr 14, 2005
Messages
623
Reaction score
18
Points
166
Location
Greece
"The nozzle check was worthless in identifying the culprit"

Even so, could you post a nozzle check scan? I really don't think there is a problem with your printhead. The irregularity of banding on the second photo shows that you have a problematic cartridge.
 

OraDBA

Getting Fingers Dirty
Joined
Dec 6, 2005
Messages
14
Reaction score
0
Points
22
Panos,

Thx for the reply. Here's one of the first nozzle checks after noticing the banding issue:

EarlyNozzle.jpg


Also, the only carts I didn't replace yesterday were: Photo Cyan, Black, and Green. The second photo has the same banding pattern but it's really hard to see. But it also has that other problem, too.

Thx again,
Dylan
 

hpnetserver

Printer Guru
Joined
Jul 8, 2005
Messages
311
Reaction score
0
Points
119
Dylan, your nozzle test print is strange. The banding lines are running vertically instead of from left to right. And they show on at least 4 different colors and they all look too similar. This is really strange. When you do a nozzle check one window will pop out to show you the pattern of good test result and the pattern of a bad one which has lines running form left to right. If that's what you see you have a clog. But your nozzle test pattern is not like that. You probably have a problem elsewhere. The fan and desert together are playing evil on the printer.
 

Grandad35

Printer Master
Platinum Printer Member
Joined
Feb 24, 2005
Messages
1,669
Reaction score
182
Points
223
Location
North of Boston, USA
Printer Model
Canon i9900 (plus 5 spares)
OraDBA,

The nozzle check looks OK, but it needs to be scanned at a higher dpi to see any detail - there is a lot of aliasing in that scan. Look at the scans in this post (http://www.nifty-stuff.com/forum/viewtopic.php?pid=3171#p3171) to see what a 2400 dpi scan of the nozzle check on a i9900 looks like - you can see the individual dots.

The second photo in your original post shows bands spaced 7 pixels apart (on a 2505 pixel tall scan). Assuming that 2505 pixels = 10" (which may be wrong), 7 pixels = 0.028". This is very small for "normal" banding, which usually occurs at a spacing equal to the paper advance distance. Is it possible that these are artifacts caused by your printing software? If you print the same image at 4x5 instead of 8x10, do the defects have the same spacing?

Your first image appears to suffer from posterization in the dark region at the top left, and some of the other defects almost appear to be jpeg artifacts. Can you post the original image?

I'm not sure that leaving the fan on overnight should cause the nozzles to clog. How long had the printer been idle? Was the power off? If it was, was the power turned off with the switch on the front or by a power failure?
 

OraDBA

Getting Fingers Dirty
Joined
Dec 6, 2005
Messages
14
Reaction score
0
Points
22
A couple of notes: I think the scans are cr*ppy because I didn't spend anytime optimizing them and then I had to resize them to get under the 300K posting limit. If you can give me some hints on the scan settings to get something better, I'm all ears. I hardly use my flatbed, so the more settings you can give, the better. Also, the nozzle checks were printed on 'High Resolution Paper' instead of photo paper because I knew I was going to start going through a bunch of paper and didn't want to burn the good stuff. If the nozzle check needs to be done on photo paper, let me know. Also, my nozzle checks always look very light. I had to set a white balance setting in VueScan to get the paper to look white from the scan. The crop from the first image was one of (3) 4x6's printed on an 8.5x11 sheet. The second crop was from an 8x10.5 printed on 8.5x11.

Lastly, I'll post a copy of the real original photo, but what you were looking at was a post-processed image where I selected my son in the foreground and then desaturated the background to b&w. So perhaps that explains why you see the posterization. And I'm sure the desaturated area shows a color cast. The printer had only been idle for a day or two. The night that I left the printer open I also left the power on.

Hope I covered everything and thx again.

Cheers,
Dylan
 

OraDBA

Getting Fingers Dirty
Joined
Dec 6, 2005
Messages
14
Reaction score
0
Points
22
Well, as panos and grandad suspected, it looks like it may have been a bad cart and not a nozzle clog afterall. In an earlier post I noted that the only carts I didn't initially change were Photo Cyan, Black, and Green. I popped all three out and closely inspected them and both the Black and Photo Cyan had empty reserve tanks. It was hard to tell on the Black because the ink had really stained the lower half of the reserve tank so I had to hold it up to the light to see that it was empty. I replaced all three, but I also just couldn't resist trying Neil Slade's "compressed air" print head cleaning method, so I gave that a whirl, too.

After replacing everything, I did a regular head clean followed by a head alignment and then printed a nozzle check. All was looking good so I let that same photo rip at 8"x10.5". I've closely inspected it about 20 times now and it looks great, so I think the worst is over.

One other question: does a regular head cleaning cycle use any "net new" ink or does it just blow some air through the nozzles and clear the ink that's sitting in them?

Thx again,
Dylan
 

Grandad35

Printer Master
Platinum Printer Member
Joined
Feb 24, 2005
Messages
1,669
Reaction score
182
Points
223
Location
North of Boston, USA
Printer Model
Canon i9900 (plus 5 spares)
Dylan,

All cleaning cycles use "new" ink. The nozzles should never be left empty, and air is never blown into the nozzles by the printer. The sound that you hear during a cleaning cycle is a vacuum pump in the printer pulling a vacuum on the exit of the nozzles, pulling ink from the carts and into the nozzles.
 
Top