- Joined
- Jan 18, 2010
- Messages
- 15,623
- Reaction score
- 8,695
- Points
- 453
- Location
- Residing in Wicklow Ireland
- Printer Model
- Canon/3D, CR-10, CR-10S, KP-3
Continued from a previous thread...
https://www.printerknowledge.com/threads/changing-the-dry-box-to-free-wheel.13078/
The steel bearings I was waiting on to complete my first Dry box arrived yesterday and I immediately installed them and completed the last few runners, and then prepared to seat and fit my new Filament reels, that I had held over since before Christmas.
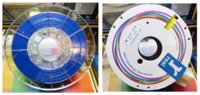
That’s when I got one hell of a shock, the Filament comes in sealed boxes and you can’t tell what the contents looks like till there open, this is a Pic of the old and new boxes..
 click to enlarge..
The Previous reels were made of plastic and I specifically converted this box for their use only, but someone in their wisdom in the REAL Factory had made other plans that I was not privy too. (Cardboard reel cores)
View attachment 8611


I reckon there must be something wrong with me because I can’t see how changing from Plastic reels to a Cardboard format can contribute towards cleaning the plastic mess on our planet.
The Company is selling Plastic Filament material to the public and now wants to be seeing as “Eco Friendly” by switching to cardboard cores, it’s like changings to paper drinking straws but still selling their drinks in plastic cups.
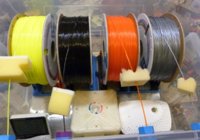
Back to reality, I have tested how much more tension it takes to pull filament from one of these cardboard reels and compared that to the old-style plastic ones, (A lot) and now I may have to convert this Dry Box back to using individual shafts like this..
 this was made for my 2nd 3 reeled (Cardboard) Dry Box
It’s great when your plans go out the Window, and your back at square 1 again, I reckon its time to admit defeat and start the reconstruction of new pieces once more to enable the use of these new reels, these are the 4th different type of reel sizes I use.
No worries, I will post Pics of my new adventure when I construct the new bits and pieces needed to make this a proper reliable working Dry Box once more...
https://www.printerknowledge.com/threads/changing-the-dry-box-to-free-wheel.13078/
The steel bearings I was waiting on to complete my first Dry box arrived yesterday and I immediately installed them and completed the last few runners, and then prepared to seat and fit my new Filament reels, that I had held over since before Christmas.
That’s when I got one hell of a shock, the Filament comes in sealed boxes and you can’t tell what the contents looks like till there open, this is a Pic of the old and new boxes..
click to enlarge.. The Previous reels were made of plastic and I specifically converted this box for their use only, but someone in their wisdom in the REAL Factory had made other plans that I was not privy too. (Cardboard reel cores)
View attachment 8611
I reckon there must be something wrong with me because I can’t see how changing from Plastic reels to a Cardboard format can contribute towards cleaning the plastic mess on our planet.
The Company is selling Plastic Filament material to the public and now wants to be seeing as “Eco Friendly” by switching to cardboard cores, it’s like changings to paper drinking straws but still selling their drinks in plastic cups.
Back to reality, I have tested how much more tension it takes to pull filament from one of these cardboard reels and compared that to the old-style plastic ones, (A lot) and now I may have to convert this Dry Box back to using individual shafts like this..
this was made for my 2nd 3 reeled (Cardboard) Dry BoxIt’s great when your plans go out the Window, and your back at square 1 again, I reckon its time to admit defeat and start the reconstruction of new pieces once more to enable the use of these new reels, these are the 4th different type of reel sizes I use.
No worries, I will post Pics of my new adventure when I construct the new bits and pieces needed to make this a proper reliable working Dry Box once more...