Canon i860 Printers

Nifty

Printer VIP
Administrator
Joined
Nov 3, 2004
Messages
3,046
Reaction score
1,405
Points
337
Location
Bay Area CA
Printer Model
CR-10, i560 ,MFC-7440N
I thought I'd post some little tid bits of information I've received regarding the Canon iSeries printers, specifically the i860. This info., for the most part, applies to the i560 and should also apply to the i960.

Bidirectional vs. Single / monodirectional printing: When you print using your default settings your printer is shooting out ink as it passes in both directions. If you change your printer settings to print on "photo paper" then it switches to print in once direction only, thus allowing the ink enough time to dry between passes.

If you run into problems with bleeding due to media, ink, etc. problems, then simply changing the paper setting to "photo" does the trick.

Auto Power Feature: You probably already know about this, but this printer has a great auto power feature that allows it to turn off when not in use, but switch back on when a print job is sent to it. Great feature!
 

InsproJen

Newbie to Printing
Joined
Jan 6, 2005
Messages
2
Reaction score
0
Points
6
i have an i850 printer that I'm having trouble with. when I run the maintenance and do a nozzle check the black square or M has squares of purple in them. hence, my printed pictures look horrible! all the other colors are printing out ok on the test. I have ran the cleaning and deep cleaning a dozen times, and bought all new cartridges and refilled them with ink but it hasn't helped. I even thought about replacing the printer head, but I can't even find a website that sells those.... I checked the canon website to no avail. I don't know what else to try, short of scraping this printer, and getting a new one. I am using ink and have been using it for almost a year now with no problems, from inkjetgoodies, so I feel the problem is in the printer itself. any suggestions would be appreciated. thanks
 

Nifty

Printer VIP
Administrator
Joined
Nov 3, 2004
Messages
3,046
Reaction score
1,405
Points
337
Location
Bay Area CA
Printer Model
CR-10, i560 ,MFC-7440N
That's pretty odd that the "M" is off but all the colors look okay. If the other test patterns are printing out just fine then I wouldn't suspect a print head issue as much as an ink cartridge issue. Have you tried putting in OEM Canon carts and running through a few prints?

From what I understand the "M" rectangle is a combination of the CYM carts to make black so if your color is off in one spot then it should be somewhere else also. Since red and blue make purple is I'd maybe look to make sure you're yellow cart is up to par.

I've had a cartridge go bad where it worked fine in supplying enough ink for the beginning of a print, but got progressively worse through the rest of the print... even to the point that the first test patterns on a print nozzle check looks okay, but the bottom rectangles look bad.

I'd try (in this order)
Putting in New OEM Canon carts and running a cleaning cycle or two and a few test prints.
Cleaning the print head using the methods described on other threads in this forum.
A new head / printer.

Maybe some other experts out there can chime in. Keep us posted.
 

Nifty

Printer VIP
Administrator
Joined
Nov 3, 2004
Messages
3,046
Reaction score
1,405
Points
337
Location
Bay Area CA
Printer Model
CR-10, i560 ,MFC-7440N
Oh... by the way, here is some info I got from Canon support about the i560 nozzle check / test pattern:

"Thank you for your reply. On the i560 nozzle check pattern, you should see six bars at the top representing the following inks respectively:

black grid
cyan (2)
magenta (2)
yellow

Next you should see thirteen rectangles (A through M) with a number in front of each one.

A, F and H = Black/Gray

B and G = Cyan

C = Magenta

D, I and J = Cyan (light blue)

E and K = Magenta (light pink)

L and M = black composite ink (all colors mixed together)

Please let us know if the nozzle test prints correctly.

If part of the top pattern is missing, clean the print head. If part of
the bottom patterns are streaked, vertically with white, align the print
head.


Both procedures can be accomplished in the printer driver from the
Maintenance tab."
 

Little Acorn

Newbie to Printing
Joined
Jun 9, 2005
Messages
4
Reaction score
0
Points
6
I am hoping someone can help me with regard to the nozzle check pattern detailed above.

I have run the test, and am unsure how to interpret the results. Boxes A - K appear as described. However, box L and M are coming out in horizonantal stripes of brown and black.

Also, in the smaller boxes that appear top left in 2 columns, the text '6C' '6M' and '6Y' is printing in red and black. The top half of the letters is black and the bottom half is red.

All inks are new and full.

Does anyone have any advice to share on how to rectify the problem? I've never had any problems with stripey images before, but I'm trying to print 150 cards urgently, containing a green image, and the image is coming out in green and brown horizontal stripes.

Many thanks.
 

BlasterQ

Printer Guru
Joined
Feb 16, 2005
Messages
137
Reaction score
0
Points
109
Try running a head cleaning procedure, most of the time, it just might need cleaning. Hope that helps.
 

Little Acorn

Newbie to Printing
Joined
Jun 9, 2005
Messages
4
Reaction score
0
Points
6
Thanks Blaster Q.

I have run the cleaning option and the deep cleaning option too. In both cases, the printer just churns and churns and makes a lot of 'rolling' noise, but it doesn't run any paper through it. For the deep cleaning option, it says that it uses a lot of ink. However, I can't understand how it uses a lot of ink when cleaning, when it's not even printing anything...where does the ink go to? Could my cleaning procedure not be wrking properly, or is this how it actually cleans?

I've been reading all sorts of things for the past 3 hours, trying to fix this. I have read about cleaning the heads with alcohol swabs. I have alcohol swabs on hand, but am not sure how to get to the heads. Presumably they are underneath where the inks are located, however, I can't get access to the underneath.....

Any further thoughts?

I've tried the Canon support site, but their server is down.
 

Grandad35

Printer Master
Platinum Printer Member
Joined
Feb 24, 2005
Messages
1,669
Reaction score
182
Points
223
Location
North of Boston, USA
Printer Model
Canon i9900 (plus 5 spares)
Little Acorn,

Cleaning cycles pull a vacuum on the nozzles, sucking ink through the nozzles. This ink is eventually discharged to a pad in the bottom of the printer - the "waste ink tank". A "deep clean" cycle uses about 3 times as much ink as a regular cleaning cycle.

When the print heads are in their "home position" they are covered by 2 sponges (the first photo in http://www.nifty-stuff.com/forum/viewtopic.php?id=161). The vacuum pump is supposed to suck the ink out of these sponges, but sometimes they become saturated and the mixed ink can be sucked back into some of the nozzles. This is the probable cause of the mixed colors that you see (magenta is in some of the black nozzles). There are two things that you can do to help the "mixed color" situation:

1. Do this only if you are somewhat mechanically inclined. Open the cover over the carts and pull the power plug. This will allow you to (gently) push the carriage all the way to the left and prevent the printer from moving the carriage again until you turn the power on again. Use a flashlight to locate the sponges that cover the print head, take a balled up paper towel and use it to blot up most of the extra ink that has soaked these sponges (only use a blotting action - do NOT scrub or make any sideways motions). Be careful to avoid touching anything other than the sponges. You will get you hands dirty while doing this, so use rubber gloves or just put your hands into a plastic bag. You will need to use several paper towels to get enough ink out. Note that when you plug the printer back in and turn it on, it will do an extended cleaning cycle because it was powered down with without the sponges vovering the nozzles. This is OK, as it will help to pull out the mixed ink and the sponges will now be able to absorb the ink.

2. Print on regular paper until the mixed colors improve. If you don't have a good test pattern, you can generate your own or there are several available on the web (e.g. http://alotofthings.com/supportforrefillers/PaletteTestPages.htm).
 

Little Acorn

Newbie to Printing
Joined
Jun 9, 2005
Messages
4
Reaction score
0
Points
6
Thank you ever so much for your comprehensive guide. You've taught me lots of things I didn't knw about the inside of a printer and I appreciate the time you spent trying to help me fix this problem.

I have followed your instrustions by opening up the printer and dabbing away at the pad under the carriage (with the carriage pushed to the LHS).

I managed to blot up quite a bit of black coloured ink from the 2 little sponges.

I have printed the test page that you provided a link to, and unfortunately after the 3rd print it doesn't appear to have corrected the problem yet. You mentioned I should print until the mixed colours improve - approximately how many sheets should I run through of the colour test before trying something else? (I don't want to waste too much ink, unless really necessary).

I have photographed how the colour pallette shown in this link prints on my printer http://www.alotofthings.com/primer_palette/cpt1_.pdf . As you can see, the only colours that print perfectly are the Lips and Lipstick, all the rest contain the horizontal stripes

test-sheet-pics-003.jpg


I would really appreciate further ideas on how to rectify the problem. Thank you.
 

Grandad35

Printer Master
Platinum Printer Member
Joined
Feb 24, 2005
Messages
1,669
Reaction score
182
Points
223
Location
North of Boston, USA
Printer Model
Canon i9900 (plus 5 spares)
Little Acorn said:
Also, in the smaller boxes that appear top left in 2 columns, the text '6C' '6M' and '6Y' is printing in red and black. The top half of the letters is black and the bottom half is red.
Little Acorn,

My reply was targeted to your comment given above. This is a symptom of ink contamination. The image that you posted does not show that problem and will not be cleared by more printing.

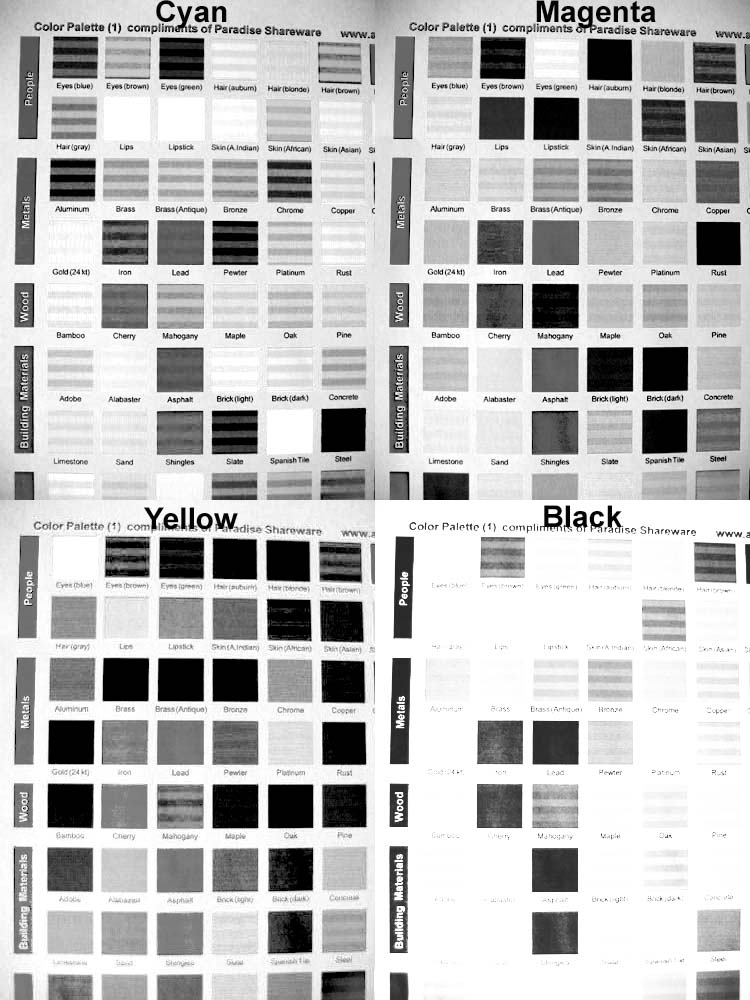
I split your image into its cyan, magenta, yellow and black channels:
TestChannels.jpg


This shows that the cyan channel has the worst problem. Because the inks in the printer are not perfect CMYK colors, a problem with the cyan can also give a reduced problem in the other colors, and I suspect that this is the case here. As a further indication that the problem is in the cyan, note that in the colors where there is no cyan the other colors are solid.

Unfortunately, I have never seen a problem like this, and the only thing that I can think of is to try a head alignment procedure. Maybe there is someone else who can help.
 
Top