B&W on Canon Printers

mikling

Printer VIP
Platinum Printer Member
Joined
Jul 2, 2006
Messages
3,239
Reaction score
1,471
Points
313
Location
Toronto, Canada
Well the latest generation of high priced Canon desktop printers (MP980, 990) can output B&W but those tiny cartridges are also quite restrictive especially when you consider it must do the work of normal C, M, Y so they empty in no time.

Otherwise getting nice B&W prints using colored inks can be tricky as the color casts can easily show in certain gradients. Even when profiled, it was tricky and a little bit of cast always crept out.

For months I had been messing around with this issue on and off and finally finished up on it. Some had asked that I post as a thread when I think I was done and I have to say now it is essentially done.

What I had not discovered since I was never trained in a B&W darkroom is how those great B&W shots are created. I had never thought of the amount of processing that goes on in creating a great B&W picture. Initially I was just using something like Photoshop and converting it to B&W. Wrong. Apparently in the old days, photographers carried around colored filters when shooting B&W and for a reason. Now these filters are in Photoshop and can be used. However, I discovered software that makes B&W much much easier. It is pricey though. NIK Silver Efex. Yah there's a 15 day free trial otherwise it's messing around time in various photoeditors to get the look you want. Once you use Silver Efex and compare it to a converted B&W from say Photoshop, you'll see why they want that kind of money. I'm not saying it's worth it, but I can see why it is worth it to some. ( One area to keep an eye on is that the program knows how to use the correct filters to convert color to B&W nicely)

So convert the image to B&W, apply filters, then voila!

With that, and messing around, I now have a nice solution for B&W for Canon printers. The printers to be used are all the 5 tank machines like the iP4000, 4200,4500, 4600 etc. Here we replace the 4 dye based ink tanks with 4 gray/grey inks. The pigment ink tank is untouched. The tanks must be flushed properly and just replacing the colored ink with the grey is not adequate. Additionally, I'll recommend that the heads be also washed out as well to remove the colored inks. Washing is not absolutely necessary as the colored inks can also be removed by simple printing.

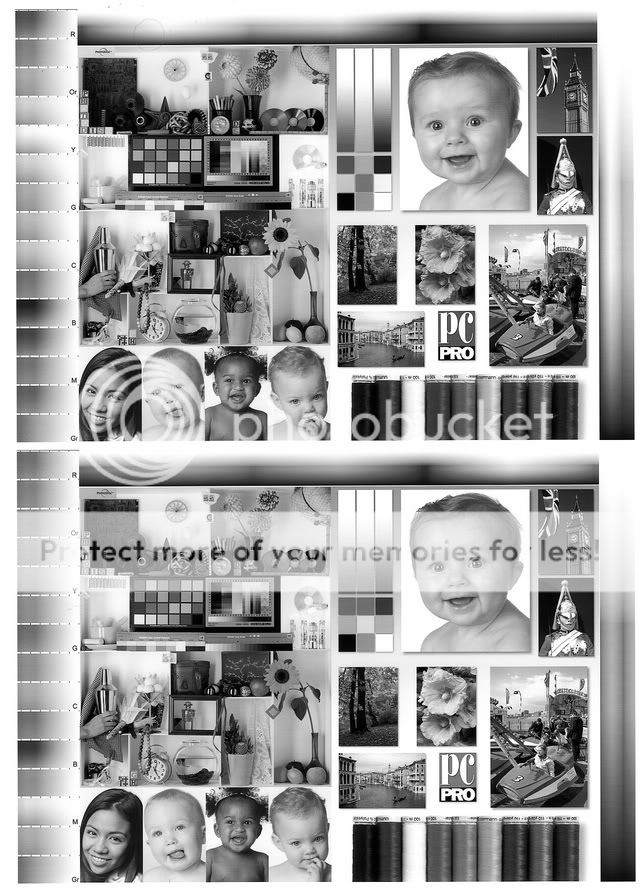
In comparing the B&W output to that of profiled output, the difference is immediately seen. It looks like B&W. I can't describe it. If you were thinking of using profiles to get neutral B&W versus this solution of using gray inks. Think no more, grey inks are vastly superior to color B&W. I was at the counter at the computer store today and say a Spyder 3 package enticing you to get better B&W with custom profiles. Aww come on DATACOLOR you know better. It may be better but it will not be B&W like it should!

The only downside is that you need to dedicate a printer for B&W. But judging by the number of printer addicts on this board, then that's not a problem. Is it worth it? if you like B&W and love Canon printers then in a word Yup. Prints are gorgeous with grey inks.

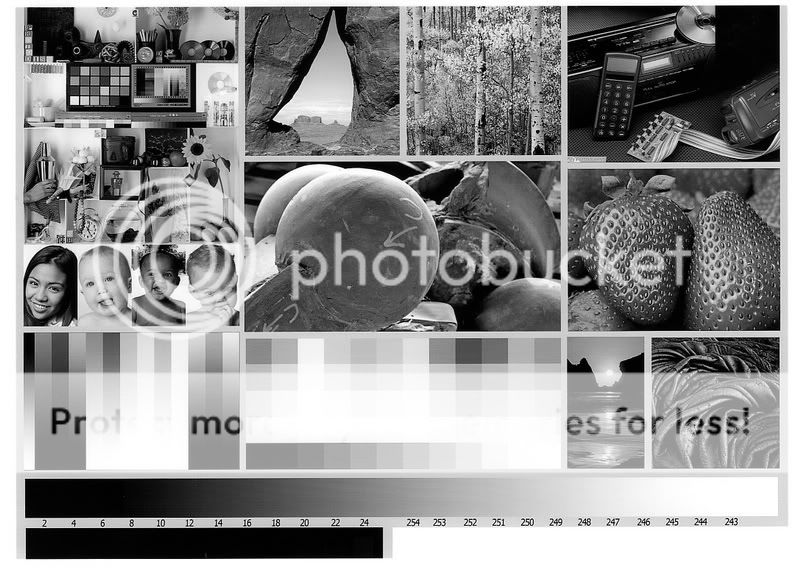
here's a scan of a test print from an MP500.

BWSample.jpg
 

mikling

Printer VIP
Platinum Printer Member
Joined
Jul 2, 2006
Messages
3,239
Reaction score
1,471
Points
313
Location
Toronto, Canada
Oh I didn't explain how it is done. Just drop the grey inks into the carts, convert the picture you want to B&W or use an existing B&W picture and print like you normally would. That's all. Amazingly simple and the pics look fabulous. The choice of photopaper you use will affect the warmth or coolness of the B&W. For example the sample is made with Kirkland Glossy Photo Paper. When HP Glossy is used, it generates a warmer tone. When HP luster is used, a sepia like effect is generated. However, in all these output, there is no cast just a shift in tone.

The fine droplet pattern of the Canon printer lends itself nicely to B&W images.

One of the challenges was finding a black that matches the tone of the gray inks and I finally found it. Black inks all have various shades and the matching of the black to the other grays was one of the stumbling blocks.
 

mikling

Printer VIP
Platinum Printer Member
Joined
Jul 2, 2006
Messages
3,239
Reaction score
1,471
Points
313
Location
Toronto, Canada
For those who are curious about the differences the processing makes. Here are two sample of a picture that had been converted from color.
The one at the top is a conversion done by Silver Efex. The lower one is a straight B&W conversion by Photoshop.

take a look at the flowers and also take a look at the square with 9 colors. That's some of the more apparent differences.

SilverEfexvsPhotoshop.jpg
 

fotofreek

Printer Master
Platinum Printer Member
Joined
Nov 5, 2004
Messages
1,811
Reaction score
434
Points
253
Location
San Francisco
great posts! Having worked in my own darkroom with B&W negs/prints, and having used a range of filters with my cameras and variable contrast paper/filters in the darkroom, I can appreciate the work you've done and the presentation in this thread.

What is the source for the four gray inks???
 

qwertydude

Printing Ninja
Joined
May 7, 2009
Messages
522
Reaction score
4
Points
89
If you convert the photo's in the computer to black and white then wouldn't you always use the same proportion of the same colors CMY? So you'd always run out of the CM since it seems Canons use CM whenever photo black is printed. Wouldn't it be better to fill CMY with gray and Photo Black with black and print in color? That way if you apply a "red" filter to darken skies then all blues would be printed darker gray by the printer driver naturally?

Yes I was there on the dying days of film.
 

RMM

Fan of Printing
Joined
Jul 25, 2010
Messages
200
Reaction score
0
Points
59
Location
Utah, USA
Very cool!

Which inks are you using? Are they an off the shelf or special mix?
 

Digital10d

Getting Fingers Dirty
Joined
Aug 18, 2010
Messages
32
Reaction score
0
Points
22
Well here goes my first message in this excellent forum. B&W with a Canon A4 !! Very interesting. In the past I have played around with Epson printers and my Epson 2400 does the best B&W to date. However I like glossy prints and the Epson being pigment just doesn't do it for me. I do not print enough to keep the Epson hassle free so recently bought a Canon 4700 to see if the latest 5 ink dye printer is any good. Well early days but so far for colour very impressed. B&W well you know already is OK but ...!! So I see your post and start to get very interested in the idea of a B&W only printer. Like all your other replies here we all want to have a little more detail. Am I right in saying that you kept the photo black ink and replace the CMY with the same shade of grey ? Do you then print greyscale or normal colour ? Is you image RGB or greyscale ? Its hard to see how linear the output print is but I if you can make custom profiles then QuadTone RIP has a nifty little program in the package that is able to make a greyscale profile which can then be used in PS. I have used this with my Epson and it makes a big difference. Look forward to learning more.

Peter.
 

mikling

Printer VIP
Platinum Printer Member
Joined
Jul 2, 2006
Messages
3,239
Reaction score
1,471
Points
313
Location
Toronto, Canada
Yes, the 2400 and 2800 does a fantastic job with B&W. No doubt about that undisputed, and I wish a 2880 was in my budget. I had the pleasure of using one for a day and it was seducing. Reality strikes I want B&W and I want it looking good. In addition, I won't print B&W every day so the Canon looks to be a good candidate. Like I said, this had started months ago.

QTR is only made for specific printers not all so it is not applicable. Lacking this the alternative is swagging a bit. So using a profiled color reference as a target, it was a bit of a eyeball routine. One day I will pull out my Spyder and check the linearity but so far I like what I see.

Now the thing is, the relative brightness varies by paper. So it is necessary to initially tweak the driver a tiny bit to match monitor brightness. Like I said and my scans show, I convert to the image to B&W and edit as B&W on the screen and print using the color driver, no need to tick off the grayscale button on the driver etc. If you print directly from color to generate B&W the results are not good. You need to add various filters to get B&W properly or nice...just like the darkroom days. This was a major oversight that kept me going in circles as my B&W images just didn't do it until I learned of this.

The other thing is that as long as the output matches in relative intensity to the screen I am happy. With color, calibration is absolutely necessary but for me, the exact matching in B&W didn't seem to be critical. After all, in B&W what you end up doing is actually modifying the image in an artistic sense to express what you see.

On matte, the pigment B&W solution is distinctly better than dye inks for a whole lot of reasons. On Matte I love the straight pigment Carbon black with its innate warmth and striking look. On Gloss, the dye B&W is better. Dye ink on Matte is also not the best from a fade standpoint as well. I imagine the ideal solution that I haven't tried yet is the dye ink on swellable paper like the Ilford Galerie Classic line or HP Premium Glossy. These papers will add longevity to the dye ink images and indeed may be an ideal combination.

The beauty of B&W on a Canon is its simplicity and economy and the smooth nature of the output with is small droplet sizes. And yes, the reliability of being able to leave the Canon unused for weeks and just put it back into operation without a thought of fear of a clog as with pigment ink.

So in summary here is the workflow.

I. RGB Image
2. Convert to B&W
3. Apply brightness, filters etc, curves etc to get what you want.
2.3.( alternatively use Silver Efex in one step)
4.Output to printer using standard color driver. ( Adjust intensity etc. to match what you see on the screen as best as possible, it may take a couple trial prints but once you get it, retain the settings for future use as that will allow you to now match screen to print for all future output, this will vary by paper)
5. Look at gorgeous B&W.

With the world all looking at color everything incl. cellphones, iPad etc. B&W just seems so special! it is a nice throwback to our dreams and memories.

Do we dream in Color or B&W? I really don't know.
 

Digital10d

Getting Fingers Dirty
Joined
Aug 18, 2010
Messages
32
Reaction score
0
Points
22
Hi again

I have been doing B&W for awhile now and you are right in saying that converting a colour image to B&W requires a lot more than converting to greyscale. In Photoshop CS/8 converting to greyscale gives the very worst B&W. Creating the image is an art which I am just an amateur. In CS there are many ways, curves, channel mixer, gradient mapping to name but a few and of cause dedicated programs that give you the option to emulate film. I see from your workflow you send an B&W image in RGB format and print as if its a colour file. I do the same thing with Canon with a custom icc profile. I then tweak the image with a PS curve to try to get a neutral print. The problems is with printing with colour inks a neutral grey is hard to achieve and when you have a good one viewed in daylight the same print under tungsten light sucks. This is where your approach is interesting. One trick I have used with the R2400 is to replace the Y ink with a black from one of the MIS B&W sets and this produces a totally neutral print but of cause you now cannot print colour. Apparently yellow ink is worst one for producing colour shifts. Which makes me wonder if the yellow ink in the Canon was replaced with grey and then use the magenta and cyan sliders in the print driver to control the tone of the print. Would this work ? Back to your setup. Have you used grey in all 4 ink positions or black + 3 greys.

QuadTone RIP is indeed only for controlling Epson printers but within the package is a program for making a greyscale icc profile. This can be used as a standalone program. The advantage is it linearises the ink/paper combo. Once the icc profile is created you use it like any other using the standard print driver.

When you print through the Canon driver do you adjust the colour sliders to control output.? Sorry for all the questions but I'm just trying to get my head around how the print driver works with essentially just one colour of ink.

Peter.
 
Top