A more powerful Fang..

The Hat

Printer VIP
Platinum Printer Member
Joined
Jan 18, 2010
Messages
15,623
Reaction score
8,695
Points
453
Location
Residing in Wicklow Ireland
Printer Model
Canon/3D, CR-10, CR-10S, KP-3
I’ve been busy making a few more thing to improve my printers, I needed a new Fang because the current one got a thump after I burned my hand while working on the hot-end and it then developed a huge crack in the casing and is now wobbling all over the place.

I will also be raising the extruder motor a bit higher to bring the tubing feeding the hot-end level and that should help make feeding the filament a lot smoother. (That will be later)

I am currently waiting on some other pieces to come in from China and when I get them, I’ll put it together, most upgrades I make and install work but not always, but its still fun seeing what works and what doesn’t.

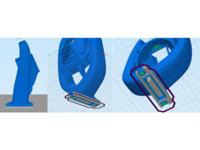
Here is a piece I made in SCAD to accommodate a new Turbo fan I want to use on the top of my new revised Fang, it took a bit of time, but I got there in the end, the only problem I encountered was figuring out how to hold this piece to the top of the Fang.
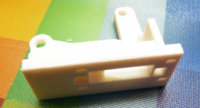
Untitled-4.jpg Untitled-5.jpg 0bad86e22127196e507468f6e57fc91d_preview_featured.jpg click to enlarge.

After studying it for a while I put four slots in the base and used cables ties in place of the screws, now it will all depend on @Redbrickman advice as to how I wire up this beast of a fan...
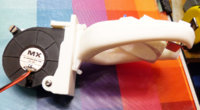
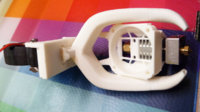
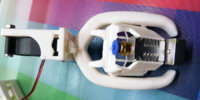
Untitled-1.jpg Untitled-2.jpg Untitled-3.jpg

I can’t give credit to the originator of the Fang because I don’t which one I’m using, but thank to him anyway, I also made a few changes to his design to help remove the Pneumatic Connector when you get a blockage...
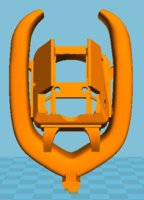
Fang.JPG ...
 

Nifty

Printer VIP
Administrator
Joined
Nov 3, 2004
Messages
3,046
Reaction score
1,405
Points
337
Location
Bay Area CA
Printer Model
CR-10, i560 ,MFC-7440N
Wow, this is awesome!!!

Creality has done a great job listening to the community and making updates / changes to their printers, but they still have their HUGE brick printhead that makes it impossible to see what your printing or to easily access the nozzle... it's so frustrating!

Thank goodness for the fang mod! It makes such a huge difference!
 

Redbrickman

Printer Master
Joined
Dec 27, 2010
Messages
1,104
Reaction score
1,187
Points
293
Location
UK
Printer Model
MB5150
@The Hat That looks like a great Mod, will be interested to see how it performs. As you know I went away from that model as I had a layer shift when the nozzle moved due to the whole thing being supported by the hotend screws, nevertheless it is a good fang and did perform well.

@Nifty

I made the Petsfang to replace the same type of Fang that The Hat showed above. The Hat knows I rave about how good the Petsfang is but I can tell you that it is superb, and for bridging there is nothing to beat it. I have done 4" bridges across a part (by mistake, forgot to add support) and it turned out completely straight and no sag at all with infill in it as well.

Petsfang is modular, you can use it with many different hotends and fans too. If you want to try one out then choose the CR10 standard model unless you have a different hotend etc.

https://www.thingiverse.com/thing:2759439

I tried it because the guy spent a lot of time with a HVAC engineer trying to get the best flow rate and direction on the part and also the fang creates a static pressure (if you use a 5015 fan) to help even out any discrepancies in the fan speed etc.
 

Nifty

Printer VIP
Administrator
Joined
Nov 3, 2004
Messages
3,046
Reaction score
1,405
Points
337
Location
Bay Area CA
Printer Model
CR-10, i560 ,MFC-7440N
Petsfang is modular, you can use it with many different hotends and fans too.
Thanks! I've been just now checking out the Petsfang... wow, that's quite the project!

My current fang seems to be working ok, and the Petsfang seems to be pretty massive in comparison. It probably doesn't make a lot of difference, but I do like to print at fast speeds, and from what I understand, any additional weight can make a difference.
 

Nifty

Printer VIP
Administrator
Joined
Nov 3, 2004
Messages
3,046
Reaction score
1,405
Points
337
Location
Bay Area CA
Printer Model
CR-10, i560 ,MFC-7440N
Ok, I couldn't help myself...

I got a bowl of water and did the same experiment that they show here:
702b1422d96d0efb331734365cfa596e_preview_featured.JPG


The good news: My OEM cooling fan and current fang obviously blow a lot of air!

Bad news... not in a perfect spot.

So, here's what the water indentations look like with the nozzle right close to the level of the water. VERY clearly there are to depressions away from the nozzle:
fang-1.jpg


Here's how low I have to drop it for the air to be centered:

fang-2.jpg


So, the debate: Do I go to the trouble of printing the Petsfang pieces and installing them to solve a problem that I don't even know if I really even have?

I mean, for the most part, my prints come out pretty fine.
 

Redbrickman

Printer Master
Joined
Dec 27, 2010
Messages
1,104
Reaction score
1,187
Points
293
Location
UK
Printer Model
MB5150
I'd leave it ;) It's working fine for you and I expect I would have continued with the fang had I not had the layer shift after the hotend screws moved. The fang did fall apart though when removing it so I expect the heat got to the area where the hotend fan is mounted.
 

The Hat

Printer VIP
Platinum Printer Member
Joined
Jan 18, 2010
Messages
15,623
Reaction score
8,695
Points
453
Location
Residing in Wicklow Ireland
Printer Model
Canon/3D, CR-10, CR-10S, KP-3
Bad news... not in a perfect spot.
I’d leave it too and not worry about it, if you reduce the fan % speed, you might find the air flow may move back to centre, or if you were reality fussy then fit a pair of baffles into the end of the fang to alter the flow direction.

My Fang didn’t suffer the same faith as @Redbrickman, but I run my nozzle at a much lower temperature than he does...
 

The Hat

Printer VIP
Platinum Printer Member
Joined
Jan 18, 2010
Messages
15,623
Reaction score
8,695
Points
453
Location
Residing in Wicklow Ireland
Printer Model
Canon/3D, CR-10, CR-10S, KP-3
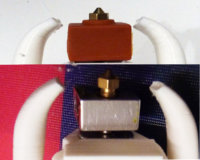
I went back and looked at the new Fang that I’ll be fitting on the CR-10 shortly, and I decided to change the angle they were facing using a heat gun and a screwdriver, and here’s the result, the older photo is not great, but it shows the new difference...

Untitled-1.jpg Capture.JPG click to enlarge.

I’ll know one way or the other if I was successful when its fitted, also note I got a pair of new socks (1 spare) that Nifty suggested for my heat block...

I love papering the hell out of my printers, because they give me so much pleasure...
Anet-Pru-sa-i3-MK7-MK8-MK9-3D-Printer/32872191482.html?spm=a2g0s.9042311.0.0.7c6e4c4drY0GoK
 

Nifty

Printer VIP
Administrator
Joined
Nov 3, 2004
Messages
3,046
Reaction score
1,405
Points
337
Location
Bay Area CA
Printer Model
CR-10, i560 ,MFC-7440N
I decided to change the angle they were facing using a heat gun and a screwdriver
Wow, that will be interesting to hear how that performs!

If I was a bit more inclined, I might do similar with a heat-gun and then maybe even use my 3D pen to add on some more lower-channel to direct the air more horizontally.

... but as stated, "if it ain't broke, don't fix it"
 

Nifty

Printer VIP
Administrator
Joined
Nov 3, 2004
Messages
3,046
Reaction score
1,405
Points
337
Location
Bay Area CA
Printer Model
CR-10, i560 ,MFC-7440N
Ugh, you guys are the WORST influences ever!!!

I get this idea in my head and can't let it go.

So, I took my heat-gun and the flat end of my tweezers and did this:
fang-3.jpg


For all I know, it could make things worse and not better... like maybe I've got too much cooling pointing closer to the nozzle, wrong place, etc.

... but it looks closer to what I'd "expect" it should look like vs how it looked before.

Time to print a test or two...
 
Top