wcandrews@sccoast.net
Getting Fingers Dirty
- Joined
- Nov 29, 2010
- Messages
- 63
- Reaction score
- 10
- Points
- 41
After gaining some valuable basic information from this forum about refilling Canon CLI-8 cartridges I have spent some weeks, a lot of paper, and ink making tests to determine how I will proceed in this refilling world. My refilling experience comes from the BCI-6 days, top filling with third party ink (WeInk, and Media Street), and third party cartridges. The new CLI-8 cartridges, with their chips, have presented a whole new set of conditions, and I thank this forum for the much needed information.
Printer: Canon Pro9000 MK II
Ink: OCP
Paper: Red River Arctic Polar Satin, and Polar Matte; and Kirkland Gloss
Profiling System: xRite i1Pro
Before I get started please believe that Im not pushing OCP ink. I dont care what ink you use, and I hope you are happy with it. OCP ink is the only ink I have and the tests were made with it.
1. I discovered the German method of refilling on this forum and find it to be the very best way to refill OEM cartridges.
There has been a lot of discussion about using tape on the refill hole to prevent leaking from that hole. By all means, if that makes you more comfortable, do it. From the very nature of the way sponges work, it shouldnt be necessary. I suspect the only way to get leakage from that hole in a cartridge in good condition is to inject ink directly into the sponge area itself.
I think it is a mistake to inject ink directly into the sponge area because it is easy to over saturate the sponge and cause it to leak from any hole. If the sponge itself wont draw the ink into the sponge, there is another problem.
2. When the first refill of an OEM cartridge is done, some decisions must be made about how to prepare the cartridge. I have tried several methods and my conclusions are as follows:
2.1 It isnt helpful, and maybe harmful, to try to purge the original cartridge with distilled water or any other purging solution.
The problem is that I doubt that the sponge ever gets dry after introducing water, etc., into the sponge. Then the new ink is diluted with the water until the new ink has completely replaced the water. My profiles have confirmed this statement. I tried that method, and the prints changed each time a print was made for a very long time.
2.2 After considering the problem from an engineering perspective, I decided that the best way to condition the original OEM cart was (1) drain it with the paper towel method, (2) fill it with the new ink (I use the German Method), then:
2.3 Drain it again with the paper towel method.
2.4 Refill it with the new ink.
2.5 I know, all the new ink in the cartridge has been dumped once. My ink costs me $0.45 per cartridge. That is a small price to pay to get the OEM cartridge to produce consistent results from the beginning. The profiles demonstrate that this system works.
Profiles
In a previous posts I have discussed how the prints with this ink and this paper change quality as they cure for three days. We have had discussions about whether to make the profile four hours after printing the profile target or wait the three days for it to cure, and I recommended four hours. We were all guessing about the correct answer, and I decided to make a final test to determine what was what.
3.1 Just to restate a known fact, the object of a printer profile is to get the print to look like the monitor display, taking into account the difference in the dynamic range of the monitor as compared to the print.
3.2 To make a sound judgement of what the different profiles produce require comparting the results on a real test print. The one I use is the best Ive seen and is shown here:
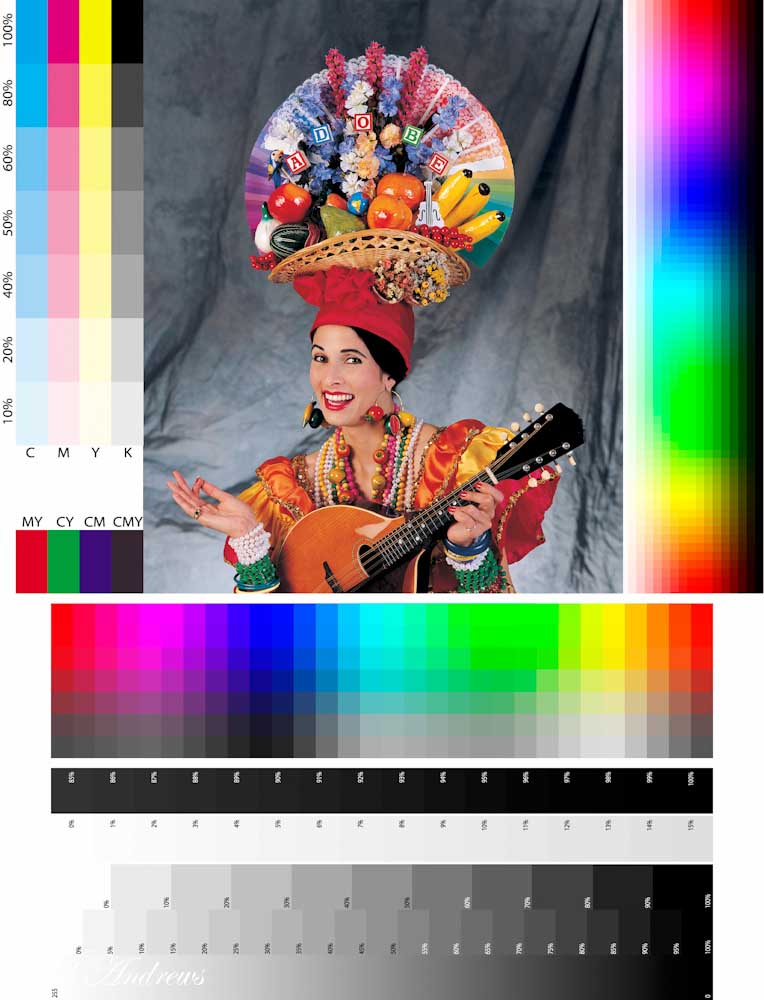
3.3 The test were made with OCP ink and Red River Polar Matte, Red River Arctic Satin, and Kirkland Signature Glossy paper.
3.4 After using a lot of paper and ink, I can say with complete confidence that I cant see any difference in making the profile with the four-hour cure and the three-day cure. That has shocked me, but thats why you make tests.
Conclusions
4.1 These tests indicate that with these three papers and OCP ink, with the good profiles from the i1Pro, the only difference in the prints is the result of the type of paper (glossy, satin, matte). They all matched the monitor display, and each other, with great accuracy. Pick the paper you want, make a good profile and go.
4.2 I was shocked at how good the Red River Polar Matte paper looked. I have not been a fan of matte paper for anything except greeting cards, but this paper with this ink will be used with my display photos until something better comes along.
Good Luck!
Wil
Printer: Canon Pro9000 MK II
Ink: OCP
Paper: Red River Arctic Polar Satin, and Polar Matte; and Kirkland Gloss
Profiling System: xRite i1Pro
Before I get started please believe that Im not pushing OCP ink. I dont care what ink you use, and I hope you are happy with it. OCP ink is the only ink I have and the tests were made with it.
1. I discovered the German method of refilling on this forum and find it to be the very best way to refill OEM cartridges.
There has been a lot of discussion about using tape on the refill hole to prevent leaking from that hole. By all means, if that makes you more comfortable, do it. From the very nature of the way sponges work, it shouldnt be necessary. I suspect the only way to get leakage from that hole in a cartridge in good condition is to inject ink directly into the sponge area itself.
I think it is a mistake to inject ink directly into the sponge area because it is easy to over saturate the sponge and cause it to leak from any hole. If the sponge itself wont draw the ink into the sponge, there is another problem.
2. When the first refill of an OEM cartridge is done, some decisions must be made about how to prepare the cartridge. I have tried several methods and my conclusions are as follows:
2.1 It isnt helpful, and maybe harmful, to try to purge the original cartridge with distilled water or any other purging solution.
The problem is that I doubt that the sponge ever gets dry after introducing water, etc., into the sponge. Then the new ink is diluted with the water until the new ink has completely replaced the water. My profiles have confirmed this statement. I tried that method, and the prints changed each time a print was made for a very long time.
2.2 After considering the problem from an engineering perspective, I decided that the best way to condition the original OEM cart was (1) drain it with the paper towel method, (2) fill it with the new ink (I use the German Method), then:
2.3 Drain it again with the paper towel method.
2.4 Refill it with the new ink.
2.5 I know, all the new ink in the cartridge has been dumped once. My ink costs me $0.45 per cartridge. That is a small price to pay to get the OEM cartridge to produce consistent results from the beginning. The profiles demonstrate that this system works.
Profiles
In a previous posts I have discussed how the prints with this ink and this paper change quality as they cure for three days. We have had discussions about whether to make the profile four hours after printing the profile target or wait the three days for it to cure, and I recommended four hours. We were all guessing about the correct answer, and I decided to make a final test to determine what was what.
3.1 Just to restate a known fact, the object of a printer profile is to get the print to look like the monitor display, taking into account the difference in the dynamic range of the monitor as compared to the print.
3.2 To make a sound judgement of what the different profiles produce require comparting the results on a real test print. The one I use is the best Ive seen and is shown here:
3.3 The test were made with OCP ink and Red River Polar Matte, Red River Arctic Satin, and Kirkland Signature Glossy paper.
3.4 After using a lot of paper and ink, I can say with complete confidence that I cant see any difference in making the profile with the four-hour cure and the three-day cure. That has shocked me, but thats why you make tests.
Conclusions
4.1 These tests indicate that with these three papers and OCP ink, with the good profiles from the i1Pro, the only difference in the prints is the result of the type of paper (glossy, satin, matte). They all matched the monitor display, and each other, with great accuracy. Pick the paper you want, make a good profile and go.
4.2 I was shocked at how good the Red River Polar Matte paper looked. I have not been a fan of matte paper for anything except greeting cards, but this paper with this ink will be used with my display photos until something better comes along.
Good Luck!
Wil
")