Problem with Cyan & Magenta Nozzles

arkpr

Getting Fingers Dirty
Joined
Feb 9, 2013
Messages
17
Reaction score
3
Points
26
I am from Mumai, India. I have a Canon MG5370 (equivalent to MG5320, MG5350 - correct me if I am wrong). It was printing good a few days back. Although it was making some creaking/squeaky noise before initialization or before first print and while shutting down and turning on, I was pretty sure that this is gonna be a serious problem in time ahead. It had also started making grinding noise during the above mentioned events. I called up canon care in mumbai and they told me that the purge unit may have become faulty. I requested a technician visit for a cleanup. Technician came the next working day and cleaned the printer from inside by opening the side panels, top cover, sheet feeder (He did not remove the carriage unit, carriage rail or any other parts). He also sprayed WD40 onto the gears which were making intermittent grinding noise (I guess the gears were at the rear of the purge unit). I requested him for a complete removal and cleanup of the purge unit but he refused saying it was a very complex and tedious job... and rather than cleaning the purge unit they prefer a complete replacement of it.

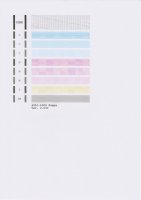
I guess I have to replace it sooner or later, but the problem I am facing now after his visit is the weird nozzle check pattern that I have scanned and attached to this thread... Please take a look at the image... also the grinding noise have become very frequent and long lasting... ( It was not so frequent before the technician's visit)

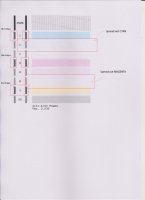
Talking about the image, the PGBK looks acceptable, also the first line of CYAN. Now the second line of CYAN is printing but it is ' washed out ' like the nozzles are not spraying in a straight direction. The first and second line of MAGENTA are acceptable but same thing happens to the third line of MAGENTA which happened to the second line of CYAN. It is ' washed out '. (spraying, but not in a straight line).

Also take a look at the black rectangles at the start of each color lines... their edges are blurred...

Please help me out sorting this problem... and also help me identifying it...

Thing I have tried to resolve it...
1) Have run head cleaning cycles ( not one after another as they could put undue stress on the nozzles...)
2) Soaked the printhead overnight in distilled water and ammonia + our local window cleaner ( we dont have windex here in india)
3) Tried cleaning the parking pads with distilled water and ammonia.
4) Purged the cyan cartridge with distilled water. Refilled it with all fresh Ink.

Any technical suggestions are also welcome... If someone can guide me cleaning the purge unit by myself, I would love to do it.

Refilling method : Top Fill - OEM Cartridges
Ink : OCP Ink
 

arkpr

Getting Fingers Dirty
Joined
Feb 9, 2013
Messages
17
Reaction score
3
Points
26
This is the image of today's nozzle check pattern...
Please take a closer look at the second line of CYAN and third line of MAGENTA... its printing but spread out in random directions...
 

Attachments

  • nozzle check 13-04-15.jpg
    934.6 KB · Views: 1,138
Last edited:

fotofreek

Printer Master
Platinum Printer Member
Joined
Nov 5, 2004
Messages
1,811
Reaction score
434
Points
253
Location
San Francisco
I don't know if it has anything to do with the problem, but I'd also do a printhead alignment. Then run a cleaning cycle or two to be sure there is ink in the recently cleaned printhead before running another nozzle test.
 

arkpr

Getting Fingers Dirty
Joined
Feb 9, 2013
Messages
17
Reaction score
3
Points
26
Thanks for the quick reply fotofreek... I have done cleaning cycles right after printhead cleaning... As far as head alignment is concerned I cannot do a manual or auto alignment as the light shades of cyan do not print...
 

arkpr

Getting Fingers Dirty
Joined
Feb 9, 2013
Messages
17
Reaction score
3
Points
26
Here is another image with markings...
 

Attachments

  • nozzle check 13-04-15 - highlighted.jpg
    nozzle check 13-04-15 - highlighted.jpg
    53.4 KB · Views: 626

martin0reg

Printer Master
Joined
May 9, 2010
Messages
1,058
Reaction score
746
Points
273
Location
Germany Ruhrgebiet
IMHO the printhead is worn out, at least the "fine nozzles" (for light M and C) are dead, besides the bars on the left should be sharp, not blurred. I think these issues can not be cleaned. Canon bubble jet print heads are expandable that's why they are easily to exchange and renew.
... IF the printer is worth it ...
You could do an "extended nozzle check" to see more details regarding the dead nozzles...google for instructions to reach the "service mode" for this check, but don't disable your printer by doing so..
 

arkpr

Getting Fingers Dirty
Joined
Feb 9, 2013
Messages
17
Reaction score
3
Points
26
Yes martin0reg, that might be the case...
Some time before in the evening I tried spraying some hot water onto the nozzles. I repeated this several times for 10 mins. After that I printed a nozzle check pattern which showed some improvement in the cyan and magenta as well. But the issue wasn't completely solved. Unfortunately I was in a hurry for doing some other stuff so I didn't scan the Image :(. This has brought up a light of hope and a little motivation to try more of cleaning... :drool. I will try n keep posted here...
Are there any other ways dealing with this problem ???
Would it be appropriate to doubt the OCP Ink ???

Please help me out guys...

Thanks to martin0reg for the reply... :)
 

berttheghost

Printer Guru
Joined
Dec 31, 2014
Messages
114
Reaction score
96
Points
117
Location
Minnesota, USA
Printer Model
canon pixma pro 9500, pro-1
@arkpr ,
It's important that the purge unit be functional, since it is responsible for priming the printhead whenever the printhead or a cartridge is replaced. Your apparent printhead problem may go away when you get the purge working properly. (Or the lack of proper priming could ruin your printhead.)

BTW, WD-40 is, IMHO, completely INappropriate for use on your printer, especially for lubricating its purge unit. I don't have the service manual for your printer, but those that I do have specify strategically placed dabs of GREASE on the appropriate parts and ONLY at the specified places on said parts. WD-40 is as much solvent as oil, and most likely rinsed away what little grease was left, doing more harm than good.
 

arkpr

Getting Fingers Dirty
Joined
Feb 9, 2013
Messages
17
Reaction score
3
Points
26
Guys ... the problem has been solved... technically...... I thought it might be useful info that I am about to post...

I had the purge unit replaced by canon service a few days back. The grinding noise was gone. But I noticed that the purge pads were of different size than on the previous unit... I have attached an image of the printhead. One can easily notice the size mismatch by the ink markings ...

Until this problem came to my attention, I continuously tried cleaning the head more and more aggressively as my frustration was building up... The pgbk nozzle pattern were completely gone... wiped out like that they never existed...(Unfortunately I have not scanned the nozzle checks). This is when I grew suspicious and took a look at the purge pads and found out that they are not of right size... due to this mismatch in size, the vacuum was not building and the head was not being primed...

I reported this to the service center... they immediately replaced the whole purge unit free of cost this time...

I thought this was the end of my problem... a faulty purge unit was replaced... pgbk came back... purge pads were of accurate size... and the whole system was working fine... except the blur and spread out prints...:(:(:( and missing fine, 1pl nozzle lines... :mad::mad::mad: of cyan and magenta...

Immediately my whole attention was centered on the printhead now... as there was no culprit to blame on... my head cleaning torture became more and more aggresive... ammonia, alcohol, window cleaners, steam, syringes filled with hot water... :somad:somad:somad I emptied my brain and used the last drop of my knowledge of head cleaning... NO POSITIVE RESULTS...

Suddenly one thing strike my mind... I remembered the canon service personnel pushing something inside when he previously had come to clean my printer, and we both concluded that the purge unit is faulty... After a bit of observation in this new direction it came to my attention that the 'carriage lift mechanism' is not working.

When the printer starts, the carriage goes to the extreme left > gets lifted upwards a bit > comes to right > goes back > shifts downwards to the original position > and starts printing... this routine was broken... the carriage stayed lifted all the time... and so the distance between paper and printhead increased... and that explains the blurred prints...

I called the service personnel again... he reversed what he had done previously... the 'carriage lift mechanism' started working again... all nozzle checks are sharp ... the fine 1pl lines came back... I have posted an image of current nozzle check when the lift mechanism is working properly... There is still some blockage ... but I guess that my aggressive cleaning methods have damaged the head beyond repair...

All this time after the purge unit was replaced ... the problem was the 'lifted carriage' which was responsible for the blur and missing lines in the nozzle check... the head was fine... :ep
shaft.png
the mismatched purge pads.jpg
ink marks on the head.jpg
Proper purge pads.jpg
 

arkpr

Getting Fingers Dirty
Joined
Feb 9, 2013
Messages
17
Reaction score
3
Points
26
Current nozzle check...
 

Attachments

  • IMG_20150515_0002.jpg
    IMG_20150515_0002.jpg
    49.7 KB · Views: 443
Top